Quantcast
Channel: dbi Blog
Viewing all 2877 articles
Browse latest View live

PostgreSQL High Availability: Patroni, Ectd , HAProxy , Keepalived

$
0
0

Patroni is one the most famous tool that can be used to setup a high avalaibilty for PostgreSQL. In this blog I am describing a test I did.
Below the environment we will use


The etcd cluster will contains 3 servers
etcd-server1: 192.168.56.100
etcd-server2: 192.168.56.101
etcd-server3: 192.168.56.106

HAProxy and Keepalived will be configured in this 2 servers.
haproxy-server1: 192.168.56.102
haproxy-server2: 192.168.56.103

A VIP will be configured
haproxyvip 192.168.56.108

We have 2 databases servers
pgserver1: 192.168.56.104 (initial primary server)
pgserver2: 192.168.56.105

Below a resume of all IP used in this blog

etcd-server1: 192.168.56.100
etcd-server2: 192.168.56.101
etcd-server3: 192.168.56.106
haproxy-server1: 192.168.56.102
haproxy-server2: 192.168.56.103
pgserver1: 192.168.56.104
pgserver2: 192.168.56.105
haproxyvip  192.168.56.108

All servers are ppc64le architecture. But the steps will not change if you are using X64 architecture
Etcd Install
The first steps is to install etcd on all etcd servers
etcd-server1
etcd-server2
etcd-server3

For the installation of etcd, the latest archive is downloaded here
The following steps were done on all 3 etc servers
Unpack the etcd downloaded archive

[root@etcd-server1 ~]# tar xvzf etcd-v3.4.14-linux-ppc64le.tar.gz

And then copy following executables to /usr/local/bin

[root@etcd-server1 etcd-v3.4.14-linux-ppc64le]# pwd
/root/etcd-v3.4.14-linux-ppc64le
[root@etcd-server1 etcd-v3.4.14-linux-ppc64le]# cp etcd etcdctl /usr/local/bin/

For the startup a etcd service is created for both servers. This service will contain the configuration values of the etcd cluster.
Below the contents of each service

-etcd.service etcd-server1

[root@etcd-server1 ~]# cat /etc/systemd/system/etcd.service
[Unit]
Description=etcd service
Documentation=https://github.com/coreos/etcd

[Service]
Type=notify
ExecStart=/usr/local/bin/etcd --name=etcd0 --data-dir=/var/lib/etcd/default.etcd --initial-advertise-peer-urls=http://192.168.56.100:2380 --listen-peer-urls=http://192.168.56.100:2380 --listen-client-urls=http://192.168.56.100:2379,http://127.0.0.1:2379 --advertise-client-urls=http://192.168.56.100:2379 --initial-cluster-token=etcd-cluster-1 --initial-cluster=etcd0=http://192.168.56.100:2380,etcd1=http://192.168.56.101:2380,etcd2=http://192.168.56.106:2380 --initial-cluster-state=new
Restart=on-failure
RestartSec=5
[Install]
WantedBy=multi-user.target
[root@etcd-server1 ~]#

-etcd.service etcd-server2

[root@etcd-server2 ~]# cat /etc/systemd/system/etcd.service
Description=etcd service
Documentation=https://github.com/coreos/etcd

[Service]
Type=notify
ExecStart=/usr/local/bin/etcd --name=etcd1 --data-dir=/var/lib/etcd/default.etcd --initial-advertise-peer-urls=http://192.168.56.101:2380 --listen-peer-urls=http://192.168.56.101:2380 --listen-client-urls=http://192.168.56.101:2379,http://127.0.0.1:2379 --advertise-client-urls=http://192.168.56.101:2379 --initial-cluster-token=etcd-cluster-1 --initial-cluster=etcd0=http://192.168.56.100:2380,etcd1=http://192.168.56.101:2380,etcd2=http://192.168.56.106:2380 --initial-cluster-state=new
Restart=on-failure
RestartSec=5
[Install]
WantedBy=multi-user.target
[root@etcd-server2 ~]#

-etcd.service etcd-server3

[root@etcd-server3 ~]# cat /etc/systemd/system/etcd.service
[Unit]
Description=etcd service
Documentation=https://github.com/coreos/etcd

[Service]
Type=notify
ExecStart=/usr/local/bin/etcd --name=etcd2 --data-dir=/var/lib/etcd/default.etcd --initial-advertise-peer-urls=http://192.168.56.106:2380 --listen-peer-urls=http://192.168.56.106:2380 --listen-client-urls=http://192.168.56.106:2379,http://127.0.0.1:2379 --advertise-client-urls=http://192.168.56.106:2379 --initial-cluster-token=etcd-cluster-1 --initial-cluster=etcd0=http://192.168.56.100:2380,etcd1=http://192.168.56.101:2380,etcd2=http://192.168.56.106:2380 --initial-cluster-state=new
Restart=on-failure
RestartSec=5
[Install]
WantedBy=multi-user.target
[root@etcd-server3 ~]#

Now let’s start etcd services on both servers (stop your firewall or do requested rules)

[root@etcd-server1 ~]# systemctl  start etcd.service
[root@etcd-server2 ~]# systemctl  start etcd.service
[root@etcd-server3 ~]# systemctl  start etcd.service
[root@etcd-server1 ~]# systemctl  enable etcd.service
[root@etcd-server2 ~]# systemctl  enable etcd.service
[root@etcd-server3 ~]# systemctl  enable etcd.service

If everything is OK, you can query the state of the etcd cluster

 [root@etcd-server2 ~]# etcdctl endpoint status --cluster -w table
+---------------------------+------------------+---------+---------+-----------+------------+-----------+------------+--------------------+--------+
|         ENDPOINT          |        ID        | VERSION | DB SIZE | IS LEADER | IS LEARNER | RAFT TERM | RAFT INDEX | RAFT APPLIED INDEX | ERRORS |
+---------------------------+------------------+---------+---------+-----------+------------+-----------+------------+--------------------+--------+
| http://192.168.56.101:2379 | 56fde5fc4136bc8b |  3.4.14 |  328 kB |     false |      false |        18 |         14 |                 14 |        |
| http://192.168.56.100:2379 |  fa26cebd7281c24 |  3.4.14 |  328 kB |     false |      false |        18 |         14 |                 14 |        |
| http://192.168.56.106:2379 | b75652c4850bb9d2 |  3.4.14 |  328 kB |      true |      false |        18 |         14 |                 14 |        |
+---------------------------+------------------+---------+---------+-----------+------------+-----------+------------+--------------------+--------+

Keepalived and HAProxy Install

These components are installed on following servers
haproxy-server1
haproxy-server2

To install Keepalived download the latest archive here
You will need maybe to install some linux required packages.
Unpack the archive and do the configure

[root@ haproxy-server1  ~]# tar xvzf keepalived-2.2.0.tar.gz
[root@ haproxy-server1 ~]# cd keepalived-2.2.0/
[root@ haproxy-server1 keepalived-2.2.0]# ./configure

If there is no error then run make and make install

[root@ haproxy-server1 keepalived-2.2.0]#  make
[root@ haproxy-server1 keepalived-2.2.0]#  make install

For Keepalived startup the same service is created on both servers.

[root@ haproxy-server1 ~]# cat /etc/systemd/system/keepalived.service
[Unit]
Description=LVS and VRRP High Availability Monitor
After=network-online.target syslog.target
Wants=network-online.target
[Service]
Type=forking
PIDFile=/run/keepalived.pid
KillMode=process
EnvironmentFile=-/usr/local/etc/sysconfig/keepalived
ExecStart=/usr/local/sbin/keepalived $KEEPALIVED_OPTIONS
ExecReload=/bin/kill -HUP $MAINPID
[Install]
WantedBy=multi-user.target
[root@etcd- haproxy-server1 ~]#

Before starting keepalived, we have to configure a configuration file on both servers.

-haproxy-server1

[root@haproxy-server1 ]# cat /etc/keepalived/keepalived.conf
global_defs {
}
vrrp_script chk_haproxy { # Requires keepalived-1.1.13
    script "killall -0 haproxy" # widely used idiom
    interval 2 # check every 2 seconds
    weight 2 # add 2 points of prio if OK
}
vrrp_instance VI_1 {
    interface eth0
    state MASTER # or "BACKUP" on backup
    priority 101 # 101 on master, 100 on backup
    virtual_router_id 51
    authentication {
        auth_type PASS
        auth_pass 1234
    }
    virtual_ipaddress {
        192.168.56.108
    }
    track_script {
        chk_haproxy
    }
}
[root@haproxy-server1 ]#

-haproxy-server2

[root@haproxy-server2 ]# cat /etc/keepalived/keepalived.conf
global_defs {
}
vrrp_script chk_haproxy { # Requires keepalived-1.1.13
    script "killall -0 haproxy" # widely used idiom
    interval 2 # check every 2 seconds
    weight 2 # add 2 points of prio if OK
}
vrrp_instance VI_1 {
    interface eth0
    state BACKUP # or "BACKUP" on backup
    priority 100 # 101 on master, 100 on backup
    virtual_router_id 51

    authentication {
        auth_type PASS
        auth_pass 1234
    }
    virtual_ipaddress {
        192.168.56.108
    }
    track_script {
        chk_haproxy
    }
}
 [root@haproxy-server2 ]#

Now it’s time to start Keepalived on both servers can be started on both servers

[root@haproxy-server1 keepalived]# systemctl start keepalived
[root@haproxy-server1 keepalived]# systemctl status keepalived
[root@haproxy-server1 keepalived]# systemctl enable keepalived

[root@haproxy-server2 keepalived]# systemctl start keepalived
[root@haproxy-server2 keepalived]# systemctl status keepalived
[root@haproxy-server2 keepalived]# systemctl enable keepalived

If everything is fine, the VIP 192.168.56.108 should be run on one server and will automatically failover to the the second server if there is any issue with the server.

Now let’s install the HAProxy on both servers haproxy-server1 and haproxy-server2. We have downloaded the latest HAProxy archive here

Then unpack the archive and run the make and make install commands (Maybe you will have to install some linux packages)

[root@etcd-server2 ~]# tar xzzf haproxy-2.3.4.tar.gz
[root@etcd-server2 ~]# cd haproxy-2.3.4/
[root@haproxy-server1 haproxy-2.1.5]# make TARGET=linux-glibc
[root@haproxy-server1 haproxy-2.1.5]# make install

Following directories are created in my case

[root@haproxy-server1 haproxy-2.1.5]#  mkdir -p /etc/haproxy
[root@haproxy-server1 haproxy-2.1.5]# mkdir -p /var/lib/haproxy
[root@haproxy-server1 haproxy-2.1.5]# touch /var/lib/haproxy/stats

To startup HAProxy a service is created on both HAProxy servers

[root@haproxy-server1 system]# cat haproxy.service

[Unit]
Description=HAProxy Load Balancer
Documentation=man:haproxy(1)
Documentation=file:/usr/share/doc/haproxy/configuration.txt.gz
# allows us to do millisecond level restarts without triggering alert in Systemd
#StartLimitInterval=0
#StartLimitBurst=0
After=network.target syslog.service
Wants=syslog.service

[Service]
Environment="CONFIG=/etc/haproxy/haproxy.cfg" "PIDFILE=/run/haproxy.pid"
# EXTRAOPTS and RELOADOPS come from this default file
# EnvironmentFile=-/etc/default/haproxy
ExecStartPre=/usr/local/sbin/haproxy -f $CONFIG -c -q
ExecStart=/usr/local/sbin/haproxy -W -f $CONFIG -p $PIDFILE $EXTRAOPTS
ExecReload=/usr/local/sbin/haproxy -f $CONFIG -c -q $EXTRAOPTS $RELOADOPTS
ExecReload=/bin/kill -USR2 $MAINPID
KillMode=mixed
#Restart=always
#Type=forking
Restart=on-failure
RestartSec=5

[Install]
WantedBy=multi-user.target
[root@haproxy-server1 system]#

The same haproxy.cfg file is configured on both HAProxy servers like

[root@haproxy-server1 ]# cat /etc/haproxy/haproxy.cfg
global
    maxconn 100

defaults
    log global
    mode tcp
    retries 2
    timeout client 30m
    timeout connect 4s
    timeout server 30m
    timeout check 5s

listen stats
    mode http
    bind *:7000
    stats enable
    stats uri /

listen production
    bind 192.168.56.108:5000
    option httpchk OPTIONS/master
    http-check expect status 200
    default-server inter 3s fall 3 rise 2 on-marked-down shutdown-sessions
    server postgresql_192.168.56.104_5432 192.168.56.104:5432 maxconn 100 check port 8008
    server postgresql_192.168.56.105_5432 192.168.56.105:5432 maxconn 100 check port 8008

listen standby
    bind 192.168.56.108:5001
    option httpchk OPTIONS/replica
    http-check expect status 200
    default-server inter 3s fall 3 rise 2 on-marked-down shutdown-sessions
    server postgresql_192.168.56.104_5432 192.168.56.104:5432 maxconn 100 check port 8008
    server postgresql_192.168.56.105_5432 192.168.56.105:5432 maxconn 100 check port 8008


[root@haproxy-server1 ]#

Let’s start HAProxy

[root@haproxy-server1 haproxy-2.1.5]# setsebool -P haproxy_connect_any=1
[root@haproxy-server1 system]# systemctl enable haproxy.service
[root@haproxy-server1 system]# systemctl start haproxy.service
[root@haproxy-server1 system]# systemctl status haproxy.service

[root@haproxy-server2 system]# setsebool -P haproxy_connect_any=1
[root@haproxy-server2 system]# systemctl start haproxy.service
[root@haproxy-server2 system]# systemctl status haproxy.service
[root@haproxy-server2 system]# systemctl enable haproxy.service

Patroni Install

Patroni will be installed on both PostgreQL servers pgserver1 and pgserver2. Some components will be installed with root and some components with the user postgres
In my case I had to install some linux packages

[root@pgserver1 ~]# yum install python3-pip.noarch
[root@pgserver1 ~]# yum install python36-devel.x86_64

With the user root install following component

[root@pgserver1 ~]# pip3 install --upgrade setuptools

With the user postgres install these components

[postgres@pgserver1 ~]$ pip3 install --user  psycopg2-binary
[postgres@pgserver1 ~]$ pip3 install --user  python-etcd
[postgres@pgserver1 ~]$ pip3 install --user wheel
[postgres@pgserver1 ~]$ pip3 install --user patroni

If all components are installed without error, we can now configure a configuration file for each patroni

-pgserver1

[postgres@pgserver1 cat /etc/patroni.yaml
scope: postgres_poc
name: pg-patroni1
restapi:
    listen: 192.168.56.104:8008
    connect_address: 192.168.56.104:8008
etcd3:
    hosts: 192.168.56.100:2379,192.168.56.101:2379,192.168.56.106:2379
bootstrap:
    dcs:
        ttl: 30
        loop_wait: 10
        retry_timeout: 10
        maximum_lag_on_failover: 1048576
        postgresql:
            use_pg_rewind: true
postgresql:
    listen: 192.168.56.104:5432
    bin_dir: /u01/app/postgres/product/13/db_1/bin
    connect_address: 192.168.56.104:5432
    data_dir: /u02/pgdata
    pgpass: /tmp/pgpass
    authentication:
        replication:
            username: postgres
            password: postgres
        superuser:
            username: postgres
            password: postgres
    parameters:
        unix_socket_directories: '.'
tags:
    nofailover: false
    noloadbalance: false
    clonefrom: false
    nosync: false

[postgres@pgserver1 ~]$

-pgserver1

[postgres@pgserver2 ~]$ cat /etc/patroni.yaml
scope: postgres_poc
name: pg-patroni2
restapi:
    listen: 192.168.56.105:8008
    connect_address: 192.168.56.105:8008
etcd3:
    hosts: 192.168.56.100:2379,192.168.56.101:2379,192.168.56.106:2379
bootstrap:
    dcs:
        ttl: 30
        loop_wait: 10
        retry_timeout: 10
        maximum_lag_on_failover: 1048576
        postgresql:
            use_pg_rewind: true
postgresql:
    listen: 192.168.56.105:5432
    bin_dir: /u01/app/postgres/product/13/db_1/bin
    connect_address: 192.168.56.105:5432
    data_dir: /u02/pgdata
    pgpass: /tmp/pgpass
    authentication:
        replication:
            username: postgres
            password: postgres
        superuser:
            username: postgres
            password: postgres
    parameters:
        unix_socket_directories: '.'
tags:
    nofailover: false
    noloadbalance: false
    clonefrom: false
    nosync: false

[postgres@pgserver2 ~]$

The pg_hba.conf file should be configured on both databse servers to allow connections from the different servers. Then patroni can be started on both servers.

On pgserver1 which is actullaly the primary, we will see outputs like

[postgres@pgserver1 PG1]$ patroni /etc/patroni.yaml
…
…
2020-01-15 20:31:45,898 INFO: acquired session lock as a leader
2020-01-15 20:31:55,862 INFO: Lock owner: pg-patroni1; I am pg-patroni1
2020-01-15 20:31:55,871 INFO: Lock owner: pg-patroni1; I am pg-patroni1
2020-01-15 20:31:55,905 INFO: no action.  i am the leader with the lock

On pgserver2 which is the standby server we will have outputs like

[postgres@pgserver2 PG1]$ patroni /etc/patroni.yaml
..
2020-01-15 20:41:25,941 INFO: Lock owner: pg-patroni1; I am pg-patroni2
2020-01-15 20:41:25,941 INFO: does not have lock
2020-01-15 20:41:25,952 INFO: no action.  i am a secondary and i am following a leader

For the automatic startup of Patroni a service can be created on both databases servers

[root@pgserver1 ~]# cat /etc/systemd/system/patroni.service
[Service]
Type=simple

User=postgres
Group=postgres

#ExecStart=/usr/local/bin/patroni /opt/patroni/patroni.yml
ExecStart=/home/postgres/.local/bin/patroni  /etc/patroni.yaml

KillMode=process

TimeoutSec=30

Restart=no

[Install]
WantedBy=multi-user.target
[root@pgserver1 ~]#

The command patronictl will be used to manage Patroni

-List the members of the configuration

[postgres@pgserver1 ~]$ patronictl -c /etc/patroni.yaml list

+----------+-------------+----------------+--------+---------+----+-----------+
| Cluster  |    Member   |      Host      |  Role  |  State  | TL | Lag in MB |
+----------+-------------+----------------+--------+---------+----+-----------+
| postgres | pg-patroni1 | 192.168.56.104 | Leader | running |  1 |           |
| postgres | pg-patroni2 | 192.168.56.105 | Replica| running |  1 |         0 |
+----------+-------------+----------------+--------+---------+----+-----------+

Perform a switchover

[postgres@pgserver1 ~]$ patronictl -c /etc/patroni.yaml switchover
Master [pg-patroni1]:
Candidate ['pg-patroni2'] []:
When should the switchover take place (e.g. 2021-01-15T11:16 )  [now]:
Current cluster topology
+ Cluster: postgres_poc (6917537380726361322) ----+----+-----------+
| Member      | Host          | Role    | State   | TL | Lag in MB |
+-------------+---------------+---------+---------+----+-----------+
| pg-patroni1 | 192.168.56.104| Leader  | running |  1 |           |
| pg-patroni2 | 192.168.56.105| Replica | running |  1 |         0 |
+-------------+---------------+---------+---------+----+-----------+
Are you sure you want to switchover cluster postgres_poc, demoting current master pg-patroni1? [y/N]: y
2021-01-15 10:16:35.39948 Successfully switched over to "pg-patroni2"
+ Cluster: postgres_poc (6917537380726361322) ----+----+-----------+
| Member      | Host          | Role    | State   | TL | Lag in MB |
+-------------+---------------+---------+---------+----+-----------+
| pg-patroni1 | 192.168.56.104| Replica | stopped |    |   unknown |
| pg-patroni2 | 192.168.56.105| Leader  | running |  1 |           |
+-------------+---------------+---------+---------+----+-----------+

[postgres@pgserver1 ~]$ patronictl -c /etc/patroni.yaml list
+ Cluster: postgres_poc (6917537380726361322) ----+----+-----------+
| Member      | Host          | Role    | State   | TL | Lag in MB |
+-------------+---------------+---------+---------+----+-----------+
| pg-patroni1 | 192.168.56.104| Replica | running |  2 |         0 |
| pg-patroni2 | 192.168.56.105| Leader  | running |  2 |           |
+-------------+---------------+---------+---------+----+-----------+

If the primary crash, the replica will be automatically promoted.
For the connection to the databases, client can use the VIP configured via HAProxy

-To connect to the standby the port 5001 is used

[postgres@ [~]> psql -h 192.168.56.108 -p 5001 -U postgres
Password for user postgres:
psql (13.1)
SSL connection (protocol: TLSv1.2, cipher: ECDHE-RSA-AES256-GCM-SHA384, bits: 256, compression: off)
Type "help" for help.
postgres=# select pg_is_in_recovery();
 pg_is_in_recovery
-------------------
 t
(1 row)

-To connect to the primary the port 5000 is used

[postgres@ [~]> psql -h 192.168.56.108 -p 5000 -U postgres
Password for user postgres:
psql (13.1)
SSL connection (protocol: TLSv1.2, cipher: ECDHE-RSA-AES256-GCM-SHA384, bits: 256, compression: off)
Type "help" for help.
postgres=# select pg_is_in_recovery();
 pg_is_in_recovery
-------------------
 f
(1 row)

Conclusion

Hope this may help

Cet article PostgreSQL High Availability: Patroni, Ectd , HAProxy , Keepalived est apparu en premier sur Blog dbi services.


AWS EC2 instance deployment with Terraform

$
0
0

When it comes to quickly provision a server in the Cloud, using an Infrastructure as Code (IaC) tool is a solution to consider.
There are many IaC products available and among them, Terraform seems to be the most popular.

The following is a non-exhaustive list of Terraform advantages :
– Terraform can deploy infrastructure to multiple cloud service providers simultaneously
– With Terraform, you can easily preview and validate infrastructure changes before they are applied
– The code is written in a declarative way. Not procedural
– Terraform creates immutable infrastructure (using configuration snapshots)


In this post, we are going to deploy an AWS EC2 instance and all the related network components and (their features) required to access it through SSH.
For that it’s necessary to deploy following AWS services :
– VPC (Virtual Private Cloud)
– Security Group
– Subnet
– Route Table
– Internet Gateway
– And finally the EC2 instance

For a better manageability I do recommend to create one dedicated file per service listed above. This will also give a good overview what the Terraform Configuration is made of :

joc@joc:$ tree
.
├── aws-config.tf
├── create-igw.tf
├── create-instance.tf
├── create-rt.tf
├── create-sbn.tf
├── create-sg.tf
├── create-vpc.tf
├── variables_output.tf
└── variables.tf

0 directories, 9 files


Variables

Using variables in a Terraform Configuration is a good practice. Like with all other tools and programming languages, their purpose is to create a value only once and to reuse it across the whole deployment configuration.
The best is to create a dedicated file to store them. Here’s what mine looks like :

# variables.tf

# Variables for general information
######################################

variable "aws_region" {
  description = "AWS region"
  type        = string
  default     = "eu-central-1"
}

variable "owner" {
  description = "Configuration owner"
  type        = string
}

variable "aws_region_az" {
  description = "AWS region availability zone"
  type        = string
  default     = "a"
}


# Variables for VPC
######################################

variable "vpc_cidr_block" {
  description = "CIDR block for the VPC"
  type        = string
  default     = "10.0.0.0/16"
}

variable "vpc_dns_support" {
  description = "Enable DNS support in the VPC"
  type        = bool
  default     = true
}

variable "vpc_dns_hostnames" {
  description = "Enable DNS hostnames in the VPC"
  type        = bool
  default     = true
}


# Variables for Security Group
######################################

variable "sg_ingress_proto" {
  description = "Protocol used for the ingress rule"
  type        = string
  default     = "tcp"
}

variable "sg_ingress_ssh" {
  description = "Port used for the ingress rule"
  type        = string
  default     = "22"
}

variable "sg_egress_proto" {
  description = "Protocol used for the egress rule"
  type        = string
  default     = "-1"
}

variable "sg_egress_all" {
  description = "Port used for the egress rule"
  type        = string
  default     = "0"
}

variable "sg_egress_cidr_block" {
  description = "CIDR block for the egress rule"
  type        = string
  default     = "0.0.0.0/0"
}


# Variables for Subnet
######################################

variable "sbn_public_ip" {
  description = "Assign public IP to the instance launched into the subnet"
  type        = bool
  default     = true
}

variable "sbn_cidr_block" {
  description = "CIDR block for the subnet"
  type        = string
  default     = "10.0.1.0/24"
}


# Variables for Route Table
######################################

variable "rt_cidr_block" {
  description = "CIDR block for the route table"
  type        = string
  default     = "0.0.0.0/0"
}


# Variables for Instance
######################################

variable "instance_ami" {
  description = "ID of the AMI used"
  type        = string
  default     = "ami-0211d10fb4a04824a"
}

variable "instance_type" {
  description = "Type of the instance"
  type        = string
  default     = "t2.medium"
}

variable "key_pair" {
  description = "SSH Key pair used to connect"
  type        = string
  default     = "joc-key-pair"
}

variable "root_device_type" {
  description = "Type of the root block device"
  type        = string
  default     = "gp2"
}

variable "root_device_size" {
  description = "Size of the root block device"
  type        = string
  default     = "50"
}

Each of these variable will be used to describe our environment and they will need to be prefixed by var. when we will be using them.
Let’s start with the first step.

Provider

As already said, Terraform supports infrastructure deployment to several Cloud providers. Thus, the first things to do in our Configuration is to define the provider we want to use.
As the providers’ API have several versions available, it’s important to define a version constraint to force Terraform to select a single version
that all parts of your configuration are compatible with. If you don’t do that you take the risk to use a newer version that might not be compatible with your Configuration.
A good way to force the maximum version we want to work with is to use the ~> operator. This will allow to use only patch releases within a specific minor release :

# aws_config.tf

terraform {
  required_providers {
    aws = {
      source  = "hashicorp/aws"
      version = "~> 3.26"
    }
  }
}

provider "aws" {
  profile = "default"
  region  = var.aws_region
}

As I don’t set my AWS_ACCESS_KEY_ID and AWS_SECRET_ACCESS_KEY (security), Terraform will use the one coming from my environment variables.

VPC

VPC (Virtual Private Cloud) is one of the fundamental component to create when starting an AWS project. It allows to launch resources in a virtual and isolated network. Creating a VPC is optional, but it becomes mandatory when you want to create interconnections with others networks or if you want to isolate some EC2 instances in a subnet unreachable from outside :

# create-vpc.tf

resource "aws_vpc" "vpc" {
  cidr_block           = var.vpc_cidr_block
  enable_dns_hostnames = var.vpc_dns_hostnames
  enable_dns_support   = var.vpc_dns_support

  tags = {
    "Owner" = var.owner
    "Name"  = "${var.owner}-vpc"
  }
}

This defines the IP range that will be used and enable DNS support and hostname so the instance can get a DNS name.

Security Group

To control inbound and outbound access to an EC2 instance, it’s required to create a Security Group.
A Security Group is like the local firewall of the instance. If we want to be able to connect to the instance via SSH we need to create an ingress rule allowing our IP to connect to TCP port 22.
In order to be able to connect to the instance from wherever we are located (home, office, …), let’s store our current public IP using the data sources module of Terraform. Then it can be used as a variable to define the value of the cidr_blocks argument in the ingress attributes :

# create sg-tf

data "http" "myip" {
  url = "http://ipv4.icanhazip.com"
}

resource "aws_security_group" "sg" {
  name        = "${var.owner}-sg"
  description = "Allow inbound traffic via SSH"
  vpc_id      = aws_vpc.vpc.id

  ingress = [{
    description      = "My public IP"
    protocol         = var.sg_ingress_proto
    from_port        = var.sg_ingress_ssh
    to_port          = var.sg_ingress_ssh
    cidr_blocks      = ["${chomp(data.http.myip.body)}/32"]
    ipv6_cidr_blocks = []
    prefix_list_ids  = []
    security_groups  = []
    self             = false

  }]

  egress = [{
    description      = "All traffic"
    protocol         = var.sg_egress_proto
    from_port        = var.sg_egress_all
    to_port          = var.sg_egress_all
    cidr_blocks      = [var.sg_egress_cidr_block]
    ipv6_cidr_blocks = []
    prefix_list_ids  = []
    security_groups  = []
    self             = false

  }]

  tags = {
    "Owner" = var.owner
    "Name"  = "${var.owner}-sg"
  }
}

A second rules exists in this Security Group to allow the instance to connect outside.

Subnet

A subnet must be created inside the VPC, with its own CIDR block, which is a subset of the VPC CIDR block :

#create-sbn.tf

resource "aws_subnet" "subnet" {
  vpc_id                  = aws_vpc.vpc.id
  cidr_block              = var.sbn_cidr_block
  map_public_ip_on_launch = var.sbn_public_ip
  availability_zone       = "${var.aws_region}${var.aws_region_az}"

  tags = {
    "Owner" = var.owner
    "Name"  = "${var.owner}-subnet"
  }
}

If you plan to create more than one subnet, think about deploying them into different Availability Zones.

Internet Gateway

We also need an Internet Gateway to enable access over the Internet.

# create-igw.tf

resource "aws_internet_gateway" "igw" {
  vpc_id = aws_vpc.vpc.id

  tags = {
    "Owner" = var.owner
    "Name"  = "${var.owner}-igw"
  }
}

If the traffic of a subnet is routed to the Internet Gateway, the subnet is known as a public subnet. That means that all instances connected to this subnet can connect the Internet through the Internet Gateway.
To define this association, we need a Route Table :

Route Table

#create-rt.tf

resource "aws_route_table" "rt" {
  vpc_id = aws_vpc.vpc.id

  route {
    cidr_block = var.rt_cidr_block
    gateway_id = aws_internet_gateway.igw.id
  }

  tags = {
    "Owner" = var.owner
    "Name"  = "${var.owner}-rt"
  }

}

The link between the subnet and the route table is done by creating an association :

resouresource "aws_route_table_association" "rt_sbn_asso" {
  subnet_id      = aws_subnet.subnet.id
  route_table_id = aws_route_table.rt.id
}


Instance

The network layer is now ready. We can create the EC2 instance in the subnet of our VPC :

# create-instance.tf

resource "aws_instance" "instance" {
  ami                         = var.instance_ami
  availability_zone           = "${var.aws_region}${var.aws_region_az}"
  instance_type               = var.instance_type
  associate_public_ip_address = true
  vpc_security_group_ids      = [aws_security_group.sg.id]
  subnet_id                   = aws_subnet.subnet.id
  key_name                    = var.key_pair

  root_block_device {
    delete_on_termination = true
    encrypted             = false
    volume_size           = var.root_device_size
    volume_type           = var.root_device_type
  }

  tags = {
    "Owner"               = var.owner
    "Name"                = "${var.owner}-instance"
    "KeepInstanceRunning" = "false"
  }
}


Init

Everything is ready. To start the deployment, we need first of all to initialize our working directory :

joc@joc:$ terraform init

Initializing the backend...

Initializing provider plugins...
- Finding latest version of hashicorp/http...
- Finding hashicorp/aws versions matching "~> 3.26"...
- Installing hashicorp/http v2.0.0...
- Installed hashicorp/http v2.0.0 (signed by HashiCorp)
- Installing hashicorp/aws v3.26.0...
- Installed hashicorp/aws v3.26.0 (signed by HashiCorp)

Terraform has created a lock file .terraform.lock.hcl to record the provider
selections it made above. Include this file in your version control repository
so that Terraform can guarantee to make the same selections by default when
you run "terraform init" in the future.

Terraform has been successfully initialized!

You may now begin working with Terraform. Try running "terraform plan" to see
any changes that are required for your infrastructure. All Terraform commands
should now work.

If you ever set or change modules or backend configuration for Terraform,
rerun this command to reinitialize your working directory. If you forget, other
commands will detect it and remind you to do so if necessary.
joc@joc:$


Validate

Then we can check if the code of our Configuration is syntactically valid :

joc@joc:$ terraform validate
Success! The configuration is valid.

joc@joc:$


Plan

Terraform can show what will be deployed using the plan command. This is very useful to check all the resources before creating them.
As the output is quite long I’ll truncate it and keep only some lines :

joc@joc:$ terraform plan
var.owner
  Configuration owner

  Enter a value: joc


An execution plan has been generated and is shown below.
Resource actions are indicated with the following symbols:
  + create

Terraform will perform the following actions:
...
...
...
Plan: 7 to add, 0 to change, 0 to destroy.

Changes to Outputs:
  + public_ip = (known after apply)

------------------------------------------------------------------------

Note: You didn't specify an "-out" parameter to save this plan, so Terraform
can't guarantee that exactly these actions will be performed if
"terraform apply" is subsequently run.

joc@joc:~$

At line n° 5 we are prompted to give a name to the owner of the Configuration. This is because we didn’t set a default value to the variable “owner” (see variables.tf). As you may have noticed, this variable is regularly used to name the resources as well as to tag them. This will be helpful when working with these resources.

Apply

Finally we can apply the execution plan and everything will be created in few minutes only :

joc@joc:$ terraform apply
var.owner
  Configuration owner

  Enter a value: joc


An execution plan has been generated and is shown below.
Resource actions are indicated with the following symbols:
  + create

Terraform will perform the following actions:
...
...
...
aws_vpc.vpc: Creating...
aws_vpc.vpc: Creation complete after 3s [id=vpc-00aa8a9136306adf2]
aws_internet_gateway.igw: Creating...
aws_subnet.subnet: Creating...
aws_security_group.sg: Creating...
aws_internet_gateway.igw: Creation complete after 1s [id=igw-069cde646f3d4967f]
aws_route_table.rt: Creating...
aws_subnet.subnet: Creation complete after 1s [id=subnet-07034f2432203028e]
aws_route_table.rt: Creation complete after 0s [id=rtb-06fd67d98d0d8d24c]
aws_route_table_association.rt_sbn_asso: Creating...
aws_route_table_association.rt_sbn_asso: Creation complete after 1s [id=rtbassoc-04b8fd0f0984d648b]
aws_security_group.sg: Creation complete after 2s [id=sg-0c3547bc9189af478]
aws_instance.instance: Creating...
aws_instance.instance: Still creating... [10s elapsed]
aws_instance.instance: Still creating... [20s elapsed]
aws_instance.instance: Still creating... [30s elapsed]
aws_instance.instance: Creation complete after 33s [id=i-0c102b97c854bbb80]

Apply complete! Resources: 7 added, 0 changed, 0 destroyed.

Outputs:

public_ip = "18.194.28.183"
joc@joc:$

The last line displays the public IP of the newly created instance. The is done thanks to the output variable defined into the file variables_output.tf :

# variable_output.tf

# Variables to show after the deployment
#########################################

output "public_ip" {
  value = aws_instance.instance.public_ip
}


We should now be able to connect to the instance :

joc@joc:$ ssh -i "~/joc-key-pair.pem" ec2-user@18.194.28.183
The authenticity of host '18.194.28.183 (18.194.28.183)' can't be established.
ECDSA key fingerprint is SHA256:aFg3EBxHgGENRKvFyMpZbfFPbAqz0RRiZqpsXM8T1po.
Are you sure you want to continue connecting (yes/no/[fingerprint])? yes
Warning: Permanently added '18.194.28.183' (ECDSA) to the list of known hosts.
[ec2-user@ip-10-0-1-194 ~]$


That’s it ! Let’s see what it looks like from the AWS Console…

VPC :


Security Group :

Subnet :

Internet Gateway :

Route Table :

Instance :

Cet article AWS EC2 instance deployment with Terraform est apparu en premier sur Blog dbi services.

Oracle 21c : Two nodes Grid Infrastructure Installation

$
0
0

Oracle 21c is actually released in the cloud, and I did some tests to setup a Grid infrastructure cluster with two nodes.
I used following two VM servers to test
racp1vm1
racp1vm2
Below the addresses I am using. Note that a dns server is setup

192.168.0.101 racp1vm1.dbi.lab racp1vm1            --public network
192.168.0.103 racp1vm2.dbi.lab racp1vm2            --public network
192.168.0.102 racp1vm1-vip.dbi.lab racp1vm1-vip    --vitual network
192.168.0.104 racp1vm2-vip.dbi.lab racp1vm2-vip    --virtual network
10.1.1.1 racp1vm1-priv.dbi.lab racp1vm1-priv       --private network
10.1.1.2 racp1vm2-priv.dbi.lab racp1vm2-priv       --private network

The scan name should be resolved in a round-robin method. Every time the nslookup command should return a different IP as first address

racp1-scan.dbi.lab :  192.168.0.105
racp1-scan.dbi.lab : 192.168.0.106
racp1-scan.dbi.lab . 192.168.0.107
[root@racp1vm1 diag]# nslookup racp1-scan
Server:         192.168.0.100
Address:        192.168.0.100#53

Name:   racp1-scan.dbi.lab
Address: 192.168.0.105
Name:   racp1-scan.dbi.lab
Address: 192.168.0.107
Name:   racp1-scan.dbi.lab
Address: 192.168.0.106

[root@racp1vm1 diag]# nslookup racp1-scan
Server:         192.168.0.100
Address:        192.168.0.100#53

Name:   racp1-scan.dbi.lab
Address: 192.168.0.107
Name:   racp1-scan.dbi.lab
Address: 192.168.0.106
Name:   racp1-scan.dbi.lab
Address: 192.168.0.105

[root@racp1vm1 diag]# nslookup racp1-scan
Server:         192.168.0.100
Address:        192.168.0.100#53

Name:   racp1-scan.dbi.lab
Address: 192.168.0.106
Name:   racp1-scan.dbi.lab
Address: 192.168.0.105
Name:   racp1-scan.dbi.lab
Address: 192.168.0.107

[root@racp1vm1 diag]#

I used udev for the ASM disks and below the contents of my udev file

[root@racp1vm1 install]# cat /etc/udev/rules.d/90-oracle-asm.rules
Oracle ASM devices
KERNEL==\”sd[b-f]1",  OWNER="grid", GROUP="asmadmin", MODE="0660"

The installation is the same that for the 19c. Unzip your software in your GRID_HOME

[grid@racp1vm1 ~]$ mkdir -p /u01/app/21.0.0.0/grid
[grid@racp1vm1 ~]$ unzip -d /u01/app/21.0.0.0/grid grid_home-zip.zip

And run the gridSetup.sh command

[grid@racp1vm1 grid]$ ./gridSetup.sh

I got some warnings i decided to ignore and go ahead

As specified I executed the scripts on both nodes

[root@racp1vm1 ~]# /u01/app/oraInventory/orainstRoot.sh
Changing permissions of /u01/app/oraInventory.
Adding read,write permissions for group.
Removing read,write,execute permissions for world.

Changing groupname of /u01/app/oraInventory to oinstall.
The execution of the script is complete.
[root@racp1vm1 ~]#

[root@racp1vm2 ~]# /u01/app/oraInventory/orainstRoot.sh
Changing permissions of /u01/app/oraInventory.
Adding read,write permissions for group.
Removing read,write,execute permissions for world.

Changing groupname of /u01/app/oraInventory to oinstall.
The execution of the script is complete.
[root@racp1vm2 ~]#

Below truncated outputs of root.sh.

[root@racp1vm1 ~]# /u01/app/21.0.0.0/grid/root.sh
Performing root user operation.

The following environment variables are set as:
    ORACLE_OWNER= grid
    ORACLE_HOME=  /u01/app/21.0.0.0/grid

Enter the full pathname of the local bin directory: [/usr/local/bin]:
…
..
CRS-4256: Updating the profile
Successful addition of voting disk 39600544f8794f63bfb83f128d9a9079.
Successfully replaced voting disk group with +CRSDG.
CRS-4256: Updating the profile
CRS-4266: Voting file(s) successfully replaced
##  STATE    File Universal Id                File Name Disk group
--  -----    -----------------                --------- ---------
 1. ONLINE   39600544f8794f63bfb83f128d9a9079 (/dev/sdc1) [CRSDG]
Located 1 voting disk(s).
2021/02/08 15:05:06 CLSRSC-594: Executing installation step 17 of 19: 'StartCluster'.
2021/02/08 15:06:00 CLSRSC-343: Successfully started Oracle Clusterware stack
2021/02/08 15:06:00 CLSRSC-594: Executing installation step 18 of 19: 'ConfigNode'.
2021/02/08 15:08:06 CLSRSC-594: Executing installation step 19 of 19: 'PostConfig'.
2021/02/08 15:08:27 CLSRSC-325: Configure Oracle Grid Infrastructure for a Cluster ... succeeded
[root@racp1vm2 install]# /u01/app/21.0.0.0/grid/root.sh
Performing root user operation.

The following environment variables are set as:
    ORACLE_OWNER= grid
    ORACLE_HOME=  /u01/app/21.0.0.0/grid

Enter the full pathname of the local bin directory: [/usr/local/bin]:
The contents of "dbhome" have not changed. No need to overwrite.
   Copying oraenv to /usr/local/bin ...
The file "coraenv" already exists in /usr/local/bin.  Overwrite it? (y/n)
[n]: y
…
…
2021/02/08 15:15:00 CLSRSC-343: Successfully started Oracle Clusterware stack
2021/02/08 15:15:00 CLSRSC-594: Executing installation step 18 of 19: 'ConfigNode'.
2021/02/08 15:15:20 CLSRSC-594: Executing installation step 19 of 19: 'PostConfig'.
2021/02/08 15:15:27 CLSRSC-325: Configure Oracle Grid Infrastructure for a Cluster ... succeeded
[root@racp1vm2 install]#

Then click OK

You can verify that the installation was fine

[root@racp1vm1 diag]# /u01/app/21.0.0.0/grid/bin/crsctl query crs activeversion
Oracle Clusterware active version on the cluster is [21.0.0.0.0]
[root@racp1vm1 diag]#

[root@racp1vm1 diag]# /u01/app/21.0.0.0/grid/bin/crsctl check cluster -all
**************************************************************
racp1vm1:
CRS-4537: Cluster Ready Services is online
CRS-4529: Cluster Synchronization Services is online
CRS-4533: Event Manager is online
**************************************************************
racp1vm2:
CRS-4537: Cluster Ready Services is online
CRS-4529: Cluster Synchronization Services is online
CRS-4533: Event Manager is online
**************************************************************
[root@racp1vm1 diag]#
[root@racp1vm1 diag]# /u01/app/21.0.0.0/grid/bin/crsctl stat res -t
--------------------------------------------------------------------------------
Name           Target  State        Server                   State details
--------------------------------------------------------------------------------
Local Resources
--------------------------------------------------------------------------------
ora.LISTENER.lsnr
               ONLINE  ONLINE       racp1vm1                 STABLE
               ONLINE  ONLINE       racp1vm2                 STABLE
ora.chad
               ONLINE  ONLINE       racp1vm1                 STABLE
               ONLINE  ONLINE       racp1vm2                 STABLE
ora.net1.network
               ONLINE  ONLINE       racp1vm1                 STABLE
               ONLINE  ONLINE       racp1vm2                 STABLE
ora.ons
               ONLINE  ONLINE       racp1vm1                 STABLE
               ONLINE  ONLINE       racp1vm2                 STABLE
ora.proxy_advm
               OFFLINE OFFLINE      racp1vm1                 STABLE
               OFFLINE OFFLINE      racp1vm2                 STABLE
--------------------------------------------------------------------------------
Cluster Resources
--------------------------------------------------------------------------------
ora.ASMNET1LSNR_ASM.lsnr(ora.asmgroup)
      1        ONLINE  ONLINE       racp1vm1                 STABLE
      2        ONLINE  ONLINE       racp1vm2                 STABLE
ora.CRSDG.dg(ora.asmgroup)
      1        ONLINE  ONLINE       racp1vm1                 STABLE
      2        ONLINE  ONLINE       racp1vm2                 STABLE
ora.LISTENER_SCAN1.lsnr
      1        ONLINE  ONLINE       racp1vm1                 STABLE
ora.LISTENER_SCAN2.lsnr
      1        ONLINE  ONLINE       racp1vm1                 STABLE
ora.LISTENER_SCAN3.lsnr
      1        ONLINE  ONLINE       racp1vm2                 STABLE
ora.asm(ora.asmgroup)
      1        ONLINE  ONLINE       racp1vm1                 Started,STABLE
      2        ONLINE  ONLINE       racp1vm2                 Started,STABLE
ora.asmnet1.asmnetwork(ora.asmgroup)
      1        ONLINE  ONLINE       racp1vm1                 STABLE
      2        ONLINE  ONLINE       racp1vm2                 STABLE
ora.cdp1.cdp
      1        ONLINE  ONLINE       racp1vm1                 STABLE
ora.cdp2.cdp
      1        ONLINE  ONLINE       racp1vm1                 STABLE
ora.cdp3.cdp
      1        ONLINE  ONLINE       racp1vm2                 STABLE
ora.cvu
      1        ONLINE  ONLINE       racp1vm1                 STABLE
ora.qosmserver
      1        ONLINE  ONLINE       racp1vm1                 STABLE
ora.racp1vm1.vip
      1        ONLINE  ONLINE       racp1vm1                 STABLE
ora.racp1vm2.vip
      1        ONLINE  ONLINE       racp1vm2                 STABLE
ora.scan1.vip
      1        ONLINE  ONLINE       racp1vm1                 STABLE
ora.scan2.vip
      1        ONLINE  ONLINE       racp1vm1                 STABLE
ora.scan3.vip
      1        ONLINE  ONLINE       racp1vm2                 STABLE
--------------------------------------------------------------------------------
[root@racp1vm1 diag]#

Cet article Oracle 21c : Two nodes Grid Infrastructure Installation est apparu en premier sur Blog dbi services.

8000 databases in one PostgreSQL cluster?

$
0
0

A while ago I posted this tweet on Twitter:

While this might sound unusual, this actually was under consideration by one of our customers. Each of their customers usually gets a dedicated database and is free to do in that database whatever they want. Because they can also create multiple schemas, a schema only solution was not the way to go. To be clear right now: We did not implement it like this, the reasons are in this post. The actual implementation will follow with a follow up post.

To see what it means to work with such many databases let’s initialize the cluster, nothing special here:

postgres@pg13:/home/postgres/ [pg131] initdb -D /u02/pgdata/13
The files belonging to this database system will be owned by user "postgres".
This user must also own the server process.

The database cluster will be initialized with locale "C.UTF-8".
The default database encoding has accordingly been set to "UTF8".
The default text search configuration will be set to "english".

Data page checksums are disabled.

creating directory /u02/pgdata/13 ... ok
creating subdirectories ... ok
selecting dynamic shared memory implementation ... posix
selecting default max_connections ... 100
selecting default shared_buffers ... 128MB
selecting default time zone ... Etc/UTC
creating configuration files ... ok
running bootstrap script ... ok
performing post-bootstrap initialization ... ok
syncing data to disk ... ok

initdb: warning: enabling "trust" authentication for local connections
You can change this by editing pg_hba.conf or using the option -A, or
--auth-local and --auth-host, the next time you run initdb.

Success. You can now start the database server using:

    pg_ctl -D /u02/pgdata/13 -l logfile start

Starting up:

postgres@pg13:/home/postgres/ [pg131] pg_ctl -D /u02/pgdata/13/ start
waiting for server to start....2021-02-10 20:51:19.878 UTC [15930] LOG:  starting PostgreSQL 13.1 dbi services build on x86_64-pc-linux-gnu, compiled by gcc (Debian 8.3.0-6) 8.3.0, 64-bit
2021-02-10 20:51:19.879 UTC [15930] LOG:  listening on IPv4 address "127.0.0.1", port 5432
2021-02-10 20:51:19.883 UTC [15930] LOG:  listening on Unix socket "/tmp/.s.PGSQL.5432"
2021-02-10 20:51:19.889 UTC [15931] LOG:  database system was shut down at 2021-02-10 20:49:54 UTC
2021-02-10 20:51:19.895 UTC [15930] LOG:  database system is ready to accept connections
 done
server started
postgres@pg13:/home/postgres/ [pg131] psql -c "select version()" postgres
                                                  version                                                  
-----------------------------------------------------------------------------------------------------------
 PostgreSQL 13.1 on x86_64-pc-linux-gnu, compiled by gcc (Debian 8.3.0-6) 8.3.0, 64-bit
(1 row)

Generating 8000 databases in PostgreSQL is quite easy, all you need to do is something like this:

postgres@pg13:/home/postgres/ [pg131] for i in {1..8000}; do psql -c "create database db_${i}" postgres; done
CREATE DATABASE
CREATE DATABASE
CREATE DATABASE
...
postgres@pg13:/home/postgres/ [pg131] psql -c "select count(*) from pg_database" postgres
 count 
-------
  8003
(1 row)

This will take some time but PostgreSQL quite happily creates the databases. You can actually create much more databases, if you really want, up to 4,294,950,911. Now that we have 8000 databases, let’s do some math. A single PostgreSQL database consumes around 8MB of disk space. As we have 8000 databases, that is around 64000MB of disk space, for just the empty databases:

postgres@pg13:/home/postgres/ [pg131] du -sh /u02/pgdata/13/
60G     /u02/pgdata/13/

This is quite some space, that could be used more efficiently. As all of these databases should be owned by a separate user, that makes 8000 users in addition:

postgres@pg13:/home/postgres/ [pg131] for i in {1..8000}; do psql -c "create user u_${i}" postgres; done
postgres@pg13:/home/postgres/ [pg131] for i in {1..8000}; do psql -c "alter database db_${i} owner to u_${i}" postgres; done

Now lets assume each of those database contains 100 tables, 100 indexes and 100 sequences. Initially I wanted to do it like this, but this is actually a very bad idea:

postgres@pg13:/home/postgres/ [pg131] for i in {1..8000}
> do
>     for e in {1..100}
>     do
>         psql -c "create table tab${e}(a int primary key generated always as identity, b text, c date)" db_${i}
>     done
> done
CREATE TABLE
CREATE TABLE
CREATE TABLE
...

Creating 800000 connections is catastrophic for performance, so a much better way of doing it, is like this (and this are still 8000 connections and it will take some time to complete):

postgres@pg13:/home/postgres/ [pg131] for e in {1..100}
> do
>     echo "create table tab${e}(a int primary key generated always as identity, b text, c date);" >> /var/tmp/load.sql
> done
postgres@pg13:/home/postgres/ [pg131] for i in {1..8000}
> do
>     psql -f /var/tmp/load.sql db_${i}
> done
CREATE TABLE
CREATE TABLE
CREATE TABLE
...
postgres@pg13:/home/postgres/ [pg131] rm -f /var/tmp/load.sql

Once that completed, let’s check the space usage again:

postgres@pg13:/home/postgres/ [pg131] du -sh /u02/pgdata/13/
88G     /u02/pgdata/13/

We’ve added 28GB and do not have a single user generated row in any of these databases, this is quite huge. Only from this point of view, it does not seems a good idea to combine as many databases as in this example into a single cluster. But there is more to consider than space usage:

  • When you have 8000 databases you need to expect 8000 concurrent sessions. How do you handle that, especially if each of those connections goes to a different database?
  • Backup and Restore: Physical backup and restore only works for the whole cluster. Of course could restore the whole cluster to another system and then pick specific databases you are interested in, but this will take some time as well.
  • Autovacuum has potentially to process many databases in parallel, so how many worker processes can you give?
  • 8000 databases with 100 tables each are at least 80’0000 files on disk, not counting FSM, VM and index files. Depending on your file system and your segment size you might need to tweak the file system as well.
  • Access permissions: Managing access permissions for at least 8000 users might become tricky. In addition pg_hba.conf gets large.
  • I guess it all comes down to: Are you willing to invest into a monster machine with as many cores as currently are available on the market, which lots and lots of memory and the fastest disks you can get? And then you probably want at least two of them so you can failover in case of a disaster, or even three if you want to have automated failover? And then you need at least one test system as close to production as possible.

Cet article 8000 databases in one PostgreSQL cluster? est apparu en premier sur Blog dbi services.

Microsoft Flexible Server for PostgreSQL

$
0
0

This Blog is about some findings on Microsoft’s new Flexible Server offering for PostgreSQL which is in Customer Preview at the moment.

Findings about the infrastructure

The Microsoft Flexible Server for PostgreSQL is using Ubuntu as OS infrastructure, I think it is worth to be noticed that Microsoft’s new offering is switching from Windows to Linux.

postgres=> select version();
version
-----------------------------------------------------------------------------------------------------------------
PostgreSQL 12.5 on x86_64-pc-linux-gnu, compiled by gcc (Ubuntu 5.4.0-6ubuntu1~16.04.12) 5.4.0 20160609, 64-bit

Ubuntu upgrade ist planned as i know, Ubuntu 16.04 is end of support 04/2021.

Findings about performance

We have tested the performance which is more stable than on the old Single Server offering.

Differences

The new setup is one virtual machine per instance, instead of one big machine with many instances on. On the old setup there is in any case a gateway in between, which causes security and in some points also performance issues. On the old setup, with many instances, this gateway moves the connection for any instance to Port 5432 which is PostgreSQL default, with show port; we have seen many instances running originally in the 20000 port region.

The mapping from ports in the 20000 region to 5432 is done by this gateway and this is gone with the new offering.

Collation

The default collation on Azure Flexible Server Offering is UTF-8 which is PostgreSQL default.

postgres=> show server_encoding;
server_encoding
-----------------
UTF8

postgres=> \l
List of databases
Name | Owner | Encoding | Collate | Ctype | Access privileges
-------------------+----------------+----------+------------+------------+-----------------------------------
azure_maintenance | azuresu | UTF8 | en_US.utf8 | en_US.utf8 |
postgres | azure_pg_admin | UTF8 | en_US.utf8 | en_US.utf8 |
template0 | azuresu | UTF8 | en_US.utf8 | en_US.utf8 | =c/azuresu +
| | | | | azuresu=CTc/azuresu
template1 | azure_pg_admin | UTF8 | en_US.utf8 | en_US.utf8 | =c/azure_pg_admin +
| | | | | azure_pg_admin=CTc/azure_pg_admin

SSL

is stable:

postgres=> select * from pg_stat_ssl;
pid | ssl | version | cipher | bits | compression | client_dn | client_serial | issuer_dn
-------+-----+---------+-----------------------------+------+-------------+---------------------------------------------+------------------------------------------------+-----------------------------------
51 | f | | | | | | |
55 | f | | | | | | |
56 | f | | | | | | |
57 | f | | | | | | |
28669 | t | TLSv1.2 | ECDHE-RSA-AES256-GCM-SHA384 | 256 | f | /CN=azuresu.b92f28e7b317.database.azure.com | 1293482480206780384144623282355891870454996725 | /DC=GBL/DC=AME/CN=AME INFRA CA 01
28013 | t | TLSv1.2 | ECDHE-RSA-AES256-GCM-SHA384 | 256 | f | | |
49 | f | | | | | | |
48 | f | | | | | | |
50 | f |

Extensions

Not all extensions provided by the contrib package are available on Azure, this may have some consequences if your application requires one of them:

  • address_standardizer | 2.5.1 | | Used to parse an address into constituent elements. Generally used to support geocoding address normalization step.
  • address_standardizer_data_us | 2.5.1 | | Address Standardizer US dataset example
  • adminpack | 2.0 | | administrative functions for PostgreSQL
  • amcheck | 1.1 | | functions for verifying relation integrity
  • autoinc | 1.0 | | functions for autoincrementing fields
  • azure | 1.0 | 1.0 | azure extension for PostgreSQL service
  • bloom | 1.0 | | bloom access method – signature file based index
  • btree_gin | 1.3 | | support for indexing common datatypes in GIN
  • btree_gist | 1.5 | | support for indexing common datatypes in GiST
  • citext | 1.5 | | data type for case-insensitive character strings
  • cube | 1.4 | | data type for multidimensional cubes
  • dblink | 1.2 | | connect to other PostgreSQL databases from within a database
  • dict_int | 1.0 | | text search dictionary template for integers
  • dict_xsyn | 1.0 | | text search dictionary template for extended synonym processing
  • earthdistance | 1.1 | | calculate great-circle distances on the surface of the Earth
  • file_fdw | 1.0 | | foreign-data wrapper for flat file access
  • fuzzystrmatch | 1.1 | | determine similarities and distance between strings
  • hstore | 1.5 | | data type for storing sets of (key, value) pairs
  • insert_username | 1.0 | | functions for tracking who changed a table
  • intagg | 1.1 | | integer aggregator and enumerator (obsolete)
  • intarray | 1.2 | | functions, operators, and index support for 1-D arrays of integers
  • isn | 1.2 | | data types for international product numbering standards
  • lo | 1.1 | | Large Object maintenance
  • ltree | 1.1 | | data type for hierarchical tree-like structures
  • moddatetime | 1.0 | | functions for tracking last modification time
  • pageinspect | 1.7 | | inspect the contents of database pages at a low level
  • pg_buffercache | 1.3 | | examine the shared buffer cache
  • pg_cron | 1.2 | | Job scheduler for PostgreSQL
  • pg_freespacemap | 1.2 | | examine the free space map (FSM)
  • pg_prewarm | 1.2 | | prewarm relation data
  • pg_stat_statements | 1.6 | | track execution statistics of all SQL statements executed
  • pg_trgm | 1.4 | | text similarity measurement and index searching based on trigrams
  • pg_visibility | 1.2 | | examine the visibility map (VM) and page-level visibility info
  • pgaudit | 1.3.1 | | provides auditing functionality
  • pgcrypto | 1.3 | | cryptographic functions
  • pglogical | 2.3.2 | | PostgreSQL Logical Replication
  • pglogical_origin | 1.0.0 | | Dummy extension for compatibility when upgrading from Postgres 9.4
  • pgrowlocks | 1.2 | | show row-level locking information
  • pgstattuple | 1.5 | | show tuple-level statistics
  • plpgsql | 1.0 | 1.0 | PL/pgSQL procedural language
  • postgis | 2.5.1 | | PostGIS geometry, geography, and raster spatial types and functions
  • postgis_sfcgal | 2.5.1 | | PostGIS SFCGAL functions
  • postgis_tiger_geocoder | 2.5.1 | | PostGIS tiger geocoder and reverse geocoder
  • postgis_topology | 2.5.1 | | PostGIS topology spatial types and functions
  • postgres_fdw | 1.0 | | foreign-data wrapper for remote PostgreSQL servers
  • refint | 1.0 | | functions for implementing referential integrity (obsolete)
  • seg | 1.3 | | data type for representing line segments or floating-point intervals
  • sslinfo | 1.2 | | information about SSL certificates
  • tablefunc | 1.0 | | functions that manipulate whole tables, including crosstab
  • tcn | 1.0 | | Triggered change notifications
  • timetravel | 1.0 | | functions for implementing time travel
  • tsm_system_rows | 1.0 | | TABLESAMPLE method which accepts number of rows as a limit
  • tsm_system_time | 1.0 | | TABLESAMPLE method which accepts time in milliseconds as a limit
  • unaccent | 1.1 | | text search dictionary that removes accents
  • uuid-ossp | 1.1 | | generate universally unique identifiers (UUIDs)
  • xml2 | 1.1 | | XPath querying and XSLT

These extensions are missing compared to a default community setup with the contrib package:

  • hstore_plperl
  • hstore_plperlu
  • jsonb_plperl
  • jsonb_plperlu
  • pg_stat_kcache

These extension are not in the default Linux setup with the contrib package:

  • address_standardizer_data_us
  • azure
  • pg_cron
  • pgaudit
  • pglogical
  • pglogical_origin
  • postgis
  • postgis_sfcgal
  • postgis_tiger_geocoder
  • postgis_topology

Findings about security

This is a very important point for someone who has to fulfill security requirements by corporate security. On the configuration page it is possible to enable a firewall rule to allow Azure services to connect, what does this mean in reality?
select * from pg_hba_file_rules; is blocked on the new offering, so we discussed with Microsoft if there is any change here.

This is, according to information of Microsoft, not the case, so that this finding is still present:

pg_hba.conf contains more than 10900 entries including 45 /16 Networks, means these 45 /16 networks allowing to connect 45 x 65025 IP Adresses = 2.926 Million IP addresses allowed to connect with host and password security only, with enabled Azure Services to connect.

It is interesting that with enabled SSL enforcement, the entries inside pg_hba.conf are still on host and not on hostssl. According to the PostgreSQL documentation also non SSL connections are allowed: https://www.postgresql.org/docs/11/auth-pg-hba-conf.html

host
This record matches connection attempts made using TCP/IP. Host records match either SSL or non-SSL connection attempts.
hostssl
This record matches connection attempts made using TCP/IP, but only when the connection is made with SSL encryption.
password
Require the client to supply an unencrypted password for authentication. Since the password is sent in clear text over the network, this should not be used on untrusted networks.

Password hashing is still configured to MD5instead of scram-sha-256.

On the old Single Server Offering we see broken SSL connections with select * from pg_stat_ssl; SSLwas given from your client to the Gateway, but broken from the gateway to the instance.

A restart of the instance solves the issue, but SSL status on PostgreSQL level is not monitored by Microsoft, this issue is also gone with the new Flexible Server offering by removing the Gateway with the new Linux based setup.

Yes we see many improvements, but also many things that need to be discussed.

Cet article Microsoft Flexible Server for PostgreSQL est apparu en premier sur Blog dbi services.

CentOS 8 alternatives

$
0
0

Many people are unhappy about the decision from the CentOS Board of Directors, to switch from fix releases to Stream and cutting the support date from 2029 to 31st of December 2021 for CentOS 8.

Many applications in productive environments require fix OS releases. Having more or less daily changing packages can cause many issues.

People who have upgraded from CentOS 7 to 8 are in trouble again, the cut on the support date means, they have to think about alternatives and migrate to another Linux distribution in short time.

What alternatives exist to CentOS 8 now?

RHEL 8

For small environments up to 16 systems, Red Hat offers to license them for free, so for small environments RHEL 8 is one alternative.

Anouncing the change on CentOS 8 switching to Stream without announcing this possibility is the reason for many rumors.

Oracle Linux 8

Oracle has taken this ball and offers a shell script to migrate existing CentOS installations to Oracle Linux, till now no limitations.

Running for example PostgreSQL installations on Oracle Linux may be a bit ironic.

openSUSE Leap 15.3

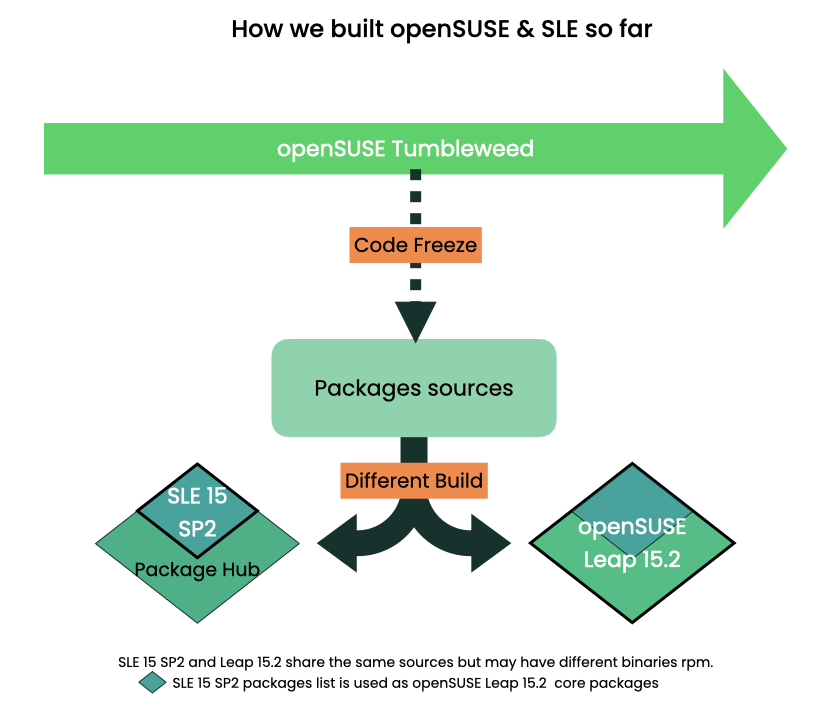
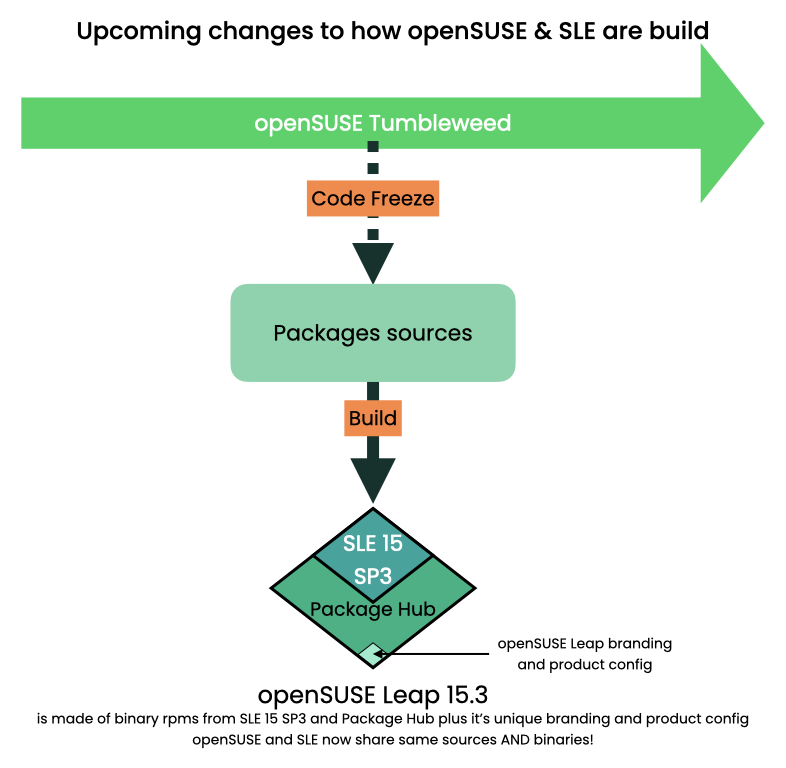
SUSE has also taken up this point, with openSUSE Leap 15.3 SUSE has switched the method how they build from Leap 15.2 to Leap 15.3 to the way CentOS has left.

Till openSUSE Leap 15.2:


Details here.

Starting with openSUSE Leap 15.3:


Details here

So openSUSE Leap with Release 15.3 becomes also an interesting alternative to CentOS 8 and is worth to take a look at in my mind.

Here we have fixed Releases once a year based on an Enterprise Release, thats what CentOS gives up with the switch to Stream on CentOS 8.

A problem may be the short time to support end after a new release is coming out, this is short with about six month.

Cet article CentOS 8 alternatives est apparu en premier sur Blog dbi services.

Network configurations on ODA

$
0
0

Introduction

ODA is an appliance, that means that everything is included in a box, and this box could eventually run its stuff only being connected to power. But it would be quite useless as nobody could connect to the databases. ODA needs network links to deliver the service.

Starting from ODA X8, there are multiple possible configurations regarding network, but also limits to what you can do. Let’s have a glance at the possibilities.

Network cards on a single-node ODA

A minimal configuration will be composed of 2 network cards.

One is for server management, also called the ILOM. ILOM is something like a server in the server itself. It consists of a small-footprint machine dedicated to manage the hardware side of the ODA. When the ODA gets powered, this ILOM is available a few minutes after you plug in the server, even if you don’t actually power up the server itself by pressing the button. There is only one physical port for this network card, it’s even not a card as it’s soldered on the server and you cannot remove it. This physical port is an Ethernet port limited to 1Gbps, so you will not be able to connect it to faster networks. It’s not a problem because you’ll never need more. There is no indication if this port could eventually use lower speeds, like 100Mbps, but using 100Mbps in 2021 would be quite odd.

The other network card is a real one, connected to the PCIe bus slot 7. You can choose between a quad-port Ethernet card, or a dual-port SFP28 card.

Ethernet card is for copper network with RJ45 cables and plugs, and is compatible with 10Gbps switches.

SFP28 card is for fiber network with optical fibers and gbics connectors, and is compatible with 10Gbps or 25Gbps switches.

2 more cards are optional. Like the previous one, you can choose between quad-port Ethernet or dual-port SFP. They can be useful for those planning to have more network interfaces for various purposes. These cards will be available in port 8 and 10.

So, when you order your ODA, you’ll have to choose which type of card for the first one, and if you want additional ones (1 or 2) and which kind of additional cards. Make sure to order exactly what you need.

Network cards on a HA ODA

HA ODA is basically 2 single-node ODAs without DATA disks inside. Disks are deported through a SAS link to one or two storage enclosures, meaning that storage capacity is bigger, but unfortunately without the speed of NVMe disks.

As one HA is 2 single-node ODAs, you’ll find 2 ILOM cards (1 per server) and 2 cards as a default (in slot 7 of each server). Each node can only have 1 additional card into slot 10. It’s not possible to add more cards for your own networks, because the other slots are dedicated to HBA SAS controllers (2x) and a specific network card.

As you may know, one of the benefit of having a HA ODA is High Availability itself, thanks to Real Application Cluster technology. This technology rely on shared storage but also on high bandwidth private network (interconnect) to link both nodes together. This private network has a dedicated card on each node on slot 1, and this network is really private because it never goes out of your ODA. It makes use of a SFP28 card of the same type as the others. But dedicated cables are provided to make a direct link between node 0 and node 1. It means 2 things: both nodes need to be very near, and you do not have to care about this network configuration: no ports to dedicate on your switch, no IP configuration to provide, etc.

As a result, network configuration on a HA ODA is not very different than network configuration of 2 single-node ODAs, but one of the additional card is mandatory and dedicated to interconnect only.

ILOM network configuration

ILOM network configuration will be composed of an IP address, a netmask and a gateway for being available from other networks. You will mainly connect to this network with a web browser on https port, or eventually with SSH terminal. ILOM is used for initial deployment or reimaging of the server, and also for diagnostic purpose.

Public network configuration

Public network is dedicated to connect your applications or clients to the databases. A public network will be based on 2 bonded interfaces on the same network card. If you ordered your ODA with 1 Ethernet card, you can choose between btbond1 or btbond2, btbond1 being a bond of the first 2 ports, btbond2 being a bond of the last 2 ports.

If you ordered your ODA with a SFP card, there is only one bond possible btbond1 on the 2 ports of the card.

For this network you will need an IP address, a netmask, a gateway and also DNS and NTP information because your ODA will need to resolve names and update its clock.

Other networks configuration (user defined networks)

You can configure other networks for additional links depending on your needs and how many cards you chose. For single-node ODAs, up to 6 networks are possible when using Ethernet (public + 5 user-defined networks) and up to 3 using SFP (1 public and 2 user-defined). For HA ODAs, up to 4 networks are possible when using Ethernet and up to 2 using SFP. These networks will be used for backup purpose, in order to dedicate a link to backup stream, administrative purpose in case you have a dedicated network for administrators, or whatever you need.

Each network you will create will be based on 2 bonded ports of a network card.

Note that bond’s names are fixed and follow this mechanism:

  • 1st card has btbond1 and eventually btbond2 if it’s an Ethernet card
  • 2nd card has btbond3 and eventually btbond4 if it’s an Ethernet card
  • for single-node ODAs, 3rd card has btbond5 and eventually btbond6 if it’s an Ethernet card

For each of these user-defined networks you will need an IP address, a netmask, a gateway and a optional VLAN tagging if needed.

To create a user-defined network, use odacli create-network and provide the physical bond, the IP configuration, for example you could create a backup network on the second bond of your primary Ethernet card with:

odacli create-network -w Backup -m Backup -s 255.255.255.0 -p 172.30.52.4 -t BOND -n btbond2

You can also display your actual networks with:

odacli list-networks

Limits

Configuration is quite flexible, but there are some limits.

Manual configuration of these interfaces is not supported. Everything is either done when deploying the appliance (public network configuration) or with odacli (additional networks configuration).

You can tweak your network scripts, but it may prevent you from applying a patch or using some odacli functions. So I do not recommend to do that.

LACP is not supported, networks are always composed of 2 bonded ports, but it’s only in active/backup mode. You cannot aggregate networks interfaces to benefit for double the speed of one. If you need more speed, connect your ODA to 10Gbps Ethernet or 25Gbps SFP switches to maximize throughput if you really need such bandwidth. Aggregating “slow” 1Gbps links makes no sense. Active/backup is enough for most cases.

Jumbo frames are not proposed during network configuration, if you really need them, for example for a backup network, you can add the settings to your network interfaces configuration files but don’t forget to remove them before patching or modifying networks through odacli.

echo 'MTU="9000"' >> /etc/sysconfig/network-scripts/ifcfg-p2p1
echo 'MTU="9000"' >> /etc/sysconfig/network-scripts/ifcfg-p2p2
echo 'MTU="9000"' >> /etc/sysconfig/network-scripts/ifcfg-btbond3
ifdown btbond3; ifup btbond3

If you still use an old 1Gbps fiber switch, the ODA will not manage to connect to the network, even if the network link is detected. 1Gbps SFP makes no sense compared to 1Gbps Ethernet.

Using both Ethernet and SFP is not possible, and it’s probably for now the main drawback regarding the network on ODA. Mixing up the 2 types of network cards is possible, but you will not be able to use both of them. An ODA with the 2 types of card only makes sense when you plan an upgrade to SFP later (with a reimage) or if your datacenters don’t support the same kind of networks and you want your ODAs to be identical. This is probably a good idea to have the same cards on each ODA.

It’s not possible to make a bond between different physical cards. It would make sense as the card itself could have a failure, but there is no way for such configuration with odacli. Don’t forget that a real Disaster Recovery solution is the only answer for extended hardware troubles today.

Finally, if you decided to go for SFP, don’t forget to order the gbics corresponding to your configuration, they are not provided as a standard on ODA, they are optional. Make sure to have the correct gbics according to the network specification of the cards and your switch on both sides of the fiber cable. I heard about some incompatibilities between network card, gbics plugged into the card, gbic plugged into the switch and the switch itself. It’s not an ODA specific subject but make sure that this point will not delay your ODA project.

ODA and VLANs

VLAN tagging is fully supported on ODA, but I recommend to use transparent VLANs and tag the switch port instead of configuring this tagging on the ODA itself. You can still create additional VLANs on top of the public interface, but you will share the bonding for multiple purposes, not the best option. One bonding for one VLAN is probably a better configuration.

Conclusion

There is a lot of possibilities regarding network configuration on ODA, but as usual, take the time to define what you need, look at your available ports and speeds with your network administrator, and prepare carefully information like IPs and hostnames. Changing something on the network after deployment is not recommended and even not always possible.

Cet article Network configurations on ODA est apparu en premier sur Blog dbi services.

SUSE Manager installation

$
0
0

In this Blog I will write the requirements and steps to install SUSE Manager Server. Maybe you heard about SUSE Manager but you could not understand why a SUSE Manager Server (SUMA) can help to manage your server environments easier.

How can SUMA help you?

  • Without automated processes, the systems management overhead increases, and this leadS to increased costs.
  • Get a complete hardware and software inventory of your systems.
  • Install Software with few clicks to multiple servers
  • SUSE Manager delivers complete life-cycle management for Linux systems (System Deployment, Patch Management, Subscription Management, Configuration Maintenance)
  • Create custom repositories for delivering RPM based applications
  • Patch Management
  • Manage Docker Images

SUMA4 Architecture

  • Salt Master
    • Broadcast commands to be executed down on the Salt Minions
  • Salt API
    • This is the connector between Tomcat and the Salt Master
  • Tomcat
    • Implements the SUMA web UI
  • Taskomatic
    • Mixture of the “cron” and “at” commands
  • PostgreSQL
    • List of all clients & repositories
    • Reporting information
    • etc.
  • ZeroMQ (0MQ)
    • messaging library designed to connect disparate parts of any distributed systems

Requirements:

  • SLES 15 Installer Media
  • Hardware requirements:
    • RAM: 8GB for test, min. 32 GB for production Server
    • CPU: For up to 200 connected systems 4 CPUs, for 201-1000 Systems 4 to 8 CPUs
    • DISK: Depends on how many products you are supporting. min 150GB
  • Firewall Ports:
25 SMTP for SUSE Manager to send notifications emails
80 / 443 Connecting to SCC (SUSE Customer Center)
5269 Connects a SUSE Manager proxy to SUSE Manager for pushing actions to proxies and clients via the proxy

Important: Choose the host name of the SUMA server carefully. Changing the name after installation is doable, but not supported.

Installation

Boot from ISO and select Installation

Select SUSE Manager Server 4.x

If you do not register, the updates and security fixes will be disabled. You gen also get for 120 Days trial access code from here:
https://scc.suse.com/product/suse-manager?architecture=x86_64&version=4.1&_ga=2.98972762.59522187.1609766212-1527968285.1605703189

Just click next

For testing it is enough to install the SUMA on single disk, but for a production server we recommend you to split the OS and Database etc.

The registration can take a few minutes.

The last step is to configure the root password.

If you want to enable SSH, you should click on “enable” SSH:

The installation of the SUMA Server done 🙂

SUMA configuration

After you successfully installed the SUMA Server, connect via SSH to the server. Before you continue to configure the SUMA Server, we recommend to check the hostname of your server. Because after you configured the server, it will be difficult to change the hostname. And also your host needs a FQDN, either in /etc/hosts or, preferrable, in the DNS. You can check your current FQDN name with following command: hostname -f

Let’s start configuring the SUMA Server: yast2 susemanager_setup

SUMA Certificate Setup.

PostgreSQL database and user will be automatically created. I recommend you to write this password somewhere like in a KeePass.

The Installation takes few Minutes. Once in the top is writing “Setup is completed”, you can click on Next on the right bottom.

After the installation, you are able to connect to the server using any browser. Open Webbrowser and type: https://<your-suma-ip / hostname>

As you see the installation of SUSE Manager is not difficult. But there are few points which is very important:

  • Split your DISK’s
    • min Size Description
      / 100GB file system
      /var/spacewalk 50 GB per SUSE Product, 100GB RHE product
      /var/lib/pgsql 50 GB Database
      /srv/www/htdocs/pub for custom repositories
      /var/log
  • Installing SUMA4 on an existing SLES Server is not supported!


Cet article SUSE Manager installation est apparu en premier sur Blog dbi services.


PostgreSQL on Linux: what is cached?

$
0
0

By Franck Pachot

.
In a recent tweet I wanted to highlight the importance of knowing what you measure with pgbench, because looking at “Transactions per second” without knowing if you are in shared buffer cache hits, or filesystem cache hit, or storage cache hit, or physical read… is just meaningless:


The “scale” with the default pgbench tables stores about 15MB per scale value, mostly in the pgbench_accounts table and indexes. The default select-only workload apparently reads 90% of it. But I also mentioned that the filesystem “cached” is two times this size, and this is where a tweet is too short to explain. This is actually wrong, except that this is exactly what is reported by `free` or /proc/meminfo in the “cache” metric. When you read 1GB you will not have 2GB cached from the file reads. However, if shared_buffers is large enough, you will have 1GB in file cache and 1GB in shared memory, and both are reported by the “cached” value, even when `free`also reports the `shared` part independently. And that’s why in this tweet, I have put the green bars behind the yellow ones, rather than on top: “cached” includes “shared”

The basic Linux metrics are misleading, and many people read them without really knowing what they measure. I encourage everyone to read the docs and look at small specific test cases to get a better understanding. Here is one on PostgreSQL.


sudo yum install -y gcc readline-devel zlib-devel bison bison-devel flex
git clone --branch REL_13_STABLE https://github.com/postgres/postgres.git
( cd postgres && ./configure --enable-debug && make &&sudo make install && cd contrib && sudo make install )

I’ve installed PostgreSQL in my lab, from the source because I often want to have the debug symbols.


git clone  https://github.com/yazgoo/linux-ftools
( cd linux-ftools/ && ./configure && make && sudo make install )

I’ve installed ftools which have an interesting fincore utility to show how files are mapped in the filesystem cache


/usr/local/pgsql/bin/pg_ctl initdb -D ~/pgdata
/usr/local/pgsql/bin/pg_ctl -D ~/pgdata -l pglog start
/usr/local/pgsql/bin/pgbench -i -s 42 postgres
/usr/local/pgsql/bin/psql postgres <<<" create extension pg_prewarm; "

I’ve created a PostgreSQL database, initialized a pgbench schema with scale=42 (about 630 MB) and installed the pg_prewarm extension to load quickly a table in cache.


[opc@instance-20210203-1009 ~]$ df -h pgdata
652M    pgdata/base

[opc@instance-20210203-1009 ~]$ grep ^shared pgdata/postgresql.conf
shared_buffers = 900MB
shared_memory_type = mmap

I allocated 900MB of shared buffers.

Important point: I have not allocated huge pages here. All metrics displayed here (with `free`) are about small pages. The shared_buffers allocated in huge page are not counted in the “shared” metric. I have an older blog post about this.


[opc@instance-20210203-1009 ~]$ /usr/local/pgsql/bin/pg_ctl -D ~/pgdata -l pglog stop
waiting for server to shut down.... done
server stopped

[opc@instance-20210203-1009 ~]$ sudo su << "/proc/sys/vm/drop_caches"'

[opc@instance-20210203-1009 ~]$ free -mw
              total        used        free      shared     buffers       cache   available
Mem:          14714        3443       11061          33           0         209       10989
Swap:          8191        3061        5130

With the instance stopped, and sync’d and flushed, I have nearly no shared memory used in this system, 209M cached and 10GB free.


[opc@instance-20210203-1009 ~]$ /usr/local/pgsql/bin/pg_ctl -D ~/pgdata -l pglog start
waiting for server to start.... done
server started

[opc@instance-20210203-1009 ~]$ free -mw
              total        used        free      shared     buffers       cache   available
Mem:          14714        3446       11005          72           0         261       10940
Swap:          8191        3061        5130

With the instance started, nothing changes. Because Linux does lazy allocation for SHM: shared buffers will be allocated when used, so only very little is there for other areas.


[opc@instance-20210203-1009 ~]$ /usr/local/pgsql/bin/psql postgres <<<" select pg_size_pretty(current_setting('block_size')::int*pg_prewarm('pgbench_accounts','buffer')); "

 pg_size_pretty
----------------
 538 MB
(1 row)

[opc@instance-20210203-1009 ~]$ free -mw
              total        used        free      shared     buffers       cache   available
Mem:          14714        3448        9917         611           0        1348       10378
Swap:          8191        3061        5130

I loaded the 538MB of pgbench_account table. It was first read to the filesystem cache, increasing to “cache” with this size, and copied from there to the shared buffer cache. As it fits there, the “shared” size is now raised from 72M to 611M. However, because “cache” includes “share” it shows 1.3G but a more interesting number is “available” which decreased by 562 because the shared buffers cannot be reclaimed, but the file cache can be reclaimed, once synced, if physical memory is needed.

That’s the specificity of PostgreSQL. A shared memory segment is allocated in userspace to manage concurrent writes to the pages, and read them from this shared buffer cache for frequently read data. But, contrary to most RDBMS, no further optimization is done here in the RDBMS code (like prefetching for reads, reordering for writes). This means that we must have sufficient available space for the filesystem cache where those optimization will happen in the kernel space. The frequently read data which does not fit in shared_buffers should be cached there. And the pages written to the shared_buffer should be filesystem cache hits at checkpoint time. That’s PostgreSQL double buffering and it is visible in the “cache” value, where both are accounted.

In order to get better predictability of performance, it is very important to understand what is in filesystem cache and there’s a utility that can help. I installed linux-ftools above, and here is linux-fincore to get a summary of cached files:


[opc@instance-20210203-1009 ~]$ linux-fincore -s $(find pgdata/base -type f) | grep ^total

total cached size: 565,534,720

Here are my 539MB of data. Unfortunately, you need to pass the file list you want to check. That’s why I start to look at the total only, in order to be sure that my set of file are representative of what I find in the filesystem cache. Here, from all files under PGDATA I have 539MB in cache and I know this is the size I’ve read.


[opc@instance-20210203-1009 ~]$ linux-fincore -s -S 1048576  $(find pgdata/base -type f)

filename                               size        total_pages    min_cached page       cached_pages        cached_size        cached_perc
--------                               ----        -----------    ---------------       ------------        -----------        -----------
pgdata/base/13581/16438         564,043,776            137,706                  0            137,706        564,043,776             100.00
pgdata/base/13581/16446          94,363,648             23,038                 -1                  0                  0               0.00
---
total cached size: 564,043,776

I show the detail here, only for files with more than 1MB in cache. And of course, this can be joined with the file path within the data directory:


[opc@instance-20210203-1009 ~]$ \
/usr/local/pgsql/bin/psql postgres <<<" select relname,relkind,current_setting('block_size')::int*relpages/1024/1024 as size_MB,current_setting('block_size')::int*buffers/1024/1024 as shared_mb,relfilenode,current_setting('data_directory')||'/'||pg_relation_filepath(oid) as file_path from pg_class c left outer join (select relfilenode, count(*) as buffers from pg_buffercache group by relfilenode) b using(relfilenode) where relpages>100;" | awk '/[/]base[/]/{"linux-fincore -s "$NF"* | grep ^total | cut -d: -f2" | getline f;printf "%6dM %s\n",gensub(/,/,"","g",f)/1024/1024,$0;next}{printf "%6s  %s\n","",$0}'


                relname        | relkind | size_mb | shared_mb | relfilenode |             file_path
        -----------------------+---------+---------+-----------+-------------+-----------------------------------
   537M  pgbench_accounts      | r       |     537 |       537 |       16438 | /home/opc/pgdata/base/13581/16438
     0M  pgbench_accounts_pkey | i       |      89 |           |       16446 | /home/opc/pgdata/base/13581/16446

        (2 rows)

This is a quick and dirty one-liner to get the size in filesystem, with the total size and size in shared_buffers (thanks to the pg_buffercache extension) for objects with more than 100 pages.


[opc@instance-20210203-1009 ~]$ sudo su << "/proc/sys/vm/drop_caches"'    

[opc@instance-20210203-1009 ~]$ free -mw
              total        used        free      shared     buffers       cache   available
Mem:          14714        3478       10438         612           0         797       10370
Swap:          8191        3040        5151

I flushed the cache (don’t do that in production!) and only the shared memory remains (mostly)


[opc@instance-20210203-1009 ~]$ /usr/local/pgsql/bin/pg_ctl -D ~/pgdata -l pglog stop                                                                         waiting for server to shut down.... done
server stopped
[opc@instance-20210203-1009 ~]$ free -mw
              total        used        free      shared     buffers       cache   available
Mem:          14714        3477       11009          34           0         227       10945
Swap:          8191        3040        5151

When the PostgreSQL instance is stopped the shared memory is released.

You may wonder what are those 227M that are still in cache. I have many things running in this lab, but let’s check:


[opc@instance-20210203-1009 ~]$ find / -type f -exec linux-fincore {} \; 2>/dev/null |  awk '/^[/]/{gsub(/,/,"");m=$(NF-1)/1024/1024;gsub(/  */," ");if(m>1)printf "%10d MB %s\n",m,$0}' | sort -h | tee all.log | sort -n | tail -10

        73 MB /var/cache/yum/x86_64/7Server/ol7_developer_EPEL/gen/primary_db.sqlite 76955648 18788 0 18788 76955648 100.00
        75 MB /home/opc/simulator_19.9.0.0.0/portainer_image.tar 78691328 19212 0 19212 78692352 100.00
        83 MB /usr/bin/dockerd 87196536 21289 0 21289 87199744 100.00
        93 MB /home/opc/simulator_19.9.0.0.0/jre/lib/amd64/libjfxwebkit.so 97667680 23845 0 23845 97669120 100.00
       102 MB /usr/lib/locale/locale-archive 107680160 26290 0 26290 107683840 100.00
       104 MB /var/lib/rpm/Packages 109428736 26716 0 26716 109428736 100.00
       189 MB /var/cache/yum/x86_64/7Server/ol7_latest/gen/primary_db.sqlite 198237184 48398 0 48398 198238208 100.00
       224 MB /home/opc/simulator_19.9.0.0.0/oda_simulator.tar.gz 235565495 57512 0 57512 235569152 100.00
       229 MB /home/opc/simulator_19.9.0.0.0/oraclelinux_image.tar 240947200 58825 0 58825 240947200 100.00
       486 MB /home/opc/pgdata/base/13581/16438 564043776 137706 1969 124652 510574592 90.52

This took a while but shows which files are in cache. Those .tar and .tar.gz seems to be related to my previous blog post on ODA Simulator and are docker bind mounts. However, lsof and fuser shows me that they are not used. I didn’t spend lot of time on this but I don’t know how to get them out of the cache.

However, back to the topic and now that the “cache” metric is understood, here is the initial test I did with pgbench:

All is run with shared_buffers=4GB. The values displayed as orange and green areas are the increase of size, in MB, after the pgbench run, values taken from `free -wm`. When scale is less than 70, the size of pg_bench database is 1054MB (yellow), I see no additional SHM allocated (orange) and the filesystem “cached” (green) increases by the size read from files. Then, when scale increases to 270 the SHM allocates memory to fit those pages in shared_buffers (orange). The “cached” (green) includes the SHM and shows the filesystem cached. Above the 280 scale, the SHM doesn’t goes higher because we reached the 4GB of shared_buffer. There is still free memory at OS level and then the “cache” increases with the size of data read. I’ve also added the performance metric “tps” – transactions per seconds. Running this select-only workload on a scale that fits in shared_buffers shows constant performance (about 13500 tps here in single thread). It decreases slowly when there’s some pages to copy from the filesystem cache. And when I reach a scale that doesn’t fit in physical RAM, physical reads are involved and tps gets much lower. I have 14GB of RAM here and I reach this point at scale 570 with 8GB of frequently read data to fit in addition to the 4GB of shared_buffers.

This illustrates the behavior of PostgreSQL double buffering. You should have an idea about the frequently read data that you want to fit in shared_buffers for maximum performance. And the additional size that must be available in physical memory to avoid I/O latencies. This is select-only workload. Now imagine that 10% of this data is updated… new tuples, new pages, in shared_buffers, checkpointed to the filesystem cache, synced, and the related WAL also goes there, usually with full page logging. You need a lot of RAM. And looking at pgbench results without knowing those sizes is meaningless. And looking at OS metrics is a must, given that the understanding goes beyond a guess from the name.

Cet article PostgreSQL on Linux: what is cached? est apparu en premier sur Blog dbi services.

First steps on Kusto Query Language (KQL)

$
0
0

Do you know this query language?  No, it’s time to explain you and see what it is.


“A Kusto query is a read-only request to process data and return results.” dixit Microsoft Documentation here

The KQL is very simple to understand and use. I can do it then you can also do it! 😛

The first thing to know is how to call the information on a table.

In this case you  need to call the table directly with the name of the table, in the place to do a SELECT * FROM Table.

Microsoft give us the opportunity to test it directly on Azure Data Explorer here

In my example, I will use the table Covid19 and I just write the name of the table to have all information:

Using the pipe (|) delimiter, I add filters, transformations etc…

My first test is to add a clause WHERE in the query:

Covid19

| where CountryCode == 'CH'


I have all rows for Switzerland now.

When you begin, i advise you to take a look on the query best practices page and have directly the good practice here.

To filter on some columns, you need to add “Project” in the query:

Covid19
| where CountryCode == 'CH'
| project Timestamp, Country, Confirmed, Deaths

The next step is to order the result and it’s easy with an “order by”

Covid19
| where CountryCode == 'CH'
| project Timestamp, Country, Confirmed, Deaths
| order by Deaths desc

Very easy, it’s it!

The last step for this first approach is to present the result in a graph.

For this step, you will use the command render and with the intellisense, you have a lot of possibility

I choose the TimeChart to have the progression during the period:

Covid19
| where CountryCode == 'CH'
| project Timestamp, Country, Confirmed, Deaths
| order by Deaths desc 
| render timechart

Et voila, I do my first step in KQL!

Easy to understand, easy to learn, easy to use, easy to have a quick overview of your data…


Cet article First steps on Kusto Query Language (KQL) est apparu en premier sur Blog dbi services.

SUSE Manager 4.1 – installation

$
0
0

What if you need absolute control over maintenance and package deployment or if you need to keep them up to date or if
you need to automate the software management and the system provisioning with a high level of security,
SUSE Manager is the right tool you need.
In this blog post I will describe how to install the latest version of SUSE Manager 4.1.

Introduction

SUSE Manager 4.1, based on SLES 15 SP2, is the latest release of a solution that manage large sets of Linux systems,
enables you to deploy, configure, and maintain your systems across physical, virtual, and cloud environments.
It delivers a best-in-class open source infrastructure management and automation solution that lowers costs,
enhances availability and reduces complexity.

Prerequisite

Following are the requirements needed before the installation?
– The SCC (SUSE Customer Credentials)
– The unified installer, you can download it by following this link:
https://download.suse.com/index.jsp?product_id=&search=Search&families=22609&version=68287
– A supported browser for the Web UI.
Personally, I recommend to use Firefox, Chrome can also be used but don’t use Internet Explorer.
– From the server side, a 4 dedicated CPU cores is a minimum. For the Ram, SUSE recommends 32Gb, 64Gb is optimal.
– For the disk space, following volumes on different mount points should be setup:
– SUSE OS, 40Gb
– Postgres database, 60Gb
– Spacewalk repository: here it depends on your subscriptions, for every SUSE product as:
12 SP4, 12 SP15, 15SP1,15SP2, count a minimum of 50Gb but a minimum of 300 Gb for every Red Hat product.
An additional volume of 20Gb where packages are cached should be setup.
– From the network side, a FQDN (Fully Qualified Domain Name) is mandatory. If SUSE Manager can’t resolve it
correctly, it can cause serious problems for some components.
Concerning the list of ports to be open, the picture below shows the main ports used in SUSE Manager.

Installation

For your installation, you should respect the following order:
– 1 – Boot the system with the Unified installer (SLE-15-SP2-Full-x86-GM-Media1.iso) et validate the installation in the first window.

– 2 – Select English (Us) as Language, English (US) for the keyboard layout and “SUSE Manager Server 4.1” as product to install.

– 3 – Then, in the next window, configure the network and register the System using your Suse Customer Credentials.

– 4 – Skip the “Extension and Module Selection” and the “Add On Product” windows as not needed.
– 5 – On the System role window, select the Suse Manager Server (multiple disks).
– 6 – On the suggested Partitioning screen, customize it by clicking on [Expert Partitioner].
One Volume Group with one logical volume for the following mount points:
– /root
– /var/lib/posgresSQL
– /var/lib/Spacewalk
You have to respect scrupulously these mount points otherwise it will cause problems during the installation.

– 7 – Set then the Clock and Time zone but also the NTP Server by clicking on the “other settings” option to configure it.
– 8 – Create the Admin and root user.
– 9 – When reviewing the Installation settings, you can, if you want, enable the Graphical Desktop Environment. If everything is Ok, click on [Install]

When the installation is over, you can check all installed modules by using the following command:
suma4srv:~ # SUSEConnect --status-text
Installed Products:
------------------------------------------
SUSE Manager Server 4.1
(SUSE-Manager-Server/4.1/x86_64)
Registered
Subscription:
Regcode: XXXXXXXXXXXXXX
Starts at: 2020-12-21 00:00:00 UTC
Expires at: 2021-04-21 00:00:00 UTC
Status: ACTIVE
Type: evaluation
------------------------------------------
Basesystem Module
(sle-module-basesystem/15.2/x86_64)
Registered
------------------------------------------
Python 2 Module
(sle-module-python2/15.2/x86_64)
Registered
------------------------------------------
Server Applications Module
(sle-module-server-applications/15.2/x86_64)
Registered
------------------------------------------
Web and Scripting Module
(sle-module-web-scripting/15.2/x86_64)
Registered
------------------------------------------
SUSE Manager Server 4.1 Module
(sle-module-suse-manager-server/4.1/x86_64)

Conclusion

This was the first blog post of a serie and in a second blog I will detail the following steps needed to make your SUSE Manager 4.1 environment ready to use.

Cet article SUSE Manager 4.1 – installation est apparu en premier sur Blog dbi services.

JENKINS – Introduction to pipelines

$
0
0

Hi,

We already know how to create a build on Jenkins using freestyle job, it’s a quick way to make a job, but what happened when we want to have complex tasks and workflow to trigger?

Freestyle job limitation

Indeed ,it’s still possible to chain these builds to get a sophisticated workflow,but freestyle jobs are limited by many ways :
-the builds will not survive a restart of Jenkins
-freestyle job is only based on GUI configuration and not as code
-it is also working on sequential steps and can not be resumed at a particular step of the build.
We have an easier way to perform that workflow and to manage it from the beginning to the end :Using Pipelines

What is a pipeline?

A Pipeline is a user-defined model of a CD pipeline. A Pipeline’s code defines your entire build process, which typically includes stages for building an application, testing it and then delivering it.
Also, a pipeline block is a key part of Declarative Pipeline syntax.

Some vocabulary related to pipeline

Jenkins file
It’s a text file written in Groovy language containing the code of all your workflow,it is stored into a SCM like GitHub for example and can be updated by many ways as using Jenkins master UI or directly from the SCM with a text editor. As it is centralized it allows developers an easy to access it to edit update and check it.
SCM
Source code management,tracks changes of your code stored in a source code repository ,example git or mercurial,it allows you to store a Jenkinsfile and your code on it and to update it from one single point.

Pipeline structure components

  • Pipeline is structured in sections, called stages
  • Each stage includes steps
  • steps include the actual tests/commands to run
  • An agent defines where the programs and scripts execute

Node
A node is a machine which is part of the Jenkins environment and is capable of executing a Pipeline.
Also, a node block is a key part of Scripted Pipeline syntax.
Stage
A stage block defines a conceptually distinct subset of tasks performed through the entire Pipeline (e.g. “Build”, “Test” and “Deploy” stages), which is used by many plugins to visualize or present Jenkins Pipeline status/progress.
Step
A single task. Fundamentally, a step tells Jenkins what to do at a particular point in time (or “step” in the process). For example, to execute the shell command make use the sh step: sh ‘make’. When a plugin extends the Pipeline DSL, that typically means the plugin has implemented a new step

Two types of pipelines

  • Scripted pipeline: sequential execution, using Groovy expressions for flow control
  • Declarative pipeline: uses a framework to control execution ( pre-defined commands to ease pipeline creation )

Scripted pipeline

The scripted pipeline is a traditional way of writing the Jenkins pipeline as code. Ideally, a Scripted pipeline is written in the Jenkins file on the web UI of Jenkins. Unlike the Declarative pipeline, the scripted pipeline strictly uses groovy based syntax. Since this, The scripted pipeline provides huge control over the script and can manipulate the flow of the script extensively. This helps developers to develop advance and complex pipelines as code.

  • Executed serially, from top down
  • Relies on Groovy expressions for flow control
    • Requires extensive knowledge of Groovy syntax
  • Very flexible and extensible
    • Limitations are mostly Groovy limitations
    • Power users with complex requirements may need it
  • Novice users can easily mess up the syntax

pipeline as code syntax /scripted Pipeline

node {  
    stage('Build') { 
        // 
    }
    stage('Test') { 
        // 
    }
    stage('Deploy') { 
        // 
    }
}

quick example using scripted pipeline skeleton

how to check pipeline log execution

scripted pipeline output

you can check each steps of the pipeline by clicking on the log tab

Declarative pipeline

The Declarative pipeline is a new feature that is added to create the pipeline. The workflow is written in a Jenkins file which can be stored into a source code management system such as Git. Declarative pipelines role is to help developer to  create simple and quick  continuous delivery pipeline using a set of  pre-defined commands

  • Stricter, pre-defined structure
  • Execution can always be resumed after an interruption,
    no matter what caused the interruption
  • Requires only limited knowledge of Groovy syntax
    • Using Blue Ocean simplifies the Pipeline creation process even more( will be a specific topic in next blogs )
  • Encourages a declarative programming model
  • Reduces the risk of syntax errors
  • Use the script step to include bits of scripted code within a Declarative Pipeline only when you have needs that are beyond the capabilities of Declarative syntax

declarative pipeline syntax

Jenkinsfile (Declarative Pipeline)
pipeline {
    agent any 
    stages {
        stage('Build') { 
            steps {
                // 
            }
        }
        stage('Test') { 
            steps {
                // 
            }
        }
        stage('Deploy') { 
            steps {
                // 
            }
        }
    }
}

You can store your Jenkinsfile with all your codes in SCM and call them in Jenkins master jobs (in next blog we will go deeper in this topic)

Note that you can update the Jenkinsfile directly with a text editor in Github (for my case)

Conclusion

Now we know the pipeline concept and the two types of pipeline that can be used , one needing more scripting skills and the other with pre-defined commands to ease the conception.
Next time we will focus on how to create a declarative pipeline using blue ocean
Feel free to check the dbi blogger site for more tips and tricks 😉 and also for Jenkins you have loads of info on Cloudbees site and on https://www.jenkins.io/

Cet article JENKINS – Introduction to pipelines est apparu en premier sur Blog dbi services.

PostgreSQL on FreeBSD, getting started

$
0
0

Although we are running PostgreSQL mostly on Linux distributions, you can install an run PostgreSQL on a lot of other operating systems. On of them is FreeBSD. FreeBSD is one of those Unixes that derived from the Berkeley Software Distribution (BSD) and it is well known for having very few security issues and it is running a wide range of websites today. In addition, it is the foundation of storage appliances such as Isilon. Running PostgreSQL on FreeBSD is not rocket science and in this post we’ll go through the basics: Installing FreeBSD. In the follow up posts we’ll configure networking, update the system and then install PostgreSQL from pre-build packages and from source.

To make it reproducible for everyone, we’ll be using VirtualBox as the virtualization layer. Obviously you’ll need to download the FreeBSD ISO file for being able to install it. Once you have it downloaded, head over to VirtualBox and create the virtual machine:


As this is a server setup I usually disable features which are not required:

We do not need USB support:

We don’t need audio:

A more general tip regarding VirtualBox is this: I usually configure one NAT interface for connecting to the internet:

In addition I use a second interface for connecting to the virtual machine using the host only network adapter:

That’s it for the basic configuration. We can go ahead and start the virtual machine:


.. and here we go with the installation of FreeBSD:

As usual you need to specify the keyboard layout:


Of course there needs to be a hostname:

The FreeBSD ports tree makes it easy to install additional software, so, please do yourself a favor and enable it:

Next is the file system selection and as ZFS comes with a lot of features, go with it:

The defaults are fine for the scope of this post:


… and the installation starts:

Once it is completed and you specified the root password you need to configure the network interfaces. As mentioned earlier I usually go with two interfaces: “em0” is my NAT interface and “em1” is my host only interface:

IPv4 for the NAT interface is fine:

DHCP as well is fine as VirtualBox will take care of it for the NAT interface:

We don’t need IPv6:

Provide a hostname (the DNS server should be automatic, otherwise specify a valid one):

Specify your timezone:


We do not need anything more than ssh and ntp, so the defaults are fine for the services:

As we’ll not go into security details, just go ahead in the next screen:

We’ll add users later, so just skip this for now:

That’s it for the installation, go ahaed and reboot the system:


Make sure that the ISO you booted off is not anymore attached to the VMs optical drive. FreeBSD should come up quite fast:

That’s it for today. FreeBSD is up and running. In the next post we’ll configure the second network interface, update the system and install PostgreSQL from pre-build packages.

Cet article PostgreSQL on FreeBSD, getting started est apparu en premier sur Blog dbi services.

Grafana, SQL and IN() list for multi-value variable

$
0
0

By Franck Pachot

.
I’ve recently looked at Grafana. Pros: it is really nice, I mean aesthetically. If you want to build a dashboard for your boss, or put it on a large screen in the open space, that’s beautiful. Cons: not mature. I’m working for years with technology that works. When I have a problem, I find the solution (blog posts, forums, mailing lists, support notes)… But with modern software, the first problems I encounter have a dead end in unresolved git issues. And I’m actually spending more time in finding workarounds than solving problems. Yes, Grafana is nice but is very far from what I can do with Excel in 5 minutes. However, when I find a workaround, I publish it to help others and hopefully find someone who has a better solution, so please leave a comment if what I do there is completely silly.

The problem to solve: IN() list in SQL from a multi-value variable

For this example I’ve created a PostgreSQL database in Google Cloud SQL, loaded sample data from Gerald Venzl and a free grafana cloud service. My goal is to get something like that where I can choose one, many, all or no country at all:

I can query the list of countries as:


select country_id __value , name __text from countries order by 2

I alias my columns with “__value” and “__text” to show the country name to the user but get the country code from what she selected.

So I’ve created the Grafana variable with this query, and selected “Multi-value” and “Include All option” to let the user chose any combination:

Now, let’s try to use this variable, that I called “mylist” for the demo, in a SQL statement:


select * from cities where country_id in ($mylist)

I’ll show the query generated for the different user combinations


select * from cities where country_id in ('AND','ARE','AFG','ATG','ALB','ARM','AGO','ARG','AUT','AUS','AZE','BIH','BRB','BGD','BEL','BFA','BGR','BHR','BDI','BEN','BRN','BOL','BRA','BHS','BTN','BWA','BLR','BLZ','CAN','COD','CAF','COG','CHE','CIV','CHL','CMR','CHN','COL','CRI','CUB','CPV','CYP','CZE','DEU','DJI','DNK','DMA','DOM','DZA','ECU','EST','EGY','ERI','ESP','ETH','FIN','FJI','FSM','FRA','GAB','GBR','GRD','GEO','GHA','GMB','GIN','GNQ','GRC','GTM','GNB','GUY','HND','HRV','HTI','HUN','IDN','IRL','ISR','IND','IRQ','IRN','ISL','ITA','JAM','JOR','JPN','KEN','KGZ','KHM','KIR','COM','KNA','PRK','KOR','KWT','KAZ','LAO','LBN','LCA','LIE','LKA','LBR','LSO','LTU','LUX','LVA','LBY','MAR','MCO','MDA','MNE','MDG','MHL','MKD','MLI','MMR','MNG','MRT','MLT','MUS','MDV','MWI','MEX','MYS','MOZ','NAM','NER','NGA','NIC','NLD','NOR','NPL','NRU','NZL','OMN','PAN','PER','PNG','PHL','PAK','POL','PRT','PLW','PRY','QAT','ROU','SRB','RUS','RWA','SAU','SLB','SYC','SDN','SWE','SGP','SVN','SVK','SLE','SMR','SEN','SOM','SUR','SSD','STP','SLV','SYR','SWZ','TCD','TGO','THA','TJK','TLS','TKM','TUN','TON','TUR','TTO','TUV','TWN','TZA','UKR','UGA','USA','URY','UZB','VAT','VCT','VEN','VNM','VUT','WSM','XKX','YEM','ZAF','ZMB','ZWE')

This is what I have when the user selects “All” and that’s correct.


select * from cities where country_id in ('BEL','NLD','LUX')

This is what I get when the user selects some countries,and this again is correct.


select * from cities where country_id in ()

This is what I get when the user selects nothing. And I see no option in Grafana variables to disable this possibility. This is an invalid SQL syntax and gets, in PostgreSQL: pq: syntax error at or near “)”, MySQL would show: You have an error in your SQL syntax; check the manual that corresponds to your MySQL server version for the right syntax to use near ‘)’ at line 1, Oracle would show: ORA-00936: missing expression, SQL Server would show: Incorrect syntax near ‘)’. Grafana colorful charts are now less appealing when we get an non-user-friendly message like this. I need a workaround.

Not so advanced formats

I checked the “Advanced variable format options” with the hope that “advanced” options should have a format for the most common data query language which is SQL. But not. You have CSV, OpenTSDB, Doublequote, Graphite, JSON, Elasticsearch, Percentencode, Pipe, Raw, Regex, Singlequote, Sqlstring, Text, URL formats, but nothing about SQL! Yes, SQL can filter on regexp but I want index access, partition pruning which are possible with equality or IN() lists only.

Nested variables and SQL transformation

Here is my workaround. I’ve created a second variable, that will be hidden, to build the IN() list from the list of value. And because I have a SQL engine, I’ll use it to do the transformation:


select case when length($$${mylist:singlequote}$$)>0 then $$ in ($mylist:singlequote) $$ else ' is null ' end

Here I expand the previous variable with the “singlequote” format, which is the default for SQL queries. But I encapsulate it in a CASE statement. When the list is not empty, my variable builds the IN(…) list but when it is empty I choose to replace it with a IS NULL to let the user select unknown values. Of course you can decide the behaviour with a predicate that is always true or false.

Then here is my dashboard panel query:


select * from cities where country_id ${mylist_sql:raw}

which expands to the same as when I used ${mylist} when the user chooses one, many, or all values.

But when the user selects nothing:


select * from cities where country_id is null

No error and the behavior I’ve chosen. Here no rows with no work because the optimizer knows that the primary key cannot be null.

Cet article Grafana, SQL and IN() list for multi-value variable est apparu en premier sur Blog dbi services.

PostgreSQL on FreeBSD, updating & configuration

$
0
0

In the last post we installed FreeBSD, configured the keyboard, time zone and the first network interface, which gets it’s IP address via DHCP. In this post we’ll look at how we can configure the second interface, which gets a static IP address in the host only network. Once we’ve done that, we’ll update the system to the latest packages, have a look at the file system layout and kernel parameters so we can later on proceed with installing PostgreSQL.

Currently we only have the NAT interface configured. We could start working with the system in the VirtualBox console:

You’ll quickly notice that this is not much fun as the size of the terminal is fixed, rather small, and copy&paste is not working. Using a remote SSH connection is more convenient and we can already do that by using port forwarding with the NAT interface:


Having that ready we can connect with SSH:

dwe@ltdwe:~$ ssh -o Port=4444 root@localhost
The authenticity of host '[localhost]:4444 ([127.0.0.1]:4444)' can't be established.
ECDSA key fingerprint is SHA256:aq6Eb4lW5rDz+BTR9cLrK6uXiIqhSNuLBhYVH5w+f/o.
Are you sure you want to continue connecting (yes/no/[fingerprint])? yes
Warning: Permanently added '[localhost]:4444' (ECDSA) to the list of known hosts.
Password for root@freebsd.it.dbi-services.com:

Even if the password is correct, we’ll not be able to connect as root, as logins over ssh with root are not allowed. So, back to the console:

This is of course nothing you should do with serious installations, but for testing it is fine. Restarting services in FreeBSD is done with the “service” command:

From now on the SSH connection will accept root logins:

dwe@ltdwe:~$ ssh -o Port=4444 root@localhost
Password for root@freebsd.it.dbi-services.com:
Last login: Thu Feb 18 22:42:21 2021
FreeBSD 12.2-RELEASE r366954 GENERIC 

Welcome to FreeBSD!

Release Notes, Errata: https://www.FreeBSD.org/releases/
Security Advisories:   https://www.FreeBSD.org/security/
FreeBSD Handbook:      https://www.FreeBSD.org/handbook/
FreeBSD FAQ:           https://www.FreeBSD.org/faq/
Questions List: https://lists.FreeBSD.org/mailman/listinfo/freebsd-questions/
FreeBSD Forums:        https://forums.FreeBSD.org/

Documents installed with the system are in the /usr/local/share/doc/freebsd/
directory, or can be installed later with:  pkg install en-freebsd-doc
For other languages, replace "en" with a language code like de or fr.

Show the version of FreeBSD installed:  freebsd-version ; uname -a
Please include that output and any error messages when posting questions.
Introduction to manual pages:  man man
FreeBSD directory layout:      man hier

Edit /etc/motd to change this login announcement.
root@freebsd:~ $ 

That SSH is actually started when the system is booting, is controlled by rc.conf:

root@freebsd:~ $ cat /etc/rc.conf
hostname="freebsd.it.dbi-services.com"
keymap="ch.kbd"
ifconfig_em0="DHCP"
sshd_enable="YES"
ntpd_enable="YES"
# Set dumpdev to "AUTO" to enable crash dumps, "NO" to disable
dumpdev="AUTO"
zfs_enable="YES"

Remember, we are not on Linux, there is no systemd, so everything is configured in plain files. Now, that we are logged in, lets bring the system to the latest packages. To do this in FreeBSD, there is the “freebsd-update” command. The first step is to fetch the updates (which will give you a list of files that will be updated), the second step is to actually install the updates:

root@freebsd:~ # freebsd-update fetch
src component not installed, skipped
Looking up update.FreeBSD.org mirrors... none found.
Fetching public key from update.FreeBSD.org... done.
Fetching metadata signature for 12.2-RELEASE from update.FreeBSD.org... done.
Fetching metadata index... done.
Fetching 2 metadata files... done.
Inspecting system... done.
Preparing to download files... done.
Fetching 91 patches.....10....20....30....40....50....60....70....80....90 done.
Applying patches... done.
The following files will be updated as part of updating to
12.2-RELEASE-p3:
/bin/freebsd-version
/boot/kernel/autofs.ko
/boot/kernel/kernel
/boot/kernel/linux.ko
/boot/kernel/linux64.ko
/boot/kernel/mqueuefs.ko
...
root@freebsd:~ # freebsd-update install
src component not installed, skipped
Installing updates...Scanning //usr/share/certs/blacklisted for certificates...
Scanning //usr/share/certs/trusted for certificates...
 done.

Time to configure our second interface. To get the name of the interfaces there is “ifconfig”:

root@freebsd:~ # ifconfig -a
em0: flags=8843 metric 0 mtu 1500
        options=81009b
        ether 08:00:27:c1:d7:d6
        inet 10.0.2.15 netmask 0xffffff00 broadcast 10.0.2.255
        media: Ethernet autoselect (1000baseT )
        status: active
        nd6 options=29
em1: flags=8802 metric 0 mtu 1500
        options=81009b
        ether 08:00:27:39:4e:9a
        media: Ethernet autoselect (1000baseT )
        status: active
        nd6 options=29
lo0: flags=8049 metric 0 mtu 16384
        options=680003
        inet6 ::1 prefixlen 128
        inet6 fe80::1%lo0 prefixlen 64 scopeid 0x3
        inet 127.0.0.1 netmask 0xff000000
        groups: lo
        nd6 options=21

The first one (em0) is our NAT interface, the second on (em1) is the one attached to the host only network. Configuring network interfaces is also done via /etc/rc.conf:

hostname="freebsd.it.dbi-services.com"
keymap="ch.kbd"
ifconfig_em0="DHCP"
ifconfig_em1="inet 192.168.22.17 netmask 255.255.255.0"
sshd_enable="YES"
ntpd_enable="YES"
# Set dumpdev to "AUTO" to enable crash dumps, "NO" to disable
dumpdev="AUTO"
zfs_enable="YES"

Once you restarted the network, the second interface is ready:

root@freebsd:~ # service netif restart
Stopping dhclient.
Stopping Network: lo0 em0 em1.
lo0: flags=8048 metric 0 mtu 16384
        options=680003
        groups: lo
        nd6 options=21
em0: flags=8c02 metric 0 mtu 1500
        options=81009b
        ether 08:00:27:c1:d7:d6
        media: Ethernet autoselect (1000baseT )
        status: active
        nd6 options=29
em1: flags=8c02 metric 0 mtu 1500
        options=81009b
        ether 08:00:27:39:4e:9a
        media: Ethernet autoselect (1000baseT )
        status: active
        nd6 options=29
Starting Network: lo0 em0 em1.
lo0: flags=8049 metric 0 mtu 16384
        options=680003
        inet6 ::1 prefixlen 128
        inet6 fe80::1%lo0 prefixlen 64 scopeid 0x3
        inet 127.0.0.1 netmask 0xff000000
        groups: lo
        nd6 options=21
em0: flags=8843 metric 0 mtu 1500
        options=81009b
        ether 08:00:27:c1:d7:d6
        inet 10.0.2.15 netmask 0xffffff00 broadcast 10.0.2.255
        media: Ethernet autoselect (1000baseT )
        status: active
        nd6 options=29
em1: flags=8843 metric 0 mtu 1500
        options=81009b
        ether 08:00:27:39:4e:9a
        inet 192.168.22.17 netmask 0xffffff00 broadcast 192.168.22.255
        media: Ethernet autoselect (1000baseT )
        status: active
        nd6 options=29

Port forwarding to the NAT interface is not anymore required from now on, as you can directly connect to the second interface:

dwe@ltdwe:~$ ssh root@192.168.22.17
The authenticity of host '192.168.22.17 (192.168.22.17)' can't be established.
ECDSA key fingerprint is SHA256:aq6Eb4lW5rDz+BTR9cLrK6uXiIqhSNuLBhYVH5w+f/o.
Are you sure you want to continue connecting (yes/no/[fingerprint])? yes
Warning: Permanently added '192.168.22.17' (ECDSA) to the list of known hosts.
Password for root@freebsd.it.dbi-services.com:
Last login: Thu Feb 18 23:29:46 2021 from 10.0.2.2
FreeBSD 12.2-RELEASE r366954 GENERIC 

Welcome to FreeBSD!

Release Notes, Errata: https://www.FreeBSD.org/releases/
Security Advisories:   https://www.FreeBSD.org/security/
FreeBSD Handbook:      https://www.FreeBSD.org/handbook/
FreeBSD FAQ:           https://www.FreeBSD.org/faq/
Questions List: https://lists.FreeBSD.org/mailman/listinfo/freebsd-questions/
FreeBSD Forums:        https://forums.FreeBSD.org/

Documents installed with the system are in the /usr/local/share/doc/freebsd/
directory, or can be installed later with:  pkg install en-freebsd-doc
For other languages, replace "en" with a language code like de or fr.

Show the version of FreeBSD installed:  freebsd-version ; uname -a
Please include that output and any error messages when posting questions.
Introduction to manual pages:  man man
FreeBSD directory layout:      man hier

Edit /etc/motd to change this login announcement.

I really like how easy it is to configure the network. One line in the correct file, and you’re done.

When we installed FreeBSD in the last post, we opted for ZFS as the file system, and this is how it looks like:

root@freebsd:~ $ df -h
Filesystem            Size    Used   Avail Capacity  Mounted on
zroot/ROOT/default     26G    1.1G     25G     4%    /
devfs                 1.0K    1.0K      0B   100%    /dev
zroot/tmp              25G     96K     25G     0%    /tmp
zroot                  25G     96K     25G     0%    /zroot
zroot/usr/home         25G     96K     25G     0%    /usr/home
zroot/usr/src          25G     96K     25G     0%    /usr/src
zroot/usr/ports        26G    711M     25G     3%    /usr/ports
zroot/var/audit        25G     96K     25G     0%    /var/audit
zroot/var/crash        25G     96K     25G     0%    /var/crash
zroot/var/log          25G    144K     25G     0%    /var/log
zroot/var/mail         25G     96K     25G     0%    /var/mail
zroot/var/tmp          25G     96K     25G     0%    /var/tmp

The installer created one zpool and several file systems within that pool:

root@freebsd:~ $ zpool list
NAME    SIZE  ALLOC   FREE  CKPOINT  EXPANDSZ   FRAG    CAP  DEDUP  HEALTH  ALTROOT
zroot  27.5G  1.79G  25.7G        -         -     0%     6%  1.00x  ONLINE  -
root@freebsd:~ $ zfs list
NAME                 USED  AVAIL  REFER  MOUNTPOINT
zroot               1.79G  24.9G    96K  /zroot
zroot/ROOT          1.09G  24.9G    96K  none
zroot/ROOT/default  1.09G  24.9G  1.09G  /
zroot/tmp             96K  24.9G    96K  /tmp
zroot/usr            711M  24.9G    96K  /usr
zroot/usr/home        96K  24.9G    96K  /usr/home
zroot/usr/ports      711M  24.9G   711M  /usr/ports
zroot/usr/src         96K  24.9G    96K  /usr/src
zroot/var            624K  24.9G    96K  /var
zroot/var/audit       96K  24.9G    96K  /var/audit
zroot/var/crash       96K  24.9G    96K  /var/crash
zroot/var/log        144K  24.9G   144K  /var/log
zroot/var/mail        96K  24.9G    96K  /var/mail
zroot/var/tmp         96K  24.9G    96K  /var/tmp

With ZFS you have all the nice features such as RAID, de-duplication, compression, snapshots and much more. There is a dedicated page in the FreeBSD wiki if you want dig deeper and play around with ZFS.

The default shell on FreeBSD is not bash, but tcsh.

root@freebsd:~ $ echo $SHELL
/bin/csh

If you are not happy with that, you can install bash using the pkg command. When pkg is used for the first time it needs to bootstrap itself:

root@freebsd:~ # pkg search bash
The package management tool is not yet installed on your system.
Do you want to fetch and install it now? [y/N]: y
Bootstrapping pkg from pkg+http://pkg.FreeBSD.org/FreeBSD:12:amd64/quarterly, please wait...
Verifying signature with trusted certificate pkg.freebsd.org.2013102301... done
Installing pkg-1.16.1...
Extracting pkg-1.16.1: 100%
pkg: Repository FreeBSD missing. 'pkg update' required
bash-5.1.4                     GNU Project's Bourne Again SHell
bash-completion-2.11,2         Programmable completion library for Bash
bash-static-5.1.4              GNU Project's Bourne Again SHell
bashtop-0.9.25_1               Linux/OSX/FreeBSD resource monitor
checkbashisms-2.19.6           Check for the presence of bashisms
erlang-mochiweb-basho-2.9.0p2  Erlang library for building lightweight HTTP servers (Basho fork)
mybashburn-1.0.2_4             Ncurses CD burning bash script
p5-Bash-Completion-0.008_2     Extensible system to provide bash completion
p5-Term-Bash-Completion-Generator-0.02.8_2 Generate bash completion scripts
switchBashZsh-1.1              Portable shell setup for Bash/Zsh across FreeBSD/Linux/Cygwin

Because we care about warnings we’ll update first, and then install bash:

root@freebsd:~ # pkg update
Updating FreeBSD repository catalogue...
FreeBSD repository is up to date.
All repositories are up to date.
root@freebsd:~ # pkg install bash
Updating FreeBSD repository catalogue...
FreeBSD repository is up to date.
All repositories are up to date.
Updating database digests format: 100%
The following 4 package(s) will be affected (of 0 checked):

New packages to be INSTALLED:
        bash: 5.1.4
        gettext-runtime: 0.21
        indexinfo: 0.3.1
        readline: 8.0.4

Number of packages to be installed: 4

The process will require 11 MiB more space.
2 MiB to be downloaded.

Proceed with this action? [y/N]: y
[1/4] Fetching bash-5.1.4.txz: 100%    1 MiB   1.5MB/s    00:01    
[2/4] Fetching indexinfo-0.3.1.txz: 100%    6 KiB   5.8kB/s    00:01    
[3/4] Fetching readline-8.0.4.txz: 100%  353 KiB 361.2kB/s    00:01    
[4/4] Fetching gettext-runtime-0.21.txz: 100%  165 KiB 168.8kB/s    00:01    
Checking integrity... done (0 conflicting)
[1/4] Installing indexinfo-0.3.1...
[1/4] Extracting indexinfo-0.3.1: 100%
[2/4] Installing readline-8.0.4...
[2/4] Extracting readline-8.0.4: 100%
[3/4] Installing gettext-runtime-0.21...
[3/4] Extracting gettext-runtime-0.21: 100%
[4/4] Installing bash-5.1.4...
[4/4] Extracting bash-5.1.4: 100%
[root@freebsd ~]# bash --version
GNU bash, version 5.1.4(0)-release (amd64-portbld-freebsd12.2)
Copyright (C) 2020 Free Software Foundation, Inc.
License GPLv3+: GNU GPL version 3 or later 

This is free software; you are free to change and redistribute it.
There is NO WARRANTY, to the extent permitted by law.

Pretty much the same as in Linux, is setting kernel parameters. All the parameters can be either set with “sysctl” or directly in sysctl.conf:

[root@freebsd ~]# sysctl -a | head
kern.ostype: FreeBSD
kern.osrelease: 12.2-RELEASE
kern.osrevision: 199506
kern.version: FreeBSD 12.2-RELEASE r366954 GENERIC

kern.maxvnodes: 112396
kern.maxproc: 7396
kern.maxfiles: 64209
kern.argmax: 524288
kern.securelevel: -1
[root@freebsd ~]# cat /etc/sysctl.conf | head
# $FreeBSD: releng/12.2/sbin/sysctl/sysctl.conf 337624 2018-08-11 13:28:03Z brd $
#
#  This file is read when going to multi-user and its contents piped thru
#  ``sysctl'' to adjust kernel values.  ``man 5 sysctl.conf'' for details.
#

# Uncomment this to prevent users from seeing information about processes that
# are being run under another UID.
#security.bsd.see_other_uids=0
vfs.zfs.min_auto_ashift=12

We have configured the network, updated the system and we know how to search for, and install packages, and we know how we can set kernel parameters. Ready for installing PostgreSQL, in the next post.

Cet article PostgreSQL on FreeBSD, updating & configuration est apparu en premier sur Blog dbi services.


JENKINS create a pipeline using Blue Ocean

$
0
0

Hi everybody,
Last time we have seen what is Pipeline concepts including scripted and declarative pipeline methods.Today we will see how to create easily a declarative pipeline using Blue ocean tool.It will allow us to generate a workflow without needing advanced scripting skills.

what’s blue ocean?

Blue Ocean is graphical user interface making it easier to define continuous delivery pipelines. To build your pipelines you will use an integrated editor. You will be able to check their execution visually and to detected problems at any step of the workflow in order to solve then quicker.

  • starting installation of blue ocean

for our case we will add it directly to our Jenkins master using the plugin manager
You also have some interesting info at https://www.jenkins.io/doc/book/blueocean/getting-started/

  • wait for installation

create our 1st pipeline using Blue ocean

  • Now we have installed blue ocean we will start it from Jenkins dashboard

  • here we are ,we can now access to a GUI to manage pipeline creation execution and edition

using blue ocean GUI

  • select your git environment ( for this case GitHub

add a Git repository

  • to continue the pipeline creation we have to add a git repository ( if you dont have it you must create it,in this example we will use github )

  • to allow Jenkins to communicate with Github we will define an access token from Github


  • select your organization

  • select the repository to create your pipeline

  • if no Jenkinsfile found inside, blue ocean will ask to create one

  • in this part you will selected (and edit when you want) all steps of your pipeline thanks to pre-configured tools

  • Once configured you can start your pipeline an see the result

  • it is possible to check each log of each steps by clicking on it, also we have access to other in the tool bar  like “tests” and “artifacts”(where we can download output of the pipeline and see all its execution step by step)

update file from GitHub repository

when we check the log below we can see that it is connecting to Github to perform the workflow using the Jenkins file

Branch indexing

Connecting to https://api.github.com using adminjnks/****** (GitHub Access Token)

Obtained Jenkinsfile from 922c2521cbe0c42b728957a2458aed7216a9e6a2

Running in Durability level: MAX_SURVIVABILITY

[Pipeline] Start of Pipeline

[Pipeline] node

Running on Jenkins in /var/lib/jenkins/workspace/TSTPPL_main

[Pipeline] {

[Pipeline] stage

[Pipeline] { (Declarative: Checkout SCM)

[Pipeline] checkout

The recommended git tool is: NONE

using credential github

> git rev-parse --is-inside-work-tree # timeout=10

Fetching changes from the remote Git repository

> git config remote.origin.url https://github.com/admjenkins/TSTPPL.git # timeout=10

Cleaning workspace

> git rev-parse --verify HEAD # timeout=10

Resetting working tree

> git reset --hard # timeout=10

> git clean -fdx # timeout=10

Fetching without tags

Fetching upstream changes from https://github.com/admjenkins/TSTPPL.git

> git --version # timeout=10

> git --version # 'git version 2.27.0'

using GIT_ASKPASS to set credentials GitHub Access Token

> git fetch --no-tags --force --progress -- https://github.com/admjenkins/TSTPPL.git +refs/heads/main:refs/remotes/origin/main # timeout=10

Checking out Revision 922c2521cbe0c42b728957a2458aed7216a9e6a2 (main)

> git config core.sparsecheckout # timeout=10

> git checkout -f 922c2521cbe0c42b728957a2458aed7216a9e6a2 # timeout=10

> git branch -a -v --no-abbrev # timeout=10

> git branch -D main # timeout=10

> git checkout -b main 922c2521cbe0c42b728957a2458aed7216a9e6a2 # timeout=10

Commit message: "Added Jenkinsfile"

> git rev-list --no-walk cb0ef1ff70cfb9c1dc25662d420620d608bcf200 # timeout=10

Cleaning workspace

> git rev-parse --verify HEAD # timeout=10

Resetting working tree

> git reset --hard # timeout=10

> git clean -fdx # timeout=10

[Pipeline] }

[Pipeline] // stage

[Pipeline] withEnv

[Pipeline] {

[Pipeline] withEnv

[Pipeline] {

[Pipeline] stage

[Pipeline] { (TEST)

[Pipeline] echo

test fisrt stage

[Pipeline] }

[Pipeline] // stage

[Pipeline] stage

[Pipeline] { (BUILD FOLDER)

[Pipeline] sh

+ mkdir /home/jenkins/PPLTESTING

[Pipeline] }

[Pipeline] // stage

[Pipeline] stage

[Pipeline] { (CREATE FILE)

[Pipeline] sh

+ touch /home/jenkins/PPLTESTING/filecreatedPPL

[Pipeline] }

[Pipeline] // stage

[Pipeline] }

[Pipeline] // withEnv

[Pipeline] }

[Pipeline] // withEnv

[Pipeline] }

[Pipeline] // node

[Pipeline] End of Pipeline


GitHub has been notified of this commit’s build result


Finished: SUCCESS

edit Jenkins file from Source code repository

By editing the Jenkinsfile in the repository we can also update the Pipeline with the text editor.

  • Once done you select if commit will be performed on the main branch or on another branch

add parallel steps

  • with Blue ocean you also have the possibility to add parallel steps for your pipelines to check for example software version or add a file-watcher

conclusion

Now you are able to easily create and manage your pipelines with Blue ocean but bare in mind it doesn’t include every feature of Jenkins master interface.Next time we will check some pipeline use case and see how to use features like artifacts.
Feel free to visit dbi blogger’s and take a look on Cloudbees and Jenkins site.

Cet article JENKINS create a pipeline using Blue Ocean est apparu en premier sur Blog dbi services.

PostgreSQL on FreeBSD, installation from packages

$
0
0

In the last two posts we installed FreeBSD, configured networking, updated the system, installed bash and had a quick look at kernel parameters. In this post we’ll install PostgreSQL from packages. Of course you can also install PostgreSQL from source code, but this will be the topic for the next post.

We already used the “pkg” command in the last post for installing bash. The very same command is used when it comes to installing PostgreSQL from packages:

[root@freebsd ~]$ pkg search postgresql
R-cran-RPostgreSQL-0.6.2_3     R Interface to the 'PostgreSQL' Database System
exim-postgresql-4.94_4         High performance MTA for Unix systems on the Internet
libgda5-postgresql-5.2.10      Provides postgresql access for the libgda5 library
opensmtpd-extras-table-postgresql-6.7.1,1 PostgreSQL table support for OpenSMTPD
p5-PostgreSQL-PLPerl-Call-1.007 Simple interface for calling SQL functions from PostgreSQL PL/Perl
p5-PostgreSQL-PLPerl-Trace-1.001_1 Simple way to trace execution of Perl statements in PL/Perl
p5-Test-postgresql-0.09_3      Perl extension of postgresql runner for tests
pgtcl-postgresql10-2.1.1_2     TCL extension for accessing a PostgreSQL server (PGTCL-NG)
pgtcl-postgresql11-2.1.1_2     TCL extension for accessing a PostgreSQL server (PGTCL-NG)
pgtcl-postgresql12-2.1.1_2     TCL extension for accessing a PostgreSQL server (PGTCL-NG)
pgtcl-postgresql13-2.1.1_2     TCL extension for accessing a PostgreSQL server (PGTCL-NG)
pgtcl-postgresql95-2.1.1_2     TCL extension for accessing a PostgreSQL server (PGTCL-NG)
pgtcl-postgresql96-2.1.1_2     TCL extension for accessing a PostgreSQL server (PGTCL-NG)
postgresql-jdbc-42.2.18        Java JDBC implementation for PostgreSQL
postgresql-libpgeasy-3.0.4_3   Easy-to-use C interface to PostgreSQL
postgresql-libpqxx-7.2.0       New C++ interface for PostgreSQL
postgresql-odbc-13.00.0000     PostgreSQL ODBC driver
postgresql-plproxy-2.10.0      Function-based sharding for PostgreSQL
postgresql-relay-1.3.2_1       Multiplex multiple PostgreSQL databases to one relay
postgresql-repmgr-5.2.0        PostgreSQL replication manager
postgresql10-client-10.15      PostgreSQL database (client)
postgresql10-contrib-10.15     The contrib utilities from the PostgreSQL distribution
postgresql10-docs-10.15        The PostgreSQL documentation set
postgresql10-plperl-10.15      Write SQL functions for PostgreSQL using Perl5
postgresql10-plpython-10.15    Module for using Python to write SQL functions
postgresql10-pltcl-10.15       Module for using Tcl to write SQL functions
postgresql10-server-10.15      PostgreSQL is the most advanced open-source database available anywhere
postgresql11-client-11.10      PostgreSQL database (client)
postgresql11-contrib-11.10     The contrib utilities from the PostgreSQL distribution
postgresql11-docs-11.10        The PostgreSQL documentation set
postgresql11-plperl-11.10      Write SQL functions for PostgreSQL using Perl5
postgresql11-plpython-11.10    Module for using Python to write SQL functions
postgresql11-pltcl-11.10       Module for using Tcl to write SQL functions
postgresql11-server-11.10      PostgreSQL is the most advanced open-source database available anywhere
postgresql12-client-12.5       PostgreSQL database (client)
postgresql12-contrib-12.5      The contrib utilities from the PostgreSQL distribution
postgresql12-cstore_fdw-1.7.0  Columnar store for analytics with PostgreSQL
postgresql12-docs-12.5         The PostgreSQL documentation set
postgresql12-ogr_fdw-1.0.12    PostgreSQL foreign data wrapper for OGR
postgresql12-orafce-3.13.4     Oracle's compatibility functions and packages for PostgreSQL
postgresql12-pg_dirtyread-2.3  Read dead but unvacuumed tuples from a PostgreSQL relation
postgresql12-pg_repack-1.4.6   Reorganize tables in PostgreSQL databases with minimal locks
postgresql12-pg_similarity-20160917_2 Set of functions and operators for executing similarity queries
postgresql12-plperl-12.5       Write SQL functions for PostgreSQL using Perl5
postgresql12-plpgsql_check-1.15.1 PostgreSQL extension to check PL/pgSQL code
postgresql12-plpython-12.5     Module for using Python to write SQL functions
postgresql12-pltcl-12.5        Module for using Tcl to write SQL functions
postgresql12-prefix-1.2.9      Prefix Range module for PostgreSQL
postgresql12-rum-1.3.7         Inverted index with additional information in posting lists
postgresql12-server-12.5       PostgreSQL is the most advanced open-source database available anywhere
postgresql12-tds_fdw-2.0.2     PostgreSQL foreign data wrapper to connect to TDS databases
postgresql12-zhparser-0.2.0_2  PostgreSQL extension for full-text search of Chinese
postgresql13-client-13.1       PostgreSQL database (client)
postgresql13-contrib-13.1_1    The contrib utilities from the PostgreSQL distribution
postgresql13-docs-13.1         The PostgreSQL documentation set
postgresql13-plperl-13.1       Write SQL functions for PostgreSQL using Perl5
postgresql13-plpython-13.1     Module for using Python to write SQL functions
postgresql13-pltcl-13.1        Module for using Tcl to write SQL functions
postgresql13-server-13.1_1     PostgreSQL is the most advanced open-source database available anywhere
postgresql95-client-9.5.24     PostgreSQL database (client)
postgresql95-contrib-9.5.24    The contrib utilities from the PostgreSQL distribution
postgresql95-docs-9.5.24       The PostgreSQL documentation set
postgresql95-mysql_fdw-2.5.4   PostgreSQL foreign data wrapper for MySQL
postgresql95-plperl-9.5.24     Write SQL functions for PostgreSQL using Perl5
postgresql95-plpython-9.5.24   Module for using Python to write SQL functions
postgresql95-pltcl-9.5.24      Module for using Tcl to write SQL functions
postgresql95-server-9.5.24     PostgreSQL is the most advanced open-source database available anywhere
postgresql96-client-9.6.20     PostgreSQL database (client)
postgresql96-contrib-9.6.20    The contrib utilities from the PostgreSQL distribution
postgresql96-docs-9.6.20       The PostgreSQL documentation set
postgresql96-plperl-9.6.20     Write SQL functions for PostgreSQL using Perl5
postgresql96-plpython-9.6.20   Module for using Python to write SQL functions
postgresql96-pltcl-9.6.20      Module for using Tcl to write SQL functions
postgresql96-server-9.6.20     PostgreSQL is the most advanced open-source database available anywhere
prometheus-postgresql-adapter-0.6.0 Use PostgreSQL as a remote storage database for Prometheus
py37-postgresql-1.1.0_5        Python 3 compatible PostgreSQL database driver and tools
rubygem-azure_mgmt_postgresql-0.17.2 Microsoft Azure PostgreSQL Client Library for Ruby

As you can see, all currently supported major versions of PostgreSQL are available (Note: 9.5 is our of support since this month). Very similar to the packages you find on Linux the, FreeBSD separates PostgreSQL into several packages:

  • The PostgreSQL server itself: postgresqlXX-server
  • The PostgreSQL extensions (except the procedural languages): postgresqlXX-contrib
  • The PostgreSQL client: postgresqlXX-client
  • The procedural languages: postgresql-XX-plxxx
  • The PostgreSQL documentation: postgresql-XX-docs
  • Various third party extensions, like e.g. mysql_fdw or plpgsql_check

Of course we want to go with the latest release (13.2 currently) so lets check what is available for PostgreSQL 13:

[root@freebsd ~]$ pkg search postgresql13
pgtcl-postgresql13-2.1.1_2     TCL extension for accessing a PostgreSQL server (PGTCL-NG)
postgresql13-client-13.1       PostgreSQL database (client)
postgresql13-contrib-13.1_1    The contrib utilities from the PostgreSQL distribution
postgresql13-docs-13.1         The PostgreSQL documentation set
postgresql13-plperl-13.1       Write SQL functions for PostgreSQL using Perl5
postgresql13-plpython-13.1     Module for using Python to write SQL functions
postgresql13-pltcl-13.1        Module for using Tcl to write SQL functions
postgresql13-server-13.1_1     PostgreSQL is the most advanced open-source database available anywhere

The standard stuff is there, but compared to PostgreSQL 12 a lot of packages seem to be missing, and it is not the latest PostgreSQL release (still 13.1). Anyway, lets install the server and client:

[root@freebsd ~]$ pkg install postgresql13-server postgresql13-client
Updating FreeBSD repository catalogue...
FreeBSD repository is up to date.
All repositories are up to date.
The following 10 package(s) will be affected (of 0 checked):

New packages to be INSTALLED:
        icu: 68.2,1
        libedit: 3.1.20191231,1
        libffi: 3.3_1
        libxml2: 2.9.10_2
        llvm11: 11.0.1
        lua52: 5.2.4
        perl5: 5.32.1_1
        postgresql13-client: 13.1
        postgresql13-server: 13.1_1
        python37: 3.7.9_1

Number of packages to be installed: 10

The process will require 986 MiB more space.
164 MiB to be downloaded.

Proceed with this action? [y/N]: y
[1/10] Fetching postgresql13-server-13.1_1.txz: 100%   13 MiB   2.7MB/s    00:05    
[2/10] Fetching postgresql13-client-13.1.txz: 100%    3 MiB   1.4MB/s    00:02    
[3/10] Fetching llvm11-11.0.1.txz: 100%  107 MiB   3.1MB/s    00:36    
[4/10] Fetching libxml2-2.9.10_2.txz: 100%  826 KiB 845.7kB/s    00:01    
[5/10] Fetching python37-3.7.9_1.txz: 100%   16 MiB   3.4MB/s    00:05    
[6/10] Fetching libffi-3.3_1.txz: 100%   39 KiB  40.0kB/s    00:01    
[7/10] Fetching perl5-5.32.1_1.txz: 100%   14 MiB   2.5MB/s    00:06    
[8/10] Fetching lua52-5.2.4.txz: 100%  175 KiB 178.7kB/s    00:01    
[9/10] Fetching libedit-3.1.20191231,1.txz: 100%  134 KiB 137.4kB/s    00:01    
[10/10] Fetching icu-68.2,1.txz: 100%   10 MiB   2.2MB/s    00:05    
Checking integrity... done (0 conflicting)
[1/10] Installing libffi-3.3_1...
[1/10] Extracting libffi-3.3_1: 100%
[2/10] Installing libedit-3.1.20191231,1...
[2/10] Extracting libedit-3.1.20191231,1: 100%
[3/10] Installing libxml2-2.9.10_2...
[3/10] Extracting libxml2-2.9.10_2: 100%
[4/10] Installing python37-3.7.9_1...
[4/10] Extracting python37-3.7.9_1: 100%
[5/10] Installing perl5-5.32.1_1...
[5/10] Extracting perl5-5.32.1_1: 100%
[6/10] Installing lua52-5.2.4...
[6/10] Extracting lua52-5.2.4: 100%
[7/10] Installing postgresql13-client-13.1...
[7/10] Extracting postgresql13-client-13.1: 100%
[8/10] Installing llvm11-11.0.1...
[8/10] Extracting llvm11-11.0.1: 100%
[9/10] Installing icu-68.2,1...
[9/10] Extracting icu-68.2,1: 100%
[10/10] Installing postgresql13-server-13.1_1...
===> Creating groups.
Creating group 'postgres' with gid '770'.
===> Creating users
Creating user 'postgres' with uid '770'.
===> Creating homedir(s)

  =========== BACKUP YOUR DATA! =============
  As always, backup your data before
  upgrading. If the upgrade leads to a higher
  major revision (e.g. 9.6 -> 10), a dump
  and restore of all databases is
  required. This is *NOT* done by the port!
  See https://www.postgresql.org/docs/current/upgrading.html
  ===========================================
[10/10] Extracting postgresql13-server-13.1_1: 100%
=====
Message from python37-3.7.9_1:

--
Note that some standard Python modules are provided as separate ports
as they require additional dependencies. They are available as:

py37-gdbm       databases/py-gdbm@py37
py37-sqlite3    databases/py-sqlite3@py37
py37-tkinter    x11-toolkits/py-tkinter@py37
=====
Message from postgresql13-client-13.1:

--
The PostgreSQL port has a collection of "side orders":

postgresql-docs
  For all of the html documentation

p5-Pg
  A perl5 API for client access to PostgreSQL databases.

postgresql-tcltk 
  If you want tcl/tk client support.

postgresql-jdbc
  For Java JDBC support.

postgresql-odbc
  For client access from unix applications using ODBC as access
  method. Not needed to access unix PostgreSQL servers from Win32
  using ODBC. See below.

ruby-postgres, py-psycopg2
  For client access to PostgreSQL databases using the ruby & python
  languages.

postgresql-plperl, postgresql-pltcl & postgresql-plruby
  For using perl5, tcl & ruby as procedural languages.

postgresql-contrib
  Lots of contributed utilities, postgresql functions and
  datatypes. There you find pg_standby, pgcrypto and many other cool
  things.

etc...
=====
Message from postgresql13-server-13.1_1:

--
For procedural languages and postgresql functions, please note that
you might have to update them when updating the server.

If you have many tables and many clients running, consider raising
kern.maxfiles using sysctl(8), or reconfigure your kernel
appropriately.

The port is set up to use autovacuum for new databases, but you might
also want to vacuum and perhaps backup your database regularly. There
is a periodic script, /usr/local/etc/periodic/daily/502.pgsql, that
you may find useful. You can use it to backup and perform vacuum on all
databases nightly. Per default, it performs `vacuum analyze'. See the
script for instructions. For autovacuum settings, please review
~pgsql/data/postgresql.conf.

If you plan to access your PostgreSQL server using ODBC, please
consider running the SQL script /usr/local/share/postgresql/odbc.sql
to get the functions required for ODBC compliance.

Please note that if you use the rc script,
/usr/local/etc/rc.d/postgresql, to initialize the database, unicode
(UTF-8) will be used to store character data by default.  Set
postgresql_initdb_flags or use login.conf settings described below to
alter this behaviour. See the start rc script for more info.

To set limits, environment stuff like locale and collation and other
things, you can set up a class in /etc/login.conf before initializing
the database. Add something similar to this to /etc/login.conf:
---
postgres:\
        :lang=en_US.UTF-8:\
        :setenv=LC_COLLATE=C:\
        :tc=default:
---
and run `cap_mkdb /etc/login.conf'.
Then add 'postgresql_class="postgres"' to /etc/rc.conf.

======================================================================

To initialize the database, run

  /usr/local/etc/rc.d/postgresql initdb

You can then start PostgreSQL by running:

  /usr/local/etc/rc.d/postgresql start

For postmaster settings, see ~pgsql/data/postgresql.conf

NB. FreeBSD's PostgreSQL port logs to syslog by default
    See ~pgsql/data/postgresql.conf for more info

NB. If you're not using a checksumming filesystem like ZFS, you might
    wish to enable data checksumming. It can only be enabled during
    the initdb phase, by adding the "--data-checksums" flag to
    the postgres_initdb_flags rcvar.  Check the initdb(1) manpage
    for more info and make sure you understand the performance
    implications.

======================================================================

To run PostgreSQL at startup, add
'postgresql_enable="YES"' to /etc/rc.conf

The output is quite verbose and gives some interesting information. The first one is this:
“If you have many tables and many clients running, consider raising
kern.maxfiles using sysctl(8), or reconfigure your kernel
appropriately.”

This is something you should consider setting in production environments, but not important for now. The next one is this:

“The port is set up to use autovacuum for new databases, but you might
also want to vacuum and perhaps backup your database regularly. There
is a periodic script, /usr/local/etc/periodic/daily/502.pgsql, that
you may find useful. You can use it to backup and perform vacuum on all
databases nightly. Per default, it performs `vacuum analyze’. See the
script for instructions. For autovacuum settings, please review
~pgsql/data/postgresql.conf.”

I would be surprised if autovacuum is not enabled but informing about that does not harm. There is a reference to a script you might want to use for periodic backups and vacuuming of your databases. Notice that this script is only doing logical backups using pg_dump and pg_dumpall. Doing physical backups is a must for production workloads, so please do not rely on this script only.

The PostgreSQL packages for FreeBSD also come with an init script to initialize and start PostgreSQL:
“Please note that if you use the rc script,
/usr/local/etc/rc.d/postgresql, to initialize the database, unicode
(UTF-8) will be used to store character data by default. Set
postgresql_initdb_flags or use login.conf settings described below to
alter this behaviour. See the start rc script for more info.”

Lets go ahead an initialize PostgreSQL with all the defaults:

[root@freebsd ~]$ /usr/local/etc/rc.d/postgresql initdb
Cannot 'initdb' postgresql. Set postgresql_enable to YES in /etc/rc.conf or use 'oneinitdb' instead of 'initdb'.

Ok, this message is pretty clear:

[root@freebsd ~]$ echo "postgresql_enable=\"YES\"" >> /etc/rc.conf
[root@freebsd ~]$ /usr/local/etc/rc.d/postgresql initdb
The files belonging to this database system will be owned by user "postgres".
This user must also own the server process.

The database cluster will be initialized with locale "C".
The default text search configuration will be set to "english".

Data page checksums are disabled.

creating directory /var/db/postgres/data13 ... ok
creating subdirectories ... ok
selecting dynamic shared memory implementation ... posix
selecting default max_connections ... 100
selecting default shared_buffers ... 128MB
selecting default time zone ... Europe/Vaduz
creating configuration files ... ok
running bootstrap script ... ok
performing post-bootstrap initialization ... ok
syncing data to disk ... ok

initdb: warning: enabling "trust" authentication for local connections
You can change this by editing pg_hba.conf or using the option -A, or
--auth-local and --auth-host, the next time you run initdb.

Success. You can now start the database server using:

    /usr/local/bin/pg_ctl -D /var/db/postgres/data13 -l logfile start

As you can see the default for $PGDATA is “/var/db/postgres/data13”:

[root@freebsd ~]$ ls /var/db/postgres/data13
PG_VERSION              pg_dynshmem             pg_multixact            pg_snapshots            pg_tblspc               postgresql.auto.conf
base                    pg_hba.conf             pg_notify               pg_stat                 pg_twophase             postgresql.conf
global                  pg_ident.conf           pg_replslot             pg_stat_tmp             pg_wal
pg_commit_ts            pg_logical              pg_serial               pg_subtrans             pg_xact

Lets start PostgreSQL:

[root@freebsd ~]$ /usr/local/etc/rc.d/postgresql start 
2021-02-19 01:48:01.925 CET [10715] LOG:  ending log output to stderr
2021-02-19 01:48:01.925 CET [10715] HINT:  Future log output will go to log destination "syslog".
[root@freebsd ~]$ ps aux | grep postgres
postgres 10715   0.0  1.4 176276 28460  -  Ss   01:48     0:00.02 /usr/local/bin/postgres -D /var/db/postgres/data13
postgres 10717   0.0  1.4 176276 28476  -  Ss   01:48     0:00.00 postgres: checkpointer  (postgres)
postgres 10718   0.0  1.4 176276 28496  -  Ss   01:48     0:00.00 postgres: background writer  (postgres)
postgres 10719   0.0  1.4 176276 28496  -  Ss   01:48     0:00.00 postgres: walwriter  (postgres)
postgres 10720   0.0  1.4 176728 28776  -  Ss   01:48     0:00.00 postgres: autovacuum launcher  (postgres)
postgres 10721   0.0  0.8  30632 17420  -  Ss   01:48     0:00.00 postgres: stats collector  (postgres)
postgres 10722   0.0  1.4 176668 28740  -  Ss   01:48     0:00.00 postgres: logical replication launcher  (postgres)
root     10724   0.0  0.0    532   344  0  R+   01:48     0:00.00 grep postgres

The same as in Linux: The packages created a postgres user and a postgres group:

[root@freebsd ~]$ su - postgres
$ id -a
uid=770(postgres) gid=770(postgres) groups=770(postgres)
$ psql 
psql (13.1)
Type "help" for help.

postgres=# select version();
                                                                               version                                                                               
---------------------------------------------------------------------------------------------------------------------------------------------------------------------
 PostgreSQL 13.1 on amd64-portbld-freebsd12.2, compiled by FreeBSD clang version 10.0.1 (git@github.com:llvm/llvm-project.git llvmorg-10.0.1-0-gef32c611aa2), 64-bit
(1 row)

postgres=# 

As we enabled PostgreSQL in /etc/rc.conf it should come up by default once the box is rebooted:

[root@freebsd ~]# init 6
[root@freebsd ~]# Connection to 192.168.22.17 closed by remote host.
Connection to 192.168.22.17 closed.
dwe@ltdwe:~$ ssh root@192.168.22.17
Password for root@freebsd.it.dbi-services.com:
Last login: Fri Feb 19 01:33:55 2021 from 192.168.22.1
FreeBSD 12.2-RELEASE-p3 GENERIC 

Welcome to FreeBSD!

Release Notes, Errata: https://www.FreeBSD.org/releases/
Security Advisories:   https://www.FreeBSD.org/security/
FreeBSD Handbook:      https://www.FreeBSD.org/handbook/
FreeBSD FAQ:           https://www.FreeBSD.org/faq/
Questions List: https://lists.FreeBSD.org/mailman/listinfo/freebsd-questions/
FreeBSD Forums:        https://forums.FreeBSD.org/

Documents installed with the system are in the /usr/local/share/doc/freebsd/
directory, or can be installed later with:  pkg install en-freebsd-doc
For other languages, replace "en" with a language code like de or fr.

Show the version of FreeBSD installed:  freebsd-version ; uname -a
Please include that output and any error messages when posting questions.
Introduction to manual pages:  man man
FreeBSD directory layout:      man hier

Edit /etc/motd to change this login announcement.
root@freebsd:~ # ps aux | grep postgres
postgres 799  0.0  1.1 176140 23524  -  Ss   01:56   0:00.02 /usr/local/bin/postgres -D /var/db/postgres/data13
postgres 801  0.0  1.1 176140 23568  -  Ss   01:56   0:00.00 postgres: checkpointer  (postgres)
postgres 802  0.0  1.1 176192 23604  -  Ss   01:56   0:00.00 postgres: background writer  (postgres)
postgres 803  0.0  1.1 176192 23604  -  Ss   01:56   0:00.00 postgres: walwriter  (postgres)
postgres 804  0.0  1.2 176700 24372  -  Ss   01:56   0:00.00 postgres: autovacuum launcher  (postgres)
postgres 805  0.0  0.6  30836 12536  -  Ss   01:56   0:00.00 postgres: stats collector  (postgres)
postgres 806  0.0  1.2 176640 24236  -  Ss   01:56   0:00.00 postgres: logical replication launcher  (postgres)
root     887  0.0  0.0    532   344  0  R+   01:56   0:00.00 grep postgres
root@freebsd:~ # 

All fine, PostgreSQL is ready to be used.

You may have noticed that the binaries are not installed in a version dependent directory:

root@freebsd:~ $ which pg_ctl
/usr/local/bin/pg_ctl
root@freebsd:~ $ which postgres
/usr/local/bin/postgres

What will happen if we install another version of PostgreSQL?

root@freebsd:~ # pkg install postgresql12-server postgresql12-client
Updating FreeBSD repository catalogue...
FreeBSD repository is up to date.
All repositories are up to date.
The following 2 package(s) will be affected (of 0 checked):

New packages to be INSTALLED:
        postgresql12-client: 12.5
        postgresql12-server: 12.5

Number of packages to be installed: 2

The process will require 53 MiB more space.
15 MiB to be downloaded.

Proceed with this action? [y/N]: y
[1/2] Fetching postgresql12-server-12.5.txz: 100%   12 MiB   1.5MB/s    00:09    
[2/2] Fetching postgresql12-client-12.5.txz: 100%    3 MiB   2.7MB/s    00:01    
Checking integrity... done (3 conflicting)
  - postgresql12-server-12.5 conflicts with postgresql13-server-13.1_1 on /usr/local/bin/initdb
  - postgresql12-client-12.5 conflicts with postgresql13-client-13.1 on /usr/local/bin/clusterdb
  - postgresql12-client-12.5 conflicts with postgresql13-client-13.1 on /usr/local/bin/clusterdb
Checking integrity... done (0 conflicting)
Conflicts with the existing packages have been found.
One more solver iteration is needed to resolve them.
The following 4 package(s) will be affected (of 0 checked):

Installed packages to be REMOVED:
        postgresql13-client: 13.1
        postgresql13-server: 13.1_1

New packages to be INSTALLED:
        postgresql12-client: 12.5
        postgresql12-server: 12.5

Number of packages to be removed: 2
Number of packages to be installed: 2

Proceed with this action? [y/N]: 

This is maybe not what you want. If you decide to go with packages on FreeBSD you are stuck with one version of PostgreSQL. If we want to have the flexibility to run more than one version of PostgreSQL you need to install PostgreSQL from source code. This will be the topic for the next post.

Cet article PostgreSQL on FreeBSD, installation from packages est apparu en premier sur Blog dbi services.

PostgreSQL on FreeBSD, installation from source code

$
0
0

This is the next post in this little series about PostgreSQL on FreeBSD. You can find the previous one here:

The downside with installing from packages on FreeBSD is, that you can only run one version of PostgreSQL. If you want to run more than one, you need to install from source code, and this is the topic of this post.

AS the first step lets remove the PostgreSQL installation we did in the last post:

root@freebsd:~ $ pkg remove postgresql13-server postgresql13-client
Checking integrity... done (0 conflicting)
Deinstallation has been requested for the following 2 packages (of 0 packages in the universe):

Installed packages to be REMOVED:
        postgresql13-client: 13.1
        postgresql13-server: 13.1_1

Number of packages to be removed: 2

The operation will free 53 MiB.

Proceed with deinstalling packages? [y/N]: y
[1/2] Deinstalling postgresql13-server-13.1_1...
[1/2] Deleting files for postgresql13-server-13.1_1: 100%
==> You should manually remove the "postgres" user. 
==> You should manually remove the "postgres" group 
[2/2] Deinstalling postgresql13-client-13.1...
[2/2] Deleting files for postgresql13-client-13.1: 100%

As this will not remove $PGDATA lets get rid of that as well:

root@freebsd:~ $ rm -rf /var/db/postgres/data13/

We should also remove the auto start configuration:

root@freebsd:~ $ sed -i".bak" '$d' /etc/rc.conf
root@freebsd:~ $ cat /etc/rc.conf
hostname="freebsd.it.dbi-services.com"
keymap="ch.kbd"
ifconfig_em0="DHCP"
ifconfig_em1="inet 192.168.22.17 netmask 255.255.255.0"
sshd_enable="YES"
ntpd_enable="YES"
# Set dumpdev to "AUTO" to enable crash dumps, "NO" to disable
dumpdev="AUTO"
zfs_enable="YES"

When we installed PostgreSQL from packages some additional packages have been installed as well, lets remove them, too:

root@freebsd:~ $ pkg remove libffi libedit libxml2 python37 perl5 lua52 llvm11 icu-68
No packages matched for pattern 'icu-68'

Checking integrity... done (0 conflicting)
Deinstallation has been requested for the following 7 packages (of 0 packages in the universe):

Installed packages to be REMOVED:
        libedit: 3.1.20191231,1
        libffi: 3.3_1
        libxml2: 2.9.10_2
        llvm11: 11.0.1
        lua52: 5.2.4
        perl5: 5.32.1_1
        python37: 3.7.9_1

Number of packages to be removed: 7

The operation will free 884 MiB.

Proceed with deinstalling packages? [y/N]: y
[1/7] Deinstalling llvm11-11.0.1...
[1/7] Deleting files for llvm11-11.0.1: 100%
[2/7] Deinstalling python37-3.7.9_1...
[2/7] Deleting files for python37-3.7.9_1: 100%
[3/7] Deinstalling lua52-5.2.4...
[3/7] Deleting files for lua52-5.2.4: 100%
[4/7] Deinstalling libffi-3.3_1...
[4/7] Deleting files for libffi-3.3_1: 100%
[5/7] Deinstalling libedit-3.1.20191231,1...
[5/7] Deleting files for libedit-3.1.20191231,1: 100%
[6/7] Deinstalling libxml2-2.9.10_2...
[6/7] Deleting files for libxml2-2.9.10_2: 100%
[7/7] Deinstalling perl5-5.32.1_1...
[7/7] Deleting files for perl5-5.32.1_1: 100%

Now we should have the same state of the system as before we installed PostgreSQL from packages. We’ll not delete the postgres user and group, as we can just re-use them for installing from source code.

To download the source code we need something like wget, and to make life a bit easier we’ll also install sudo:

root@freebsd:~ $ pkg install wget sudo
Updating FreeBSD repository catalogue...
FreeBSD repository is up to date.
All repositories are up to date.
The following 4 package(s) will be affected (of 0 checked):

New packages to be INSTALLED:
        libidn2: 2.3.0_1
        libunistring: 0.9.10_1
        sudo: 1.9.5p2
        wget: 1.20.3_1

Number of packages to be installed: 4

The process will require 11 MiB more space.
2 MiB to be downloaded.

Proceed with this action? [y/N]: y
[1/4] Fetching wget-1.20.3_1.txz: 100%  651 KiB 666.2kB/s    00:01    
[2/4] Fetching sudo-1.9.5p2.txz: 100%  943 KiB 966.1kB/s    00:01    
[3/4] Fetching libidn2-2.3.0_1.txz: 100%  111 KiB 113.3kB/s    00:01    
[4/4] Fetching libunistring-0.9.10_1.txz: 100%  527 KiB 539.8kB/s    00:01    
Checking integrity... done (0 conflicting)
[1/4] Installing libunistring-0.9.10_1...
[1/4] Extracting libunistring-0.9.10_1: 100%
[2/4] Installing libidn2-2.3.0_1...
[2/4] Extracting libidn2-2.3.0_1: 100%
[3/4] Installing wget-1.20.3_1...
[3/4] Extracting wget-1.20.3_1: 100%
[4/4] Installing sudo-1.9.5p2...
[4/4] Extracting sudo-1.9.5p2: 100%

The sudo configuration in FreeBSD is not in /etc but in /usr/local/etc, and as we trust the postgres user we allow everything without a password:

root@freebsd:~ $ cat /usr/local/etc/sudoers | grep postgres
postgres ALL=(ALL) NOPASSWD: ALL

Lets download the source code:


root@freebsd:~ # su - postgres
$ pwd
/var/db/postgres
$ wget https://ftp.postgresql.org/pub/source/v13.2/postgresql-13.2.tar.bz2
$ ls -l
total 20585
-rw-r--r--  1 postgres  postgres  21057276 Feb  8 23:07 postgresql-13.2.tar.bz2
$ tar xvf postgresql-13.2.tar.bz2
$ ls -l
total 20593
drwxr-xr-x  6 postgres  postgres        19 Feb  8 23:07 postgresql-13.2
-rw-r--r--  1 postgres  postgres  21057276 Feb  8 23:07 postgresql-13.2.tar.bz2
$ cd postgresql-13.2

Before can run “configure” we need to install all the dependencies:

$ sudo pkg install perl5 perl5-devel python3 libressl-devel libxml2 libxslt openldap-client llvm11
Updating FreeBSD repository catalogue...
FreeBSD repository is up to date.
All repositories are up to date.
The following 14 package(s) will be affected (of 0 checked):

New packages to be INSTALLED:
        libedit: 3.1.20191231,1
        libffi: 3.3_1
        libgcrypt: 1.8.7
        libgpg-error: 1.41
        libressl-devel: 3.3.1
        libxml2: 2.9.10_2
        libxslt: 1.1.34_1
        llvm11: 11.0.1
        lua52: 5.2.4
        openldap-client: 2.4.57
        perl5: 5.32.1_1
        perl5-devel: 5.33.4.81
        python3: 3_3
        python37: 3.7.9_1

Number of packages to be installed: 14

The process will require 975 MiB more space.
20 MiB to be downloaded.

Proceed with this action? [y/N]: y
[1/7] Fetching perl5-devel-5.33.4.81.txz: 100%   14 MiB   3.8MB/s    00:04    
[2/7] Fetching python3-3_3.txz: 100%    1 KiB   1.1kB/s    00:01    
[3/7] Fetching libressl-devel-3.3.1.txz: 100%    3 MiB   3.2MB/s    00:01    
[4/7] Fetching libxslt-1.1.34_1.txz: 100%  233 KiB 238.4kB/s    00:01    
[5/7] Fetching openldap-client-2.4.57.txz: 100%    1 MiB   1.1MB/s    00:01    
[6/7] Fetching libgcrypt-1.8.7.txz: 100%  740 KiB 757.9kB/s    00:01    
[7/7] Fetching libgpg-error-1.41.txz: 100%  292 KiB 299.5kB/s    00:01    
Checking integrity... done (0 conflicting)
[1/14] Installing libffi-3.3_1...
[1/14] Extracting libffi-3.3_1: 100%
[2/14] Installing libgpg-error-1.41...
[2/14] Extracting libgpg-error-1.41: 100%
[3/14] Installing libedit-3.1.20191231,1...
[3/14] Extracting libedit-3.1.20191231,1: 100%
[4/14] Installing perl5-5.32.1_1...
[4/14] Extracting perl5-5.32.1_1: 100%
[5/14] Installing libxml2-2.9.10_2...
[5/14] Extracting libxml2-2.9.10_2: 100%
[6/14] Installing python37-3.7.9_1...
[6/14] Extracting python37-3.7.9_1: 100%
[7/14] Installing libgcrypt-1.8.7...
[7/14] Extracting libgcrypt-1.8.7: 100%
[8/14] Installing lua52-5.2.4...
[8/14] Extracting lua52-5.2.4: 100%
[9/14] Installing perl5-devel-5.33.4.81...
[9/14] Extracting perl5-devel-5.33.4.81: 100%
[10/14] Installing python3-3_3...
[10/14] Extracting python3-3_3: 100%
[11/14] Installing libressl-devel-3.3.1...
[11/14] Extracting libressl-devel-3.3.1: 100%
[12/14] Installing libxslt-1.1.34_1...
[12/14] Extracting libxslt-1.1.34_1: 100%
[13/14] Installing openldap-client-2.4.57...
[13/14] Extracting openldap-client-2.4.57: 100%
[14/14] Installing llvm11-11.0.1...
[14/14] Extracting llvm11-11.0.1: 100%
=====
Message from python37-3.7.9_1:

--
Note that some standard Python modules are provided as separate ports
as they require additional dependencies. They are available as:

py37-gdbm       databases/py-gdbm@py37
py37-sqlite3    databases/py-sqlite3@py37
py37-tkinter    x11-toolkits/py-tkinter@py37
=====
Message from openldap-client-2.4.57:

--
The OpenLDAP client package has been successfully installed.

Edit
  /usr/local/etc/openldap/ldap.conf
to change the system-wide client defaults.

Try `man ldap.conf' and visit the OpenLDAP FAQ-O-Matic at
  http://www.OpenLDAP.org/faq/index.cgi?file=3
for more information.

Here is the configure command (this might look differently for you, depending on what you want to have enabled):

$ sudo mkdir -p /u01/app
$ sudo chown postgres:postgres /u01/app
$ bash
[postgres@freebsd ~/postgresql-13.2]$ PGHOME=/u01/app/postgres/product/13/db_2/
[postgres@freebsd ~/postgresql-13.2]$ SEGSIZE=2
[postgres@freebsd ~/postgresql-13.2]$ BLOCKSIZE=8
[postgres@freebsd ~/postgresql-13.2]$ ./configure --prefix=${PGHOME} --exec-prefix=${PGHOME} --bindir=${PGHOME}/bin --libdir=${PGHOME}/lib --with-libraries=/usr/local/lib  --with-includes=/usr/local/include --sysconfdir=${PGHOME}/etc --includedir=${PGHOME}/include --datarootdir=${PGHOME}/share --datadir=${PGHOME}/share --with-pgport=5432 --with-perl --with-python --with-openssl --with-pam --with-ldap --with-libxml --with-libxslt --with-segsize=${SEGSIZE} --with-blocksize=${BLOCKSIZE} --with-llvm LLVM_CONFIG='/usr/local/llvm11/bin/llvm-config' 
...
config.status: creating GNUmakefile
config.status: creating src/Makefile.global
config.status: creating src/include/pg_config.h
config.status: creating src/include/pg_config_ext.h
config.status: creating src/interfaces/ecpg/include/ecpg_config.h
config.status: linking src/backend/port/tas/dummy.s to src/backend/port/tas.s
config.status: linking src/backend/port/posix_sema.c to src/backend/port/pg_sema.c
config.status: linking src/backend/port/sysv_shmem.c to src/backend/port/pg_shmem.c
config.status: linking src/include/port/freebsd.h to src/include/pg_config_os.h

Compile and install:

[postgres@freebsd ~/postgresql-13.2]$ make all
You must use GNU make to build PostgreSQL.
*** Error code 1

Stop.
make: stopped in /var/db/postgres/postgresql-13.2

Ok, so we missed to install make:

[postgres@freebsd ~/postgresql-13.2]$ sudo pkg install gmake
Updating FreeBSD repository catalogue...
FreeBSD repository is up to date.
All repositories are up to date.
The following 1 package(s) will be affected (of 0 checked):

New packages to be INSTALLED:
        gmake: 4.3_2

Number of packages to be installed: 1

The process will require 2 MiB more space.
416 KiB to be downloaded.

Proceed with this action? [y/N]: y
[1/1] Fetching gmake-4.3_2.txz: 100%  416 KiB 425.6kB/s    00:01    
Checking integrity... done (0 conflicting)
[1/1] Installing gmake-4.3_2...
[1/1] Extracting gmake-4.3_2: 100%
[postgres@freebsd ~/postgresql-13.2]$ make world
Using GNU make found at /usr/local/bin/gmake
...
/usr/local/bin/gmake -C config all
gmake[1]: Entering directory '/var/db/postgres/postgresql-13.2/config'
gmake[1]: Nothing to be done for 'all'.
gmake[1]: Leaving directory '/var/db/postgres/postgresql-13.2/config'
gmake[2]: Leaving directory '/var/db/postgres/postgresql-13.2/contrib/ltree_plpython'
gmake[1]: Leaving directory '/var/db/postgres/postgresql-13.2/contrib'
PostgreSQL, contrib, and documentation successfully made. Ready to install.

That’s it. Finally, install:

[postgres@freebsd ~/postgresql-13.2]$ make install-world
...
cd '/u01/app/postgres/product/13/db_2//lib/bitcode' && /usr/local/llvm11/bin/llvm-lto -thinlto -thinlto-action=thinlink -o ltree_plpython3.index.bc ltree_plpython3/ltree_plpython.bc
gmake[2]: Leaving directory '/var/db/postgres/postgresql-13.2/contrib/ltree_plpython'
gmake[1]: Leaving directory '/var/db/postgres/postgresql-13.2/contrib'
PostgreSQL, contrib, and documentation installation complete.

If you script that, it is not much more work than installing from packages, and you have the full flexibility. The downside is, that you need to come with your on start/stop scripts and that you need to compile any third party extension for your own.

Cet article PostgreSQL on FreeBSD, installation from source code est apparu en premier sur Blog dbi services.

Oracle DB on Azure with Multitenant Option

$
0
0

By Franck Pachot

.
If you want to run an Oracle Database in the Microsoft Azure cloud, you will install it yourself on a VM. And then, you can expect the same as when you install it in your premises, in a virtual environment. Except that Oracle makes it two times more expensive by accepting to license the processor metric on vCPUs at the condition that the Intel core factor is not applied. And in addition to that there is a weird limitation on multitenant. I create a VM with the 19c image provided by Azure. I’m not sure there’s a big advantage to have this image. You have an Oracle Linux OS, with all prerequisites (which is like having installed the preinstall rpm), and a 19.3 Oracle Home (which is like downloading it, unzip and runInstaller). But you will still have to apply the latest Release Update and create a database.

Here is what I’ve run after the creation of the VM (can be done through CustomData)


# download latest OPatch and RU (requires the URLs in OPatch and ReleaseUpdate tags)
(
mkdir -p /var/tmp/OPatch && cd /var/tmp/OPatch
wget -qc $( curl 'http://169.254.169.254/metadata/instance/compute/tags?api-version=2018-02-01&format=text' -H Metadata:true -s | awk -F";" '/OPatch:/{sub(/(^|;).*OPatch:/,"");print $1}')
mkdir -p /var/tmp/RU && cd /var/tmp/RU
wget -qc $(curl 'http://169.254.169.254/metadata/instance/compute/tags?api-version=2018-02-01&format=text' -H Metadata:true -s | awk -F";" '/ReleaseUpdate:/{sub(/(^|;).*ReleaseUpdate:/,"");print $1}')
unzip -qo p*_*_Linux-x86-64.zip
rm -f p*_*_Linux-x86-64.zip
chown -R oracle:oinstall /var/tmp/OPatch /var/tmp/RU
)
# fix the missing sar directory
mkdir -p /var/log/sa

I set the OPatch and ReleaseUpdate tags for the VM with the URL of the binaries in the Object Store. I download it there. And also fix the missing /var/log/sa.


# get Oracle Home from inventory
ORACLE_HOME=$(sudo xmllint --xpath 'string(/INVENTORY/HOME_LIST[1]/HOME/@LOC)' $(awk -F= '/^inventory_loc/{print $2}' /etc/oraInst.loc)/ContentsXML/inventory.xml)
# create autostart service
sudo tee /etc/systemd/system/oracledb.service <<CAT
[Unit]
Description=Oracle Database start/stop
Before=shutdown.target
After=network-online.target
[Service]
Type=idle
#LimitMEMLOCK=infinity
#LimitNOFILE=65535
#EnvironmentFile=/etc/oracle.env
User=oracle
Group=oinstall
ExecStart=$ORACLE_HOME/bin/dbstart $ORACLE_HOME
ExecStop=$ORACLE_HOME/bin/dbshut $ORACLE_HOME
RemainAfterExit=yes
Restart=no
[Install]
WantedBy=multi-user.target
CAT
sudo systemctl enable oracledb

This will automatically stop and start the database flagged with ‘Y’ in /etc/oratab


# Now connecting as Oracle user
sudo su - oracle <<'SU'
# set read only Oracle Home
roohctl -enable
# update to latest RU
unzip -qo -d $ORACLE_HOME /var/tmp/OPatch/p*_*_Linux-x86-64.zip
$ORACLE_HOME/OPatch/opatch lspatches
cd /var/tmp/RU/*
$ORACLE_HOME/OPatch/opatch apply --silent
cd ; rm -rf /var/tmp/RU/*
SU

I set the Oracle Home in “ROOH” mode where the configuration files are separate from the binaries. And apply the downloaded Release Update.


sudo su - oracle <<'SU'
# put the passwords in the wallet
mkdir -p       /u01/app/oracle/dbc_wallet
 yes "W4Lle7p422w0RD" | mkstore -wrl  /u01/app/oracle/dbc_wallet -create
for user in sys system pdbAdmin ; do
 yes "W4Lle7p422w0RD" | mkstore -wrl /u01/app/oracle/dbc_wallet -createEntry oracle.dbsecurity.${user}Password "Oracle19c$RANDOM"
done
# delete existing databases (just in case because we will re-create)
for i in $(awk -F: '/^.*:/{print $1}' /etc/oratab | sort -r) ; do $ORACLE_HOME/bin/dbca -silent -deleteDatabase -sourceDB $i -forceArchiveLogDeletion -useWalletForDBCredentials true -dbCredentialsWalletLocation /u01/app/oracle/dbc_wallet ; done ; rm -rf /u01/ora*
# create the DB
cdb_name=CDB
pdb_name=PDB
unique_name=${cdb_name}_$( curl 'http://169.254.169.254/metadata/instance/compute/name?api-version=2018-02-01&format=text' -H Metadata:true -s )
grep ^CDB1: /etc/oratab || $ORACLE_HOME/bin/dbca -silent \
 -createDatabase -gdbName CDB1 -sid CDB1 -createAsContainerDatabase true -numberOfPdbs 1 -pdbName PDB1 \
 -useWalletForDBCredentials true -dbCredentialsWalletLocation /u01/app/oracle/dbc_wallet \
 -datafileDestination /u01/oradata -useOMF true -storageType FS \
 -recoveryAreaDestination /u01/orareco -recoveryAreaSize 4096 -enableArchive true \
 -memoryMgmtType AUTO_SGA -totalMemory 4096 \
 -createListener LISTENER:1521 -emConfiguration EMEXPRESS -emExpressPort 443 \
 -templateName General_Purpose.dbc -databaseType OLTP -sampleSchema true -redoLogFileSize 100 \
 -initParams db_unique_name=CDB1,user_large_page=AUTO,shared_pool_size=600M
# old habit to run datapatch
$ORACLE_HOME/OPatch/datapatch
# enable database flashback and block change tracking.
rman target / <<<'set echo on; alter database flashback on; alter database enable block change tracking;'
# create a service for the application
sqlplus / as sysdba <'ORCL',network_name=>'ORCL');
exec dbms_service.start_service(service_name=>'ORCL');
alter pluggable database save state;
SQL
SU

This is the creation of the database, CDB1 here with a PDB1 pluggable database.


sudo su - oracle <<'SU'
# define the crontab to backup locally (recovery area)
t=0 ;for i in $(awk -F: '/^.*:/{print $1}' /etc/oratab | sort -r) ; do t=$(($t+1))
cat <<CRONTAB
30 $t * * 6   ( PATH="/usr/local/bin:$PATH" ; . oraenv -s << /tmp/crontab_backup.log 2>&1 <<<'set echo on; backup as compressed backupset incremental level 0 database tag "ORACLE_CRONTAB_WEEKLY";'
05 $t * * 1-5 ( PATH="/usr/local/bin:$PATH" ; . oraenv -s << /tmp/crontab_backup.log 2>&1 <<<'set echo on; backup incremental as compressed backupset level 1 database tag "ORACLE_CRONTAB_DAILY";'
${t}0 * * * * ( PATH="/usr/local/bin:$PATH" ; . oraenv -s << /tmp/crontab_backup.log 2>&1 <<<'set echo on; backup as compressed backupset archivelog all tag "ORACLE_CRONTAB_HOURLY";'
CRONTAB
done | crontab
SU

This sets a very basic backup strategy into the recovery area: full on week-end, incremental on nights, archivelog every hour. To be customized (maybe backup the recovery area to NFS – see Tim Gorman answer on AskTOM) and monitored (I like to run a “report need backup” independantly, and, of course, monitor the non-reclaimable v$recovery_area_usage).

Multitenant

I blogged about a strange limitation of multitenant when running on AWS and here I’m showing that the same exists on Azure and even with the latest Release Update. Let’s be clear, I’ve no idea if this limitation is intentional or not (bug or feature ;)) and why it has not been removed yet if considered as a bug. But if you Bring You Own License and have paid for the multitenant option, you probably want to create several pluggable databases rather than several instances in a VM.


[oracle@o19c ~]$ sql / as sysdba

SQLcl: Release 19.1 Production on Mon Feb 22 07:51:23 2021

Copyright (c) 1982, 2021, Oracle.  All rights reserved.

Connected to:
Oracle Database 19c Enterprise Edition Release 19.0.0.0.0 - Production
Version 19.10.0.0.0


SQL> show pdbs

    CON_ID CON_NAME                       OPEN MODE  RESTRICTED
---------- ------------------------------ ---------- ----------
         2 PDB$SEED                       READ ONLY  NO
         3 PDB1                           READ WRITE NO
SQL>

SQL> show parameter max_pdbs

NAME     TYPE    VALUE
-------- ------- -----
max_pdbs integer 5

I have one PDB that I have created at CDB creation time. And MAX_PDBS is set to five. That reminds me what I have seen on AWS. Let’s see how many PDBs I can create.


SQL> create pluggable database PDB2 from PDB1;

Pluggable database created.

SQL> c/2/3
  1* create pluggable database PDB3 from PDB1;
SQL> /

Pluggable database created.

SQL> c/3/4
  1* create pluggable database PDB4 from PDB1;
SQL> /

create pluggable database PDB4 from PDB1
                          *
ERROR at line 1:
ORA-65010: maximum number of pluggable databases created

SQL> show pdbs

    CON_ID CON_NAME                       OPEN MODE  RESTRICTED
---------- ------------------------------ ---------- ----------
         2 PDB$SEED                       READ ONLY  NO
         3 PDB1                           READ WRITE NO
         4 PDB2                           MOUNTED
         5 PDB3                           MOUNTED
SQL>

I cannot reach this MAX_PDBS (it is supposed to be the number of user created PDBS, not the number of containers). This is definitely not the correct behaviour. It looks like a MAX_PDBS=3 as when you don’t have the multitenant option.


SQL> oradebug setmypid
Statement processed.
SQL> oradebug call kscs_cloudprov_ut
kscs_cloudprov_ut: Detecting cloud provider...
This is a non oracle cloud database instance
This is a Azure instance
CloudDB(10), CloudDetect(10), CloudQuery(ff)
Function returned BF5A07ED
SQL>

The Oracle binaries have a function that detects on which cloud provider they run (“This is a Azure instance”) because some features are limited when you are not on the Oracle Cloud (“This is a non oracle cloud database instance”). But the binaries are the same. The detection is done through each cloud provider metadata API.


[oracle@cloud ~]$ strings $ORACLE_HOME/bin/oracle | grep "http://169.254.169.254"
http://169.254.169.254/computeMetadata/v1/instance/id
http://169.254.169.254/latest/meta-data/services/domain
http://169.254.169.254/opc/v1/instance/id
http://169.254.169.254/metadata/instance/compute/vmId?api-version=2017-04-02&format=text

The first one is valid in GCP, the second one AWS, third one OCI, and last one looks like Azure. Oracle binaries have a directory of the main cloud providers metadata endpoint to detect where it runs.


[azureuser@o19c ~]$ sudo iptables -A OUTPUT -d 169.254.169.254  -j REJECT
[azureuser@o19c ~]$ curl 'http://169.254.169.254/metadata/instance/compute/vmId?api-version=2018-02-01&format=text' -H Metadata:true -s
[azureuser@o19c ~]$

I’ve blocked this endpoint.


SQL> create pluggable database PDB4 from PDB1;

Pluggable database created.

and that works, I can create my additional PDB (note that I had to restart the instance as the detection is done at startup time)


SQL> oradebug setmypid
Statement processed.
SQL> oradebug call kscs_cloudprov_ut
kscs_cloudprov_ut: Detecting cloud provider...
This is an on-premise database instance
CloudDB(0), CloudDetect(0), CloudQuery(ff)
Function returned E31011D7

You see, I’m not on-premises as no cloud metadata is available…


[azureuser@o19c ~]$ sudo iptables -D OUTPUT -d 169.254.169.254  -j REJECT
[azureuser@o19c ~]$ curl 'http://169.254.169.254/metadata/instance/compute/vmId?api-version=2018-02-01&format=text' -H Metadata:true -s
4967bff7-591f-4583-bd57-5eb0969b9ff0[azureuser@o19c ~]$

I re-open the metadata by deleting my iptables rule. Because a Cloud VM has some cloud provider software running there which require this.

Workaround


SQL> alter system set "_cdb_disable_pdb_limit"=true scope=spfile;
System altered.

SQL> startup force
ORACLE instance started.

Total System Global Area 3439327576 bytes
Fixed Size                  9140568 bytes
Variable Size             704643072 bytes
Database Buffers         2717908992 bytes
Redo Buffers                7634944 bytes
Database mounted.
Database opened.

SQL> oradebug call kscs_cloudprov_ut
kscs_cloudprov_ut: Detecting cloud provider...
This is a non oracle cloud database instance
This is a Azure instance
CloudDB(10), CloudDetect(10), CloudQuery(ff)
Function returned BF5A07ED
SQL>

I’ve disabled this PDB limit by setting “_cdb_disable_pdb_limit”=true and check again that the instance detects that I’m running on Azure.


SQL> create pluggable database PDB5 from PDB1;
Pluggable database created.

SQL> c/5/6
  1* create pluggable database PDB6 from PDB1
SQL> /
Pluggable database created.

Ok, now I was able to create an additional PDB. But do you remember that MAX_PDBS was 5? How was I able to create a 6th one?


SQL> show parameter max_pdbs

NAME                                 TYPE        VALUE
------------------------------------ ----------- ------------------------------
max_pdbs                             integer     4098
SQL>

When disabling the limit, the MAX_PDBS was raised. So be careful because you are not allowed to create more than 252 PDBs (4096 on Oracle platforms and never 4098 – I tried it)


SQL> alter system set max_pdbs=6;
System altered.

SQL> show parameter max_pdbs

NAME                                 TYPE        VALUE
------------------------------------ ----------- ------------------------------
max_pdbs                             integer     6
SQL> create pluggable database PDB7 from PDB1;
create pluggable database PDB7 from PDB1
*
ERROR at line 1:
ORA-65010: maximum number of pluggable databases created

Fortunately, I can set the MAX_PDBS limit now that “_cdb_disable_pdb_limit”=true.

Why does it make sense?

Because when you bring your own license you are already penalized for not choosing the Oracle Cloud and one processor license that covered two cores on-premises now cover only one. Then, you want at least to optimize by consolidation: PDBs in a CDB rather than instances in a VM, and rather than multiple VMs. Note that this arithmetic on the number of cores behind the Oracle definition of a processor is subject to discussions. The documents mentioning it are “for educational purpose” and “does not constitute a contract or a commitment to any specific term”.

Anyway, you Bring Your Own License, where you can run 3 PDBs per CDB when you don’t have the multitenant option (and then you want to set MAX_PDBS=3 to be safe) or up to 252 when you have the option (and then you don’t want to be limited to 3). So in all cases, you have something to change. And Pluggable Database options can be useful to clone or relocate PDBs so that you can change the size of your VM (requires a restart) and balance the services on them.

Maybe all images are not in all region, so here is how to check:


[opc@a demo]$ az vm image list-publishers --location $(az account list-locations | jq -r '.[] | select ( .metadata.physicalLocation == "Geneva") .name ')
Command group 'vm' is experimental and under development. Reference and support levels: https://aka.ms/CLI_refstatus
(NoRegisteredProviderFound) No registered resource provider found for location 'switzerlandwest' and API version '2020-06-01' for type 'locations/publishers'. The supported api-versions are '2015-05-01-preview, 2015-06-15, 2016-03-30, 2016-04-30-preview, 2016-08-30, 2017-03-30, 2017-12-01, 2018-04-01, 2018-06-01, 2018-10-01, 2019-03-01, 2019-07-01, 2019-12-01, 2020-06-01, 2020-09-30, 2020-12-01'. The supported locations are 'eastus, eastus2, westus, centralus, northcentralus, southcentralus, northeurope, westeurope, eastasia, southeastasia, japaneast, japanwest, australiaeast, australiasoutheast, australiacentral, brazilsouth, southindia, centralindia, westindia, canadacentral, canadaeast, westus2, westcentralus, uksouth, ukwest, koreacentral, koreasouth, francecentral, southafricanorth, uaenorth, switzerlandnorth, germanywestcentral, norwayeast'.

[opc@a demo]$ az vm image list-publishers --location $(az account list-locations | jq -r '.[] | select ( .metadata.physicalLocation == "Zurich") .name ') | jq '.[] | select( .name == "Oracle" ) '
WARNING: Command group 'vm' is experimental and under development. Reference and support levels: https://aka.ms/CLI_refstatus
{
  "id": "/Subscriptions/bfaaad07-4a06-45e1-9e93-4eb58fa52f87/Providers/Microsoft.Compute/Locations/SwitzerlandNorth/Publishers/Oracle",
  "location": "SwitzerlandNorth",
  "name": "Oracle",
  "tags": null
}

[opc@a demo]$ az vm image list --all --location "SwitzerlandNorth" --publisher Oracle --output table --offer database
Command group 'vm' is experimental and under development. Reference and support levels: https://aka.ms/CLI_refstatus
Offer                 Publisher    Sku                      Urn                                                         Version
--------------------  -----------  -----------------------  ----------------------------------------------------------  ---------
oracle-database-19-3  Oracle       oracle-database-19-0904  Oracle:oracle-database-19-3:oracle-database-19-0904:19.3.1  19.3.1

So for me, nothing in Geneva, but I have the list of regions, and available in Zurich.

A final note. This VM for “oracle-database-19-3” image runs on Oracle Linux. Until Jan 6th, 2021 Oracle did not allow for “Basic Limited” and “Premier Limited” on VMs larger than 8 vCPUs. This has changed to a limit of 64vCPU (and one system license can even cover two VMs within this limit). So there are good news in licensing documents sometimes…

Cet article Oracle DB on Azure with Multitenant Option est apparu en premier sur Blog dbi services.

8000 PostgreSQL clusters on one host?

$
0
0

Coming back to the last post: 8000 databases in one PostgreSQL cluster?. As we’ve seen this is doable but comes with a lot of pain points. Another solution for this kind of requirement would be to host 8000 PostgreSQL clusters on one host. Again, I am not saying this is something you should do, and again, this is not how it finally will be implemented. This is more about if you can do it, and what is means for operating such a setup. Eight thousand is a huge number, no matter if it is about this number of databases in a single cluster, or this number of clusters on a single node.

The default PostgreSQL configuration on Linux comes with 128MB of shared_buffers. Again, if we do the math, that would be 1’024’000MB for 8000 clusters on a single host. Surprisingly I do not have such a machine available right now. We’ll use a AWS EC2 t3a.xlarge which comes with 4vCPUs and 16GB of memory. If we reduce shared_buffers to 128kB (which is the minimum), we come to 1024000kB, which is around 8GB of shared_buffers for all clusters. This should be doable, not counting any other memory related parameters.

The next bit we need to calculate is the required disk space. A fresh initialized PGDATA for PostgreSQL 13.1 consumes 29MB. For 8000 clusters we will therefore need 312’000MB of disk space. Se, here we go:

postgres@pg13:/home/postgres/ [pg131] grep MemTotal /proc/meminfo 
MemTotal:       16284668 kB
ostgres@pg13:/home/postgres/ [pg131] grep proc /proc/cpuinfo 
processor       : 0
processor       : 1
processor       : 2
processor       : 3
postgres@pg13:/home/postgres/ [pg131] df -h
Filesystem       Size  Used Avail Use% Mounted on
udev             7.8G     0  7.8G   0% /dev
tmpfs            1.6G  8.4M  1.6G   1% /run
/dev/nvme0n1p1   492G  2.9G  469G   1% /
tmpfs            7.8G     0  7.8G   0% /dev/shm
tmpfs            5.0M     0  5.0M   0% /run/lock
tmpfs            7.8G     0  7.8G   0% /sys/fs/cgroup
/dev/nvme0n1p15  124M  262K  124M   1% /boot/efi
tmpfs            1.6G     0  1.6G   0% /run/user/1000

Initializing 8000 clusters will take some time, but the procedure is quite simple. We need a different directory for each PGDATA and a different port for each cluster. In addition we need to reduce shared_buffers to 128kB and then start up all the clusters. First, lets create all the data directories and check if we run into any issues with this already:

port="5432"
for i in {1..8000}
do
    PGDATA="/u02/pgdata/pgdata${i}"
    initdb -D ${PGDATA} > /dev/null 2>&1 > /dev/null
    echo "port=${port}" >> ${PGDATA}/postgresql.auto.conf
    echo "shared_buffers=128kB" >> ${PGDATA}/postgresql.auto.conf
    (( port += 1 ))
done

If you want to monitor the progress, you might do something like this:

postgres@pg13:/home/postgres/ [pg131] watch "ls -l /u02/pgdata | grep -v total | wc -l"
Every 2.0s: ls -l /u02/pgdata | grep -v total | wc -l                                                 pg13: Fri Feb 12 10:50:41 2021

146
...
Every 2.0s: ls -l /u02/pgdata | grep -v total | wc -l                                                 pg13: Fri Feb 12 11:06:14 2021

1197
...
Every 2.0s: ls -l /u02/pgdata | grep -v total | wc -l                                                 pg13: Fri Feb 12 11:13:27 2021

1696
Every 2.0s: ls -l /u02/pgdata | grep -v total | wc -l                                                 pg13: Fri Feb 12 11:54:09 2021

4452
Every 2.0s: ls -l /u02/pgdata | grep -v total | wc -l                                                 pg13: Fri Feb 12 12:19:44 2021

6116
Every 2.0s: ls -l /u02/pgdata | grep -v total | wc -l                                                 pg13: Fri Feb 12 13:35:24 2021

8000

That takes quite some time. How many space or we consuming?

postgres@pg13:/home/postgres/ [pg131] du -sh /u02/pgdata/
308G    /u02/pgdata/

Not far from what we calculated above. Before we try to start all the clusters there is another bit we need to think about. If we startup a PostgreSQL 13.1 instance, how many processes do we get by default?

postgres@debian10pg:/home/postgres/ [pg131] ps -ef | egrep "postgres \-D|postgres\:"
postgres 28408     1  0 07:42 ?        00:00:00 /u01/app/postgres/product/DEV/db_1/bin/postgres -D /u02/pgdata/DEV
postgres 28409 28408  0 07:42 ?        00:00:00 postgres: logger 
postgres 28411 28408  0 07:42 ?        00:00:00 postgres: checkpointer 
postgres 28412 28408  0 07:42 ?        00:00:00 postgres: background writer 
postgres 28413 28408  0 07:42 ?        00:00:00 postgres: walwriter 
postgres 28414 28408  0 07:42 ?        00:00:00 postgres: autovacuum launcher 
postgres 28415 28408  0 07:42 ?        00:00:00 postgres: stats collector 
postgres 28416 28408  0 07:42 ?        00:00:00 postgres: logical replication launcher 
ostgres@debian10pg:/home/postgres/ [pg131] ps -ef | egrep "postgres \-D|postgres\:" | wc -l
8

That’s eight per cluster, multiplied by 8000, that makes 64’000 processes. In the default configuration on Debian we have these limits:

postgres@debian10pg:/home/postgres/ [pg131] ulimit -a
postgres@pg13:/home/postgres/ [pg131] ulimit -a
core file size          (blocks, -c) 0
data seg size           (kbytes, -d) unlimited
scheduling priority             (-e) 0
file size               (blocks, -f) unlimited
pending signals                 (-i) 63541
max locked memory       (kbytes, -l) 65536
max memory size         (kbytes, -m) unlimited
open files                      (-n) 1024
pipe size            (512 bytes, -p) 8
POSIX message queues     (bytes, -q) 819200
real-time priority              (-r) 0
stack size              (kbytes, -s) 8192
cpu time               (seconds, -t) unlimited
max user processes              (-u) 63541
virtual memory          (kbytes, -v) unlimited
file locks                      (-x) unlimited

This will for sure not work, as we can easily try:

port="5432"
for i in {1..8000}
do
    PGDATA="/u02/pgdata/pgdata${i}"
    pg_ctl start -D ${PGDATA}/  -l /dev/null 2>&1 > /dev/null
    (( port += 1 ))
done

This will go fine until around 1500 postmasters have been started:

unable to fork process: Resource temporarily unavailable

… so we are clearly hit some limits here. Lets increase the maximum number of open files and processes limits for the postgres user (-1 means unlimited, only hard limits here):

postgres@pg13:/home/postgres/ [pg131] cat /etc/security/limits.conf  | egrep -v "^#|^$"
postgres         hard     nproc          -1
postgres         hard     nofile         -1

After restarting the session we can check the actual value of the hard limits:

postgres@pg13:/home/postgres/ [pg131] ulimit -H -n
1048576
postgres@pg13:/home/postgres/ [pg131] ulimit -H -u
unlimited

This means we should be able to create an unlimited amount of user processes, and we should be able to open 1048576 files (this seems to be the maximum on Debian). As these are the hard limits we need to increase the soft limits as well:

postgres@pg13:/home/postgres/ [pg131] ulimit -S -u unlimited
postgres@pg13:/home/postgres/ [pg131] ulimit -S -n 1048576
postgres@pg13:/home/postgres/ [pg131] ulimit -a
core file size          (blocks, -c) 0
data seg size           (kbytes, -d) unlimited
scheduling priority             (-e) 0
file size               (blocks, -f) unlimited
pending signals                 (-i) 63540
max locked memory       (kbytes, -l) 65536
max memory size         (kbytes, -m) unlimited
open files                      (-n) 1048576
pipe size            (512 bytes, -p) 8
POSIX message queues     (bytes, -q) 819200
real-time priority              (-r) 0
stack size              (kbytes, -s) 8192
cpu time               (seconds, -t) unlimited
max user processes              (-u) unlimited
virtual memory          (kbytes, -v) unlimited
file locks                      (-x) unlimited

Lets check if that is sufficient for starting the 8000 clusters:

postgres@pg13:/home/postgres/ [pg131] port="5432"
postgres@pg13:/home/postgres/ [pg131] for i in {1..8000}
> do
>     PGDATA="/u02/pgdata/pgdata${i}"
>     pg_ctl start -D ${PGDATA}/  -l /dev/null 2>&1 > /dev/null
>     (( port += 1 ))
> done

No, we’ll still hit limits (again around 1500 clusters):

no data was returned by command ""/u01/app/postgres/product/13/db_1/bin/postgres" -V"
The program "postgres" is needed by pg_ctl but was not found in the
same directory as "/u01/app/postgres/product/13/db_1/bin/pg_ctl".
Check your installation.
sh: 1: Cannot fork

Lets try to use a larger instance type: c5.9xlarge: This one comes with 36vCPU and 72GiB of memory. Will that work?

postgres@pg13:/home/postgres/ [pg131] cat /proc/cpuinfo | grep proc | wc -l
36
postgres@pg13:/home/postgres/ [pg131] cat /proc/meminfo | grep Mem
MemTotal:       72033208 kB
MemFree:        71577940 kB
MemAvailable:   71139240 kB
postgres@pg13:/home/postgres/ [pg131] ulimit -S -u unlimited
postgres@pg13:/home/postgres/ [pg131] ulimit -S -n 1048576
postgres@pg13:/home/postgres/ [pg131] for i in {1..8000}
> do
>     PGDATA="/u02/pgdata/pgdata${i}"
>     pg_ctl start -D ${PGDATA}/  -l /dev/null 2>&1 > /dev/null
>     (( port += 1 ))
> done

We can go a bit further and come to approx. 1740 running cluster, but this is far from 8000:

postgres@pg13:/home/postgres/ [pg131] ps -ef | grep postgres | grep "postgres \-D" | wc -l
1736

If we increase even more and go to c5a.24xlarge we’ll come to (96vCPUs and 192GiB of memory):

postgres@pg13:/home/postgres/ [pg131] cat /proc/cpuinfo | grep proc | wc -l
96
postgres@pg13:/home/postgres/ [pg131] cat /proc/meminfo | grep Mem
MemTotal:       195998200 kB
MemFree:        195223608 kB
MemAvailable:   194067016 kB
postgres@pg13:/home/postgres/ [pg131] ulimit -S -u unlimited
postgres@pg13:/home/postgres/ [pg131] ulimit -S -n 1048576
postgres@pg13:/home/postgres/ [pg131] for i in {1..8000}; do     PGDATA="/u02/pgdata/pgdata${i}";     pg_ctl start -D ${PGDATA}/  -l /dev/null 2>&1 > /dev/null;     (( port += 1 )); done

This will give us around 4096 clusters, which is a bit more than half the 8000 we wanted. But this also means that there is another limit we’re hitting. Four thousand clusters will consume 32000 processes, and we’re not close to the limit we’ve set above. What is it then? Increasing the number of vCPUs clearly gave us more running clusters, so there must be a relation between the number of vCPUs and the number of processes we can start. There is a kernel parameter which limits the maximum number of processes one can start on a Linux system:

postgres@pg13:/home/postgres/ [pg131] cat /proc/sys/kernel/pid_max
98304
postgres@pg13:/home/postgres/ [pg131] man proc 5
       /proc/sys/kernel/pid_max (since Linux 2.5.34)
              This file specifies the value at which PIDs wrap around (i.e., the value in this file is one greater than the maximum PID).  PIDs greater than this value are not allocated; thus, the value in this file also acts as a system-wide limit on  the  total
              number  of  processes and threads.  The default value for this file, 32768, results in the same range of PIDs as on earlier kernels.  On 32-bit platforms, 32768 is the maximum value for pid_max.  On 64-bit systems, pid_max can be set to any value up
              to 2^22 (PID_MAX_LIMIT, approximately 4 million).

We’re already higher than the default, which is 32768 and this value is dependent on the number of CPUs (more information here). This is actually not a real limit, but once that number is reached, the counter starts from 1 again and if no numbers are left, no additional process can be started. If we scale down our instance to c5.large (4vCPUs and 8GiB of memory) we’ll again get the default:

postgres@pg13:/home/postgres/ [pg131] cat /proc/sys/kernel/pid_max
32768

Although we should not hit the limit of 98304 lets try to increase that and do another run. This time we’ll also have a look at the memory usage:

postgres@pg13:/home/postgres/ [pg131] sudo bash
root@pg13:/home/postgres$ echo "196608" > /proc/sys/kernel/pid_max
root@pg13:/home/postgres$ exit
postgres@pg13:/home/postgres/ [pg131] cat /proc/sys/kernel/pid_max
196608
postgres@pg13:/home/postgres/ [pg131] ulimit -S -u unlimited
postgres@pg13:/home/postgres/ [pg131] ulimit -S -n 1048576
postgres@pg13:/home/postgres/ [pg131] for i in {1..8000}
> do
>     PGDATA="/u02/pgdata/pgdata${i}"
>     pg_ctl start -D ${PGDATA}/  -l /dev/null 2>&1 > /dev/null
>     (( port += 1 ))
> done

In a second session monitor memory usage:

postgres@pg13:/home/postgres/ [pg131] watch "free -m"
## with approx.1000 clusters
Every 2.0s: free -m                                                                                   pg13: Tue Feb 16 13:16:50 2021

              total        used        free      shared  buff/cache   available
Mem:         189152        6412      177810        4183        4929      177353
Swap:             0           0           0

## with approx. 2000 clusters
Every 2.0s: free -m                                                                                   pg13: Tue Feb 16 13:18:38 2021

              total        used        free      shared  buff/cache   available
Mem:         189152       12098      167470        8276        9583      167516
Swap:             0           0           0

## with approx. 3000 clusters
Every 2.0s: free -m                                                                                   pg13: Tue Feb 16 13:20:26 2021

              total        used        free      shared  buff/cache   available
Mem:         189152       17803      157119       12369       14229      157664
Swap:             0           0           0

## with approx. 4000 clusters
Every 2.0s: free -m                                                                                   pg13: Tue Feb 16 13:22:16 2021

              total        used        free      shared  buff/cache   available
Mem:         189152       23673      146495       16540       18983      147562
Swap:             0           0           0

… and it still fails with a bit more than 4000 clusters. The issue is not the overall memory consumption, we still have plenty of memory left. The answer is in the PostgreSQL startup log:

2021-02-16 13:43:17.990 UTC [97614] FATAL:  could not create shared memory segment: No space left on device
2021-02-16 13:43:17.990 UTC [97614] DETAIL:  Failed system call was shmget(key=21380032, size=56, 03600).
2021-02-16 13:43:17.990 UTC [97614] HINT:  This error does *not* mean that you have run out of disk space.  It occurs either if all available shared memory IDs have been taken, in which case you need to raise the SHMMNI parameter in your kernel, or because the system's overall limit for shared memory has been reached.
        The PostgreSQL documentation contains more information about shared memory configuration.
2021-02-16 13:43:17.990 UTC [97614] LOG:  database system is shut down

So we need to increase shmmni for enough shared memory segments being available. Next try:

postgres@pg13:/home/postgres/ [pg131] sudo sysctl -w kernel.shmmni=8192
kernel.shmmni = 8192
postgres@pg13:/home/postgres/ [pg131] sysctl -p
postgres@pg13:/home/postgres/ [pg131] sudo sysctl -a | grep kernel.shmmni
kernel.shmmni = 8192
postgres@pg13:/home/postgres/ [pg131] for i in {1..8000}
> do
>     PGDATA="/u02/pgdata/pgdata${i}"
>     pg_ctl start -D ${PGDATA}/  -l /dev/null 2>&1 > /dev/null
>     (( port += 1 ))
> done

sh: 1: Cannot fork
no data was returned by command ""/u01/app/postgres/product/13/db_1/bin/postgres" -V"
The program "postgres" is needed by pg_ctl but was not found in the
same directory as "/u01/app/postgres/product/13/db_1/bin/pg_ctl".
Check your installation.

Next limit hit, now we come to around 4600 clusters, which is better, but still not the 8000. This time we are hitting the number of open files:

postgres@pg13:/home/postgres/ [pg131] sudo lsof -u postgres 2>/dev/null | wc -l
1884863
postgres@pg13:/home/postgres/ [pg131] ulimit -Hn
1048576

But even if we increase the system-wide limit we’ll run into the same issue because we can not raise the user defined limit by more than 1048576:

postgres@pg13:/home/postgres/ [pg131] sudo sysctl -w fs.file-max=100000000
fs.file-max = 100000000
postgres@pg13:/home/postgres/ [pg131] sudo sysctl -a | grep fs.file-max
fs.file-max = 100000000

The reason is in the sshd_config:

postgres@pg13:/home/postgres/ [pg131]  sudo cat /etc/ssh/sshd_config | grep -i UsePam
UsePAM yes

PAM is responsible for setting the user limits. Lets skip that by removing this line and restarting sshd:

postgres@pg13:/home/postgres/ [pg131] sudo sed -i 's/UsePAM yes/UsePAM no/g' /etc/ssh/sshd_config
postgres@pg13:/home/postgres/ [pg131] grep UsePAM /etc/ssh/sshd_config
UsePAM no
postgres@pg13:/home/postgres/ [pg131] sudo systemctl restart sshd

Once we restarted the ssh session let’s try again:

dwe@ltdwe:~$ ssh -i /home/dwe/Documents/aws/dwe-key-pair.pem admin@18.195.216.2
admin@18.195.216.2: Permission denied (publickey).

Next issue, we are not able to login anymore. The way to do it is to disable the line which does the enforcing of the limits:

postgres@debian10pg:/home/postgres/ [pg14] grep -A 1 "limits" /etc/pam.d/sshd 
# access limits that are hard to express in sshd_config.
# account  required     pam_access.so
--
# Set up user limits from /etc/security/limits.conf.
# session    required     pam_limits.so

After restarting sshd lets try again:

port="5432"
for i in {1..8000}
do
    PGDATA="/u02/pgdata/pgdata${i}"
    pg_ctl start -D ${PGDATA}/  -l /home/postgres/${i}log.log
    (( port += 1 ))
done

.. and it still fails:

2021-02-19 15:49:38.457 UTC [109716] LOG:  listening on Unix socket "/tmp/.s.PGSQL.10063"
2021-02-19 15:49:38.461 UTC [109717] LOG:  database system was shut down at 2021-02-19 15:39:59 UTC
2021-02-19 15:49:38.465 UTC [109716] LOG:  could not fork worker process: Resource temporarily unavailable
2021-02-19 15:49:38.465 UTC [109716] LOG:  database system is ready to accept connections
2021-02-19 15:49:50.889 UTC [109716] LOG:  received smart shutdown request

The next test is to check if we are hitting a user/session, or a system wide limit. For that we will start the first 4000 clusters with the postgres user we already have. For the remaining 4000 clusters we’ll create another user, change $PGDATA to be owned by that user, and then try to start them. If that works, we can at least start 8000 clusters using two separate OS users:

root@ip-10-0-1-21:/home/admin# useradd -g postgres -m postgres2
root@ip-10-0-1-21:/home/admin# for i in {4001..8000}
> do
>     PGDATA="/u02/pgdata/pgdata${i}"
>     chown -R postgres2:postgres ${PGDATA}
> done
Every 2.0s: ps -ef | egrep 'postgres \-D' | wc -l                                                                                                                           ip-10-0-1-21: Tue Feb 23 10:38:49 2021

4000

First 4000 clusters:

postgres@ip-10-0-1-21:/home/postgres/ [pg132] for i in {1..4000}; do     PGDATA="/u02/pgdata/pgdata${i}";     pg_ctl start -D ${PGDATA}/  -l /home/postgres/${i}log.log; done
Every 2.0s: ps -ef | egrep 'postgres \-D' | wc -l                                                                                                                           ip-10-0-1-21: Tue Feb 23 10:38:49 2021

4000

Lets check if we can start another 4000 using the other user:

postgres2@ip-10-0-1-21:/home/postgres2/ [pg132] id -a
uid=1002(postgres2) gid=1001(postgres) groups=1001(postgres)
postgres@ip-10-0-1-21:/home/postgres2/ [pg132] for i in {1..4000}; do     PGDATA="/u02/pgdata/pgdata${i}";     pg_ctl start -D ${PGDATA}/  -l /home/postgres2/${i}log.log; done
postgres2@ip-10-0-1-21:/home/postgres2/ [pg132] cat 4632log.log
2021-02-23 10:45:38.573 UTC [61580] LOG:  starting PostgreSQL 13.2 on x86_64-pc-linux-gnu, compiled by gcc (Debian 8.3.0-6) 8.3.0, 64-bit
2021-02-23 10:45:38.573 UTC [61580] LOG:  listening on IPv4 address "127.0.0.1", port 10063
2021-02-23 10:45:38.578 UTC [61580] LOG:  listening on Unix socket "/tmp/.s.PGSQL.10063"
2021-02-23 10:45:38.585 UTC [61581] LOG:  database system was shut down at 2021-02-21 17:53:04 UTC
2021-02-23 10:45:38.597 UTC [61580] LOG:  could not fork worker process: Resource temporarily unavailable
2021-02-23 10:45:38.597 UTC [61580] LOG:  database system is ready to accept connections

Which leads to the same issue once we reach around 4600 clusters. At this point I decided to stop this experiment as the conclusion is clear: Don’t do it, for obvious reasons:

  • You’ll run into all kinds of limits
  • Managing 8000 clusters on one host is not doable, you’ll for sure do a mistake one time and then one or may clusters are damaged
  • Only looking at the number of open files and the number of processes should already tell you, again: Don’t do it
  • Many, many other reasons (backup/restore/patching/upgrades)

Cet article 8000 PostgreSQL clusters on one host? est apparu en premier sur Blog dbi services.

Viewing all 2877 articles
Browse latest View live